In this guest post, Riley Weller from itsGratuiTous.com walks you through his journey migrating his contacts, lists, and tags from ActiveCampaign to self-hosted FluentCRM, connected to WordPress with WP Fusion.
This tutorial shares how to migrate from ActiveCampaign to FluentCRM where you have FluentCRM on another host, such as a VPS or Dedicated Server, with WP Fusion plugin as the link which connects your main WordPress site to your headless CRM.
It’s heavily inspired by Jack’s switch from ActiveCampaign to FluentCRM post.
I was asked to guest post when sharing FluentCRM’s auto-migration tool was not reliable for me, as I was missing about 100~ contacts with multiple migration attempts. It happened with very old and very new contacts, and I could not pinpoint the issue.
Back to the drawing board and hours of testing, here’s my step-by-step ActiveCampaign to FluentCRM switch guide for a 1:1 successful migration. 👍
In short: We export multiple .csv files, and import at different times. There’s manual work, but the end result is worth it for the cost savings and control of data. This includes custom fields, tags, email lists, and email list status.
I will explain each stage, and then give a recap list at the end.
#Ensure WordPress and CRM are in Sync
The first step was making sure the CRM is accurate to your live WordPress site.
During migration, it opened my eyes that WP Fusion uses your CRM as its base understanding of your contacts, and on initial WP Fusion CRM setup, pushes your CRM contact’s data to your WordPress site.
It’s very important that your CRM is organized, especially your most important tags, like Member Access tags, are setup properly on contacts in your CRM. 👍
#Clean-Up Tags, Custom Fields and Accurate Subscriptions
A CRM can get unorganized with old tags and fields over time, and switching to a self-hosted CRM, I wanted the interface and database as clean as possible.
I removed unused tags and unnecessary fields, renamed a couple of tags, and re-thought my whole plan of “what information do I actually need for the best customer experience?”.
I also double-checked active subscription customers were in sync with my CRM to ensure permissions, as sometimes this data can get out of sync.
Important: After cleaning, I then ran “Resync contact IDs and tags for every user” from WP Fusion’s Batch Operations in the Advanced tab to ensure the CRM and WordPress users are in-sync even before starting migration.
#Ensure Contacts Are in Proper Lists
You may have one list or multiple lists.
However you’re setup, now’s the time to double-check contacts are in the right list, and respect their status (subscribed, unsubscribed, etc).
In my experience, one list is easier to manage with tags to segment contacts.
When ActiveCampaign introduced their new email builder, I reported a bug (it was confirmed and fixed) which didn’t respecting tag conditions, resulting in emails sent to unintended contacts.. At that time, I switched to multiple lists for reliable sending, but it introduced a messy list management automation 👎
I went back to one list with FluentCRM (REST) to ensure the VPS’ CPU is running lightweight, with no additional automation running each time to check what list a user should be in based on tags.. WAY easier to manage 🎉
#Clean ActiveCampaign Email List
You can skip this step to keep all contacts, but I heavily cleaned my stale non-customer unsubscribed contacts to start with a small database.. it’s risky as you can easily make a mistake.. but I thought it was worth it.
When self-hosting a CRM, it’s important to monitor database size, as it can quickly grow with sending emails, tracking opens, clicks, event history etc.
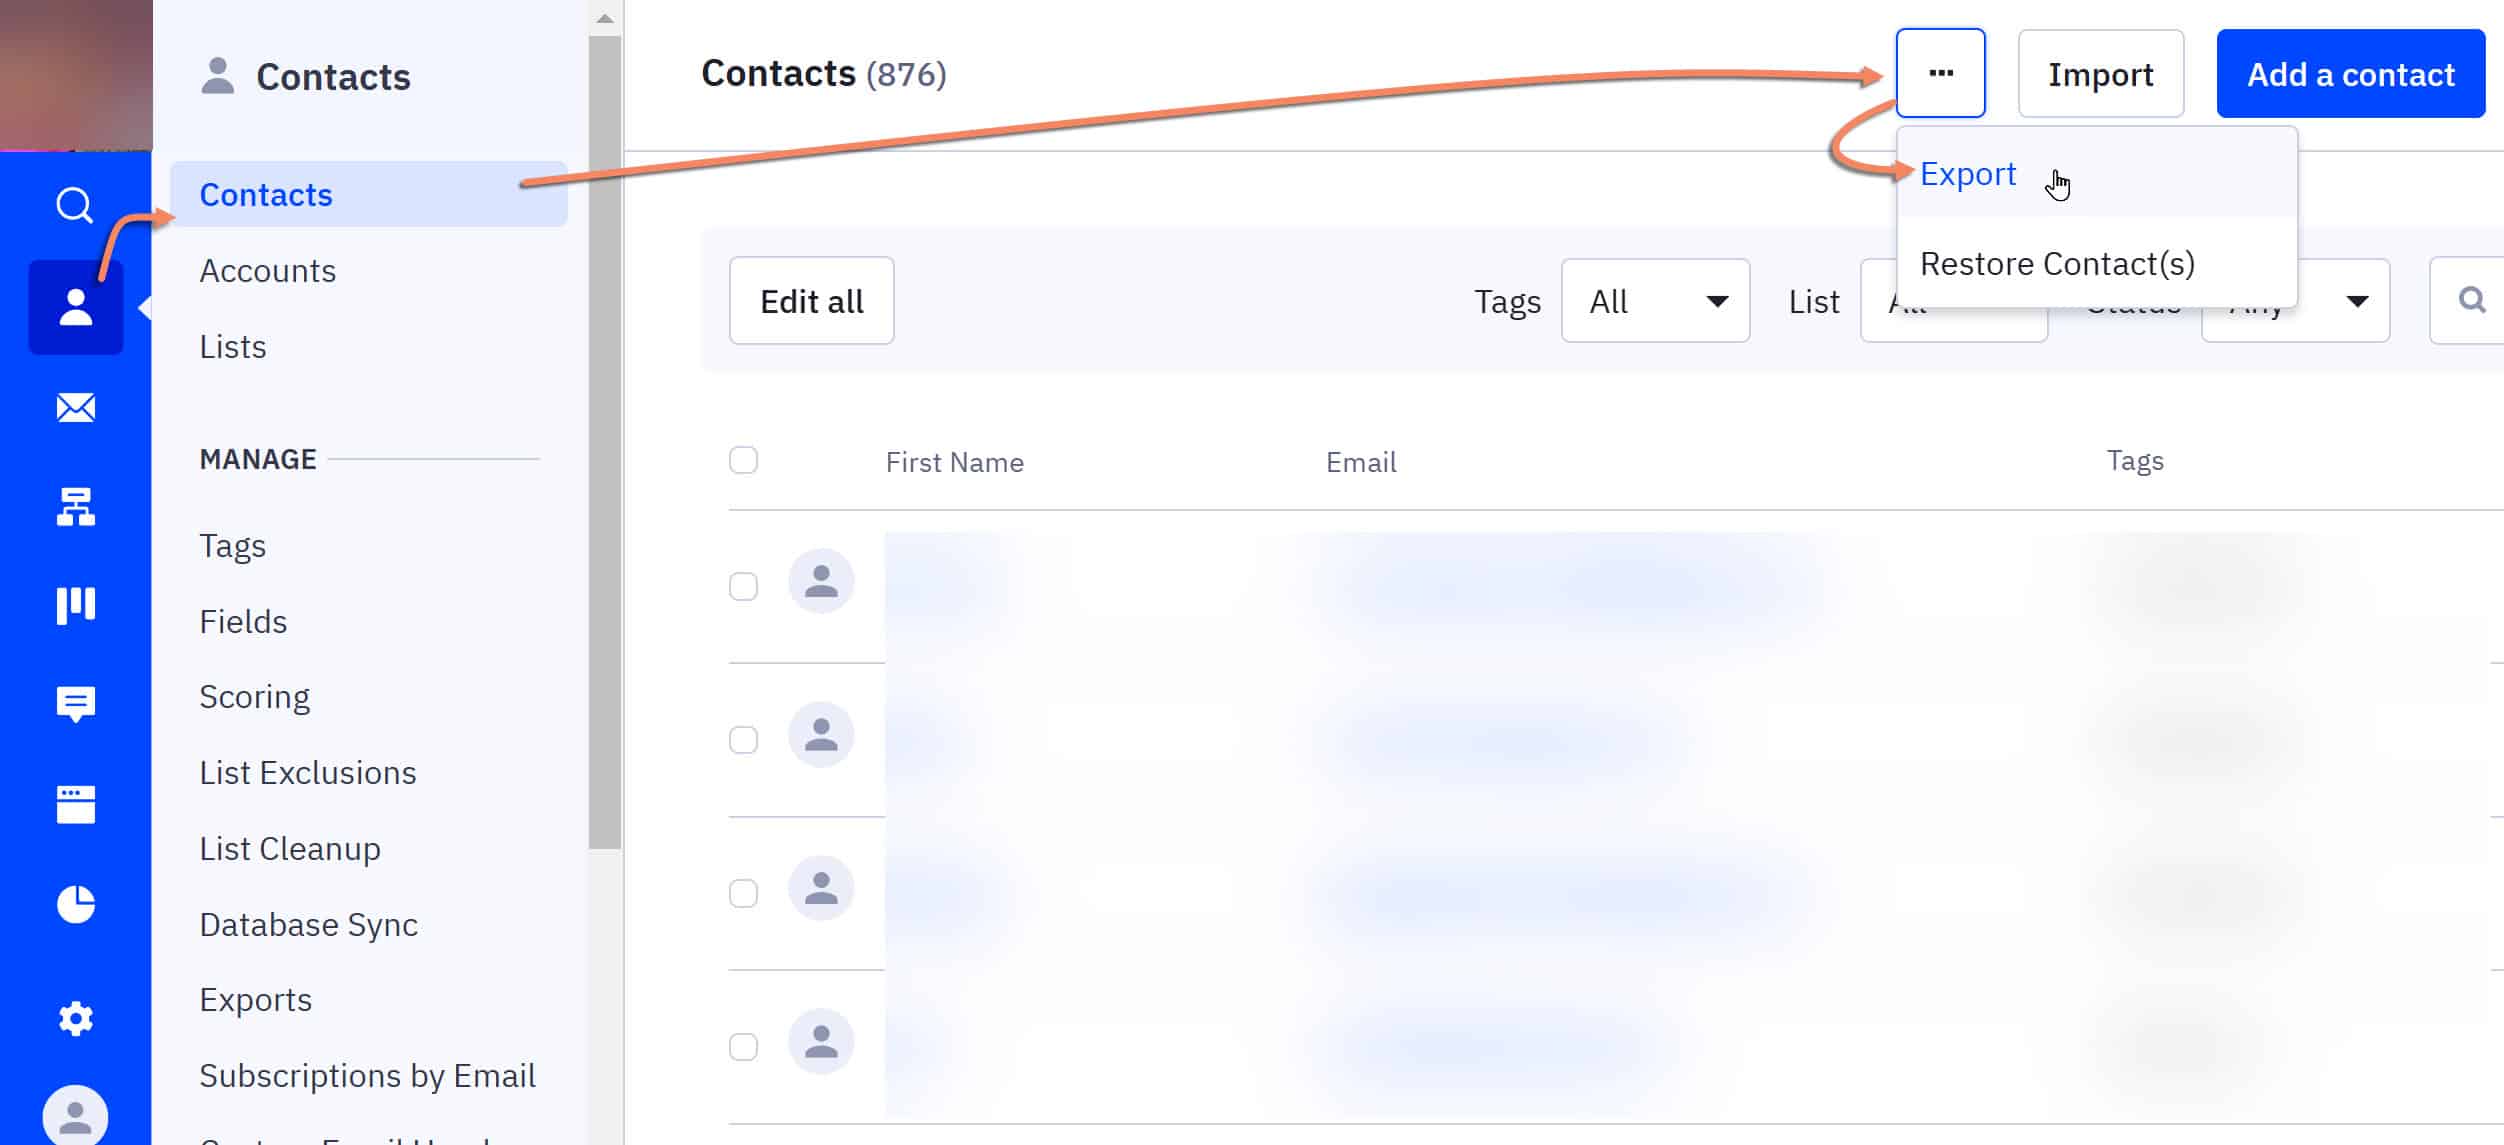
First, export ALL contacts from ActiveCampaign into a .csv file as a backup. 🙂
Thankfully ActiveCampaign allows for advanced filters to pin-point such unwanted contacts based on lists, tags, status, fields, etc.
ActiveCampaign customers before Feb 22, 2022 have access to the ActiveCampaign List Cleanup tool for mass contact deletion.. otherwise you’re limited to a deletion amount per month (unless you email them). 👎
My contact list was significantly reduced, with a much cleaner CRM experience 😁!
#Migrating to FluentCRM (REST) from ActiveCampaign
The groundwork is done!
Tags, custom fields, lists, and contacts are organized and ready to migrate!
With your homework done on what VPS provider to go with, install FluentCRM.
Make sure you:
- Add All Info into FluentCRM’s Settings
- Create Your Custom Fields
- Create a NEW Custom Field called ‘Tags-backup‘ with type ‘Single Line Text’.
These steps are very important, as we will clone this for our staging environment which tightly resembles our live environment.
Do not miss that ‘Tags-backup‘ field, as this is how we ensure contacts properly get their tags with FluentCRM’s Advanced Filter ‘includes’.
#Create Staging Sites (WordPress and CRM)
Create a staging site for BOTH your live WordPress site and FluentCRM on your VPS to practice importing contacts to get a feel for the system.
On the staging site, once you import contacts and all looks good, you should also connect WP Fusion from the staging WordPress site to your staging CRM and start running your tests.
On my VPS I had a firewall issue using ‘public_html’ folder.. I ended up creating my own folder and all worked good. 👍
🛑 You should also whitelist the IP Addresses of both your WordPress server and VPS to ensure they can always talk and are not blocked by firewalls!
After testing, follow these steps in order, as I did many tests since my 100~ contacts were not auto-migrated, and this seemed to be robust 👍.
#Step 1: Import All Contacts and Map Fields with .csv file
This first step we only map custom fields.
We are not adding contacts to lists, adding tags, or giving a status, yet!
Our FluentCRM should have no contacts yet. This .csv import will migrate ALL of our contacts and map their fields.
🛑 Remember, you must have already created the ‘Tags-backup‘ custom field. That’s where we are store the user’s tags from ActiveCampaign into FluentCRM. Without this ‘Tags-backup‘, I was not able to find a solution for how to tag those 100~ missing contacts.
Go to ActiveCampaign, and export all wanted contacts into a .csv file.
(Our other export was a backup of all contacts in case we messed up. This .csv is the actual contacts that have been cleaned and ready to migrate!)

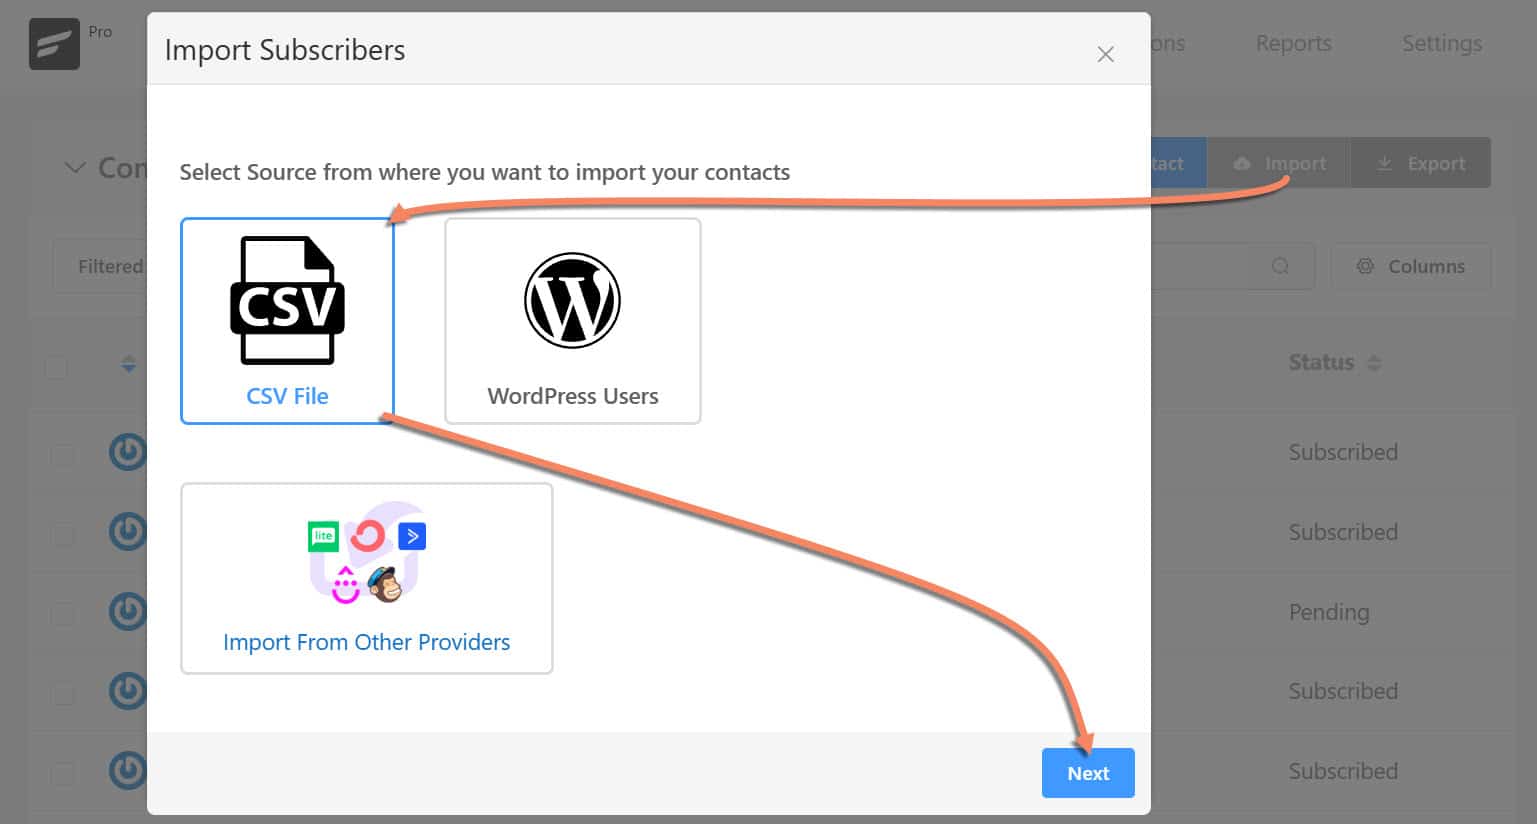
Go to FluentCRM’s “Contacts” page, click “Import”, choose “CSV File” option, and go Next. Select “Comma Separated (,)”, and load your .csv file:
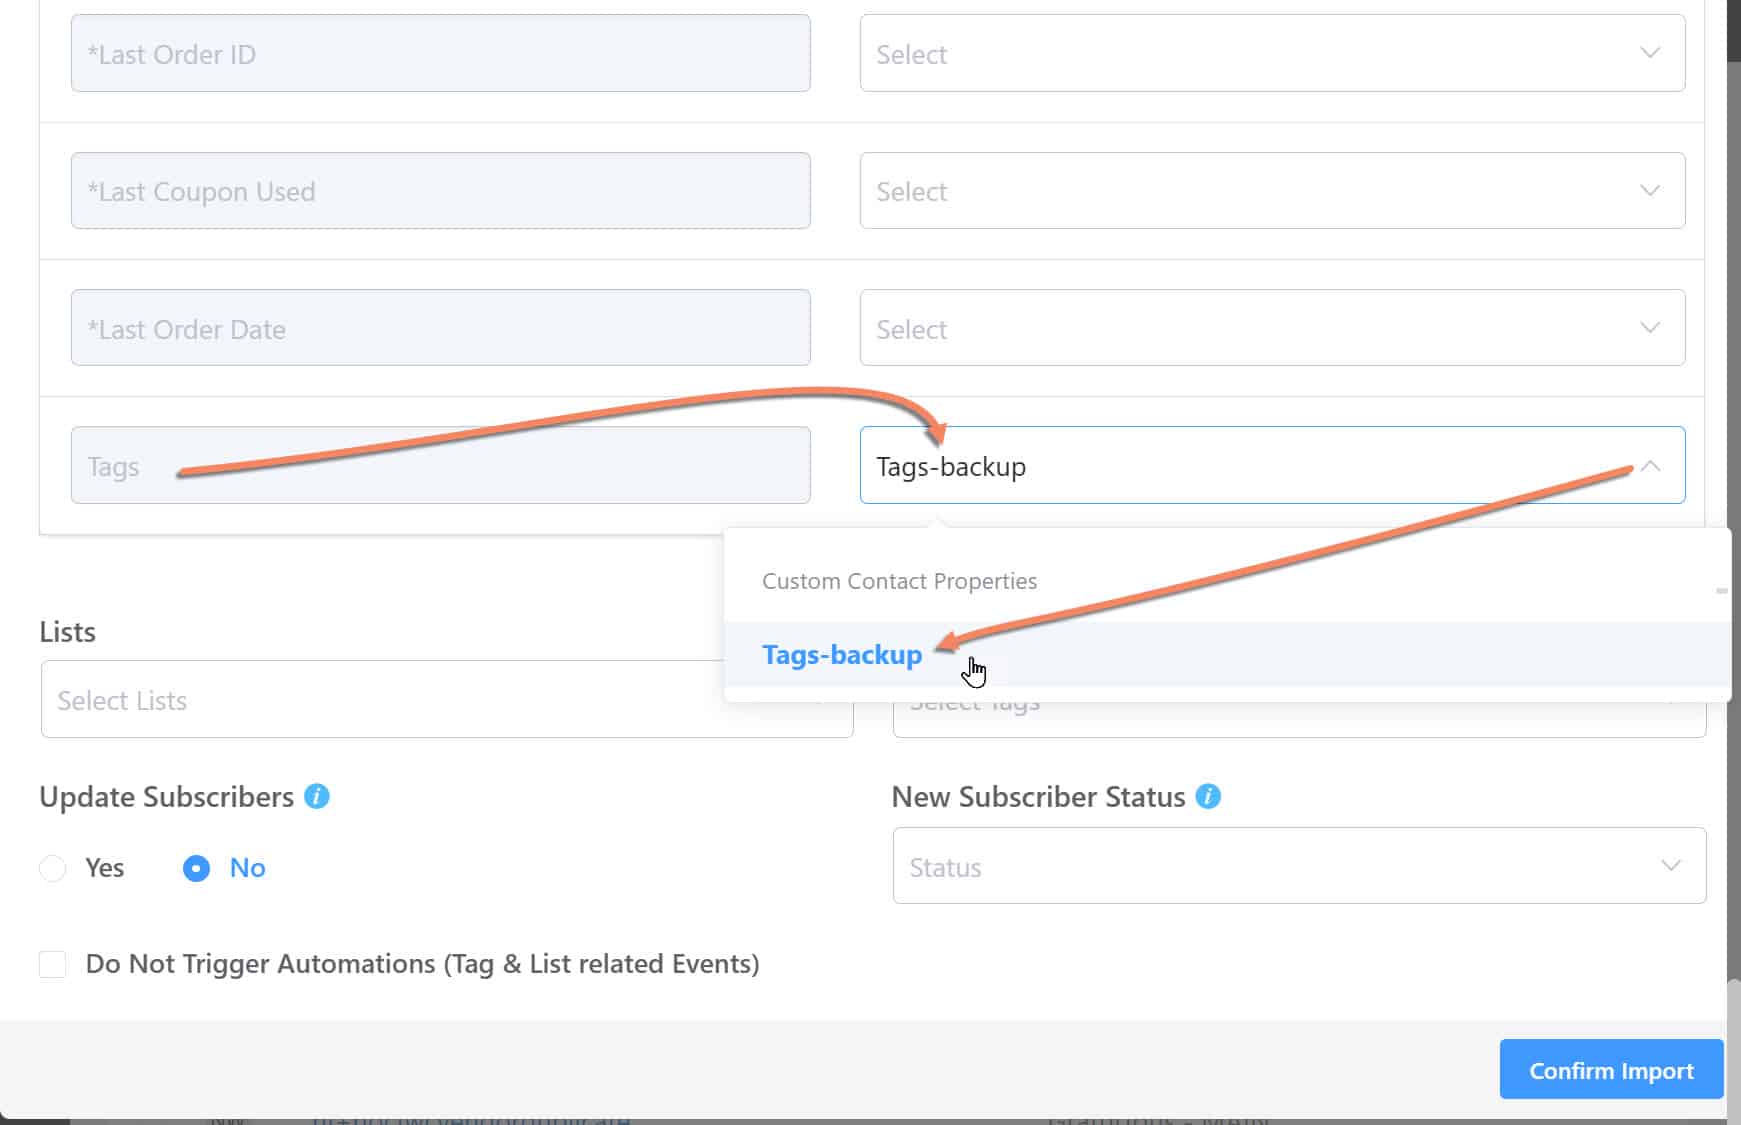
Once imported, map all your custom fields. (Too bad FluentCRM’s drop downs are not typeable here like the rest of their interface 😭).
Ensure ‘Tags’ gets mapped to your ‘Tags-backup’ field!
Let’s recap Step #1:
Step #1 imported ALL our wanted contacts and mapped all their custom fields.
We also have their tags imported into a custom field (Tags-backup) which we will assign to users using FluentCRM’s Advanced Filter and ‘includes’.. it’s manual labor, but it’s not too bad.
This solves the 100~ missed contacts.. their fields are now migrated 👍
But.. those 100~ contacts tags aren’t added yet. 👎
#Step #2: Use FluentCRM Auto-Migrator Tool
We still use FluentCRM’s auto-migrator tool, but we do it at this stage.
FluentCRM’s migration tool automatically migrates all tags from ActiveCampaign into FluentCRM, otherwise you’d have to re-create them one-by-one 😫.
Follow this step-by-step to not overwrite any contact information.
First, get your ActiveCampaign API Key found in Settings -> Developer in AC.
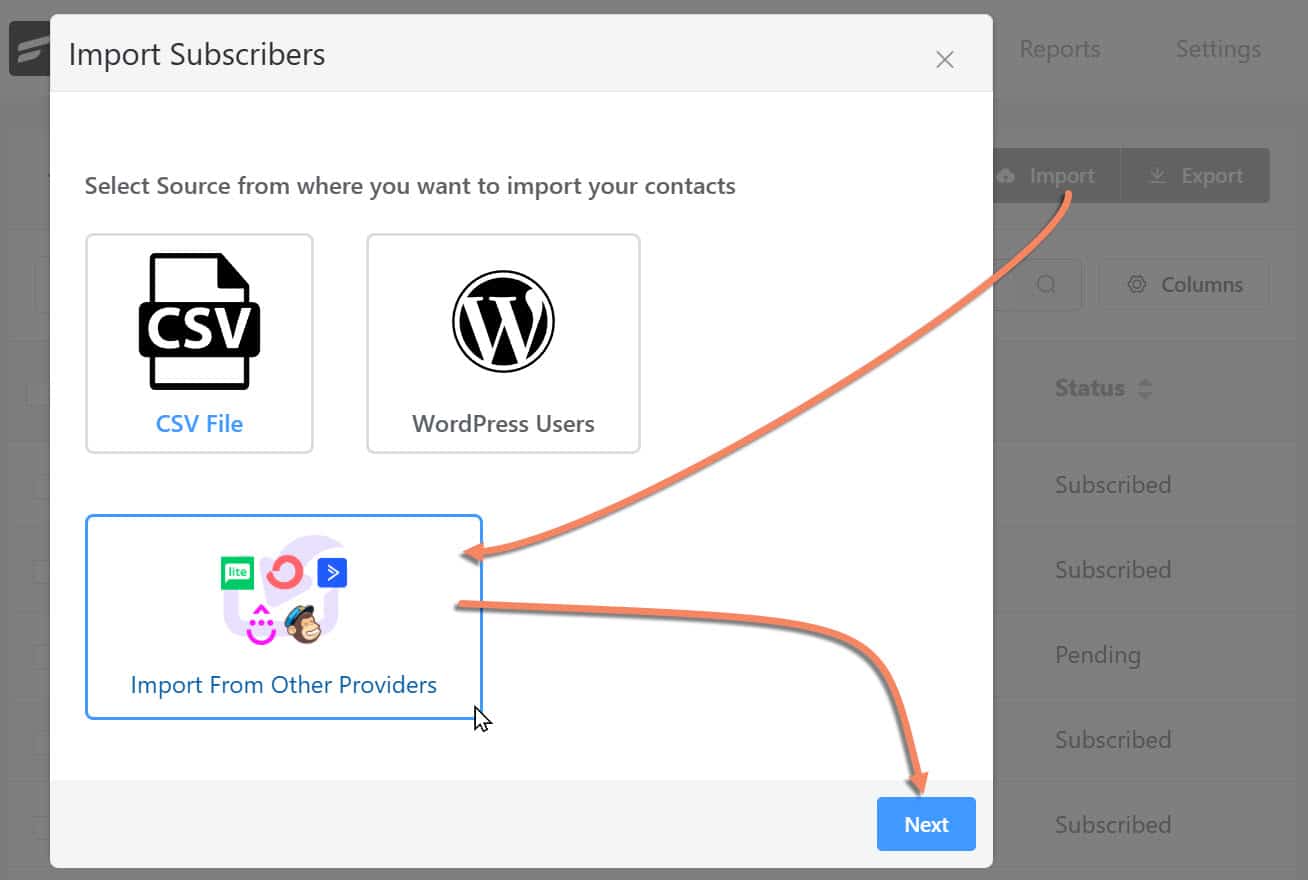
Go back to FluentCRM’s Contact Page, and select “Import” again. But this time, we’ll use “Import From Other Providers” (This is the AC to FluentCRM auto-migration tool).
Enter your ActiveCampaign API URL and Key, and select Continue [Map Data]. You will be presented with a successful prompt. 👍
Do not create or map any lists!
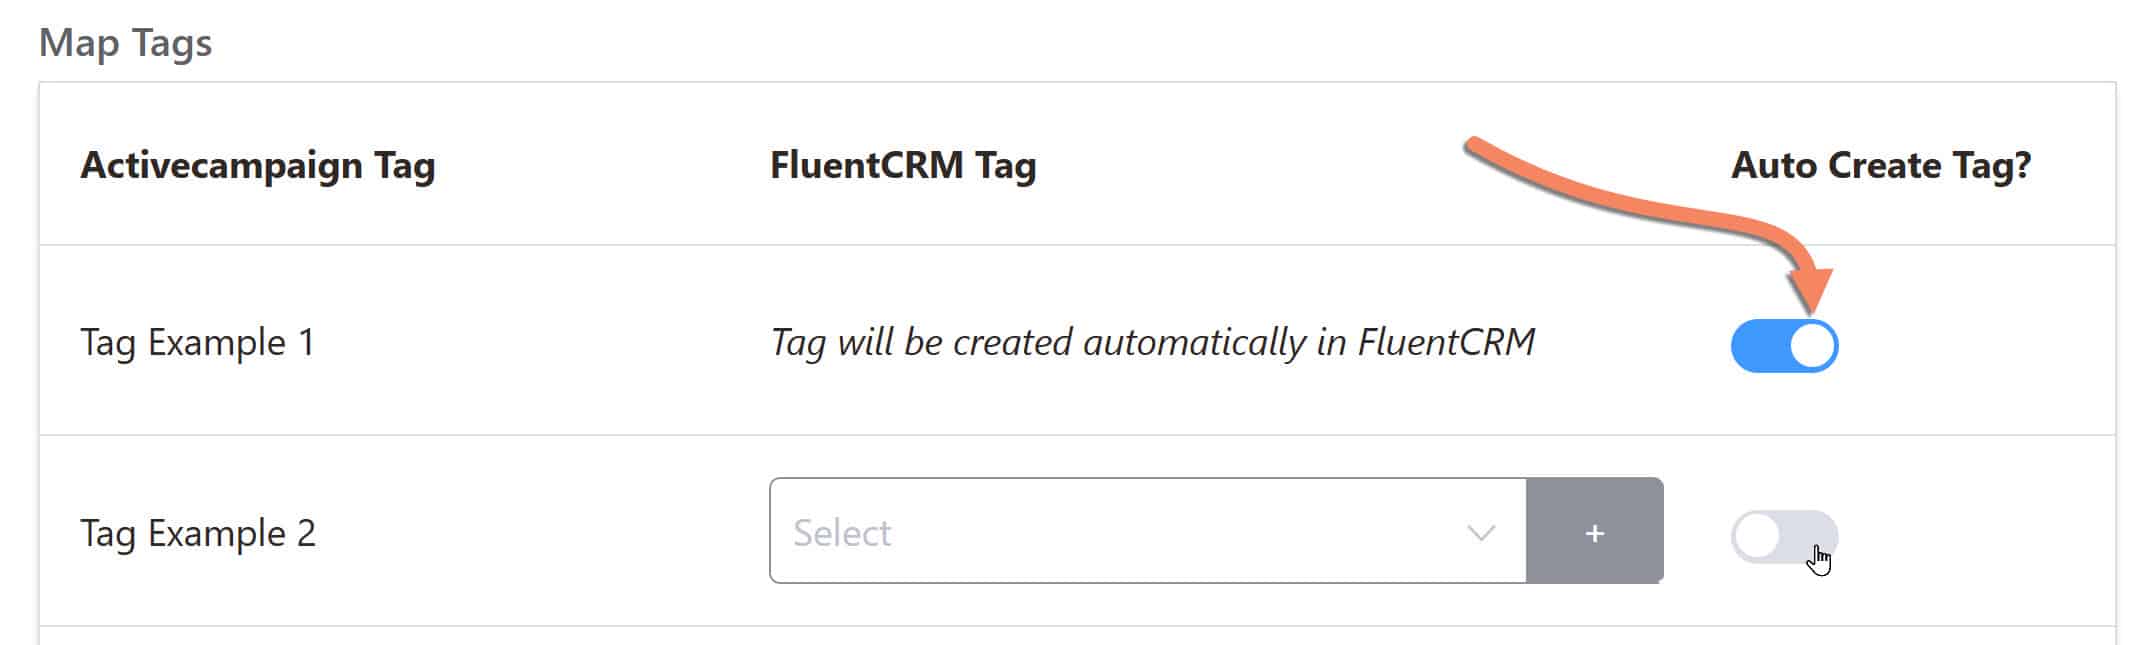
Under “Map Tags” section, enable each tag under “Auto Create Tag?”.
This migrates tags from ActiveCampaign into FluentCRM for you. 👍
(It’d be nice if FluentCRM gave 1 checkbox to select all tags.. but it’s still fast).
Do not map any fields under “Map Contact Fields” section. You don’t have to hit skip, just do not enter a value.
Do not assign a list or give a default tag ID.
YES, DISABLE “Import only active subscribers from ActiveCampaign”.
Not all customers are opted into your emailing list, therefore they’d get missed because they aren’t “active”. In addition to email sending, a CRM’s benefit is also tracking order history, tagging, giving access, event tracking etc.
In short, make sure you’re importing ALL contacts from ActiveCampaign during this FluentCRM from AC auto-migration process.
Here’s what this does:
Tags are automatically created in FluentCRM from ActiveCampaign, and automatically adds respective tags onto each contact.
🛑 My problem was those 100~ missed contacts didn’t have tags applied during this auto-migration process.
This is where we will use ‘Tags-backup’ custom field. It’s the only solution I could come up with.. because so far, we’ve imported our all contacts, mapped their fields, imported our tags into FluentCRM, but only some contacts have their tags mapped.. (this was the confusing part).
The solution is we simply “filter” by ‘Tags-backup’, and apply the tags via FluentCRM interface. With 100 tags, it took me about 45 minutes of focus.
It’s WAY FASTER than adding each tag individually to a contact. 👍
There’s two things we need to do still:
- Add tags to contacts
- Add contacts to list and their status
Let’s cover tags first.
#Step #3: Manually Add Tags to FluentCRM Contacts
The process is this:
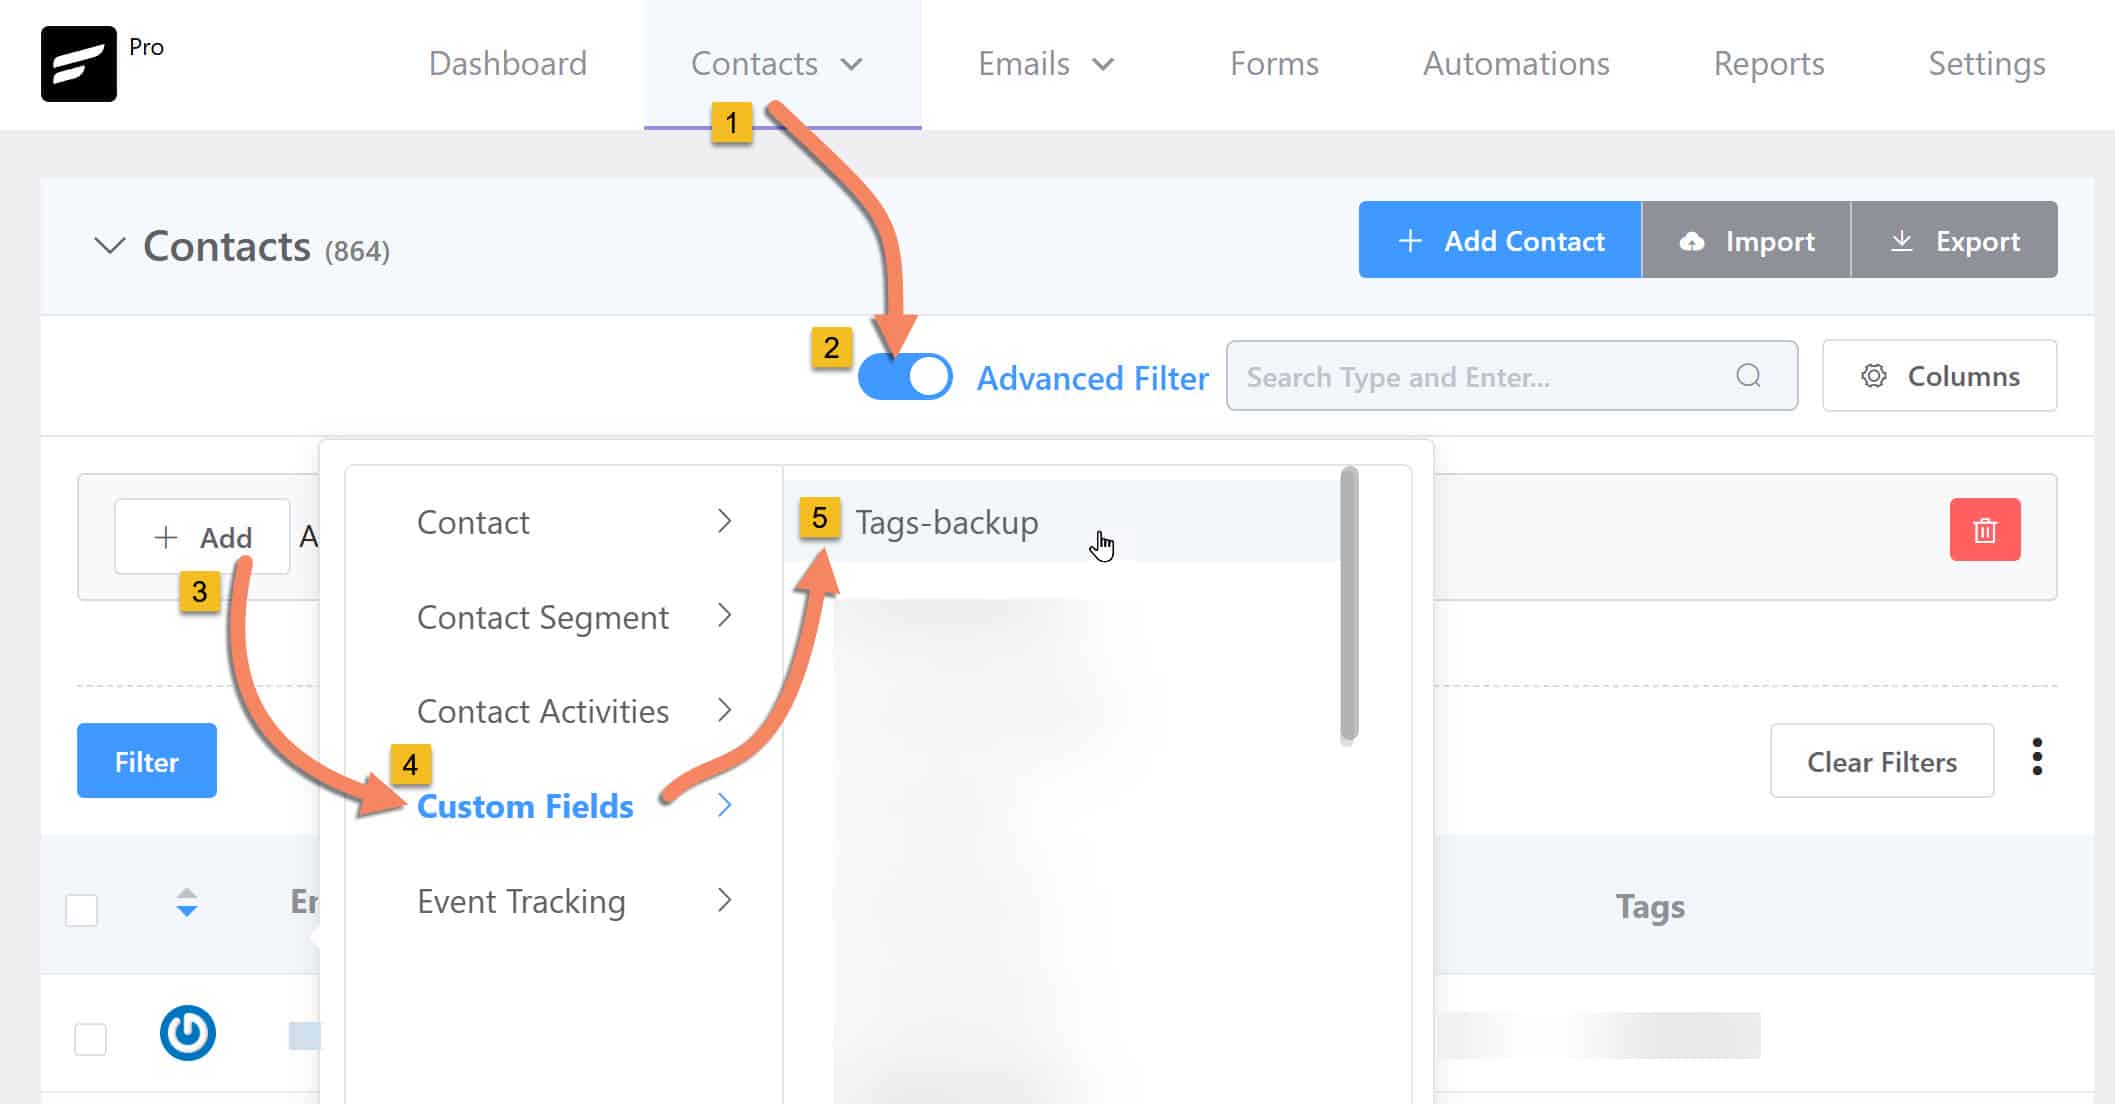
- FluentCRM Contacts page
- Select “Advanced Filter”
- Click Add+
- Select Custom Fields
- Select ‘Tags-backup‘ (we stored tags from ActiveCampaign here, which are comma separated!)
In short, we look in ‘Tags-backup‘ custom field based on the text we enter. We select ‘Includes’, and FluentCRM finds all contacts with that text in ‘Tags-backup‘.
Fastest Workflow I could Figure:
Open ActiveCampaign’s Tags page in one window, and open FluentCRM Contacts page in another window (not a new tab.. an actual new window).
I’d double-click to highlight the ActiveCampaign tag, CTRL + C (copy), then ALT + TAB to switch windows. Then simply paste the text into FluentCRM’s Advanced Filter, which shows all contacts with that text tag inside ‘Tags-backup‘.
It worked great for me. I did this for each tag separately.
🛑 Be careful if you have similar named tags! For example:
- Member
- Member – Quit
- Member – Trial
Unwanted contacts could appear even if they are not members! It’s best to label tags unique, or be cautious that tags with same text can give you undesired contacts!
This image below shows the exact process. Follow the yellow steps in order. (Also written below for you, too):
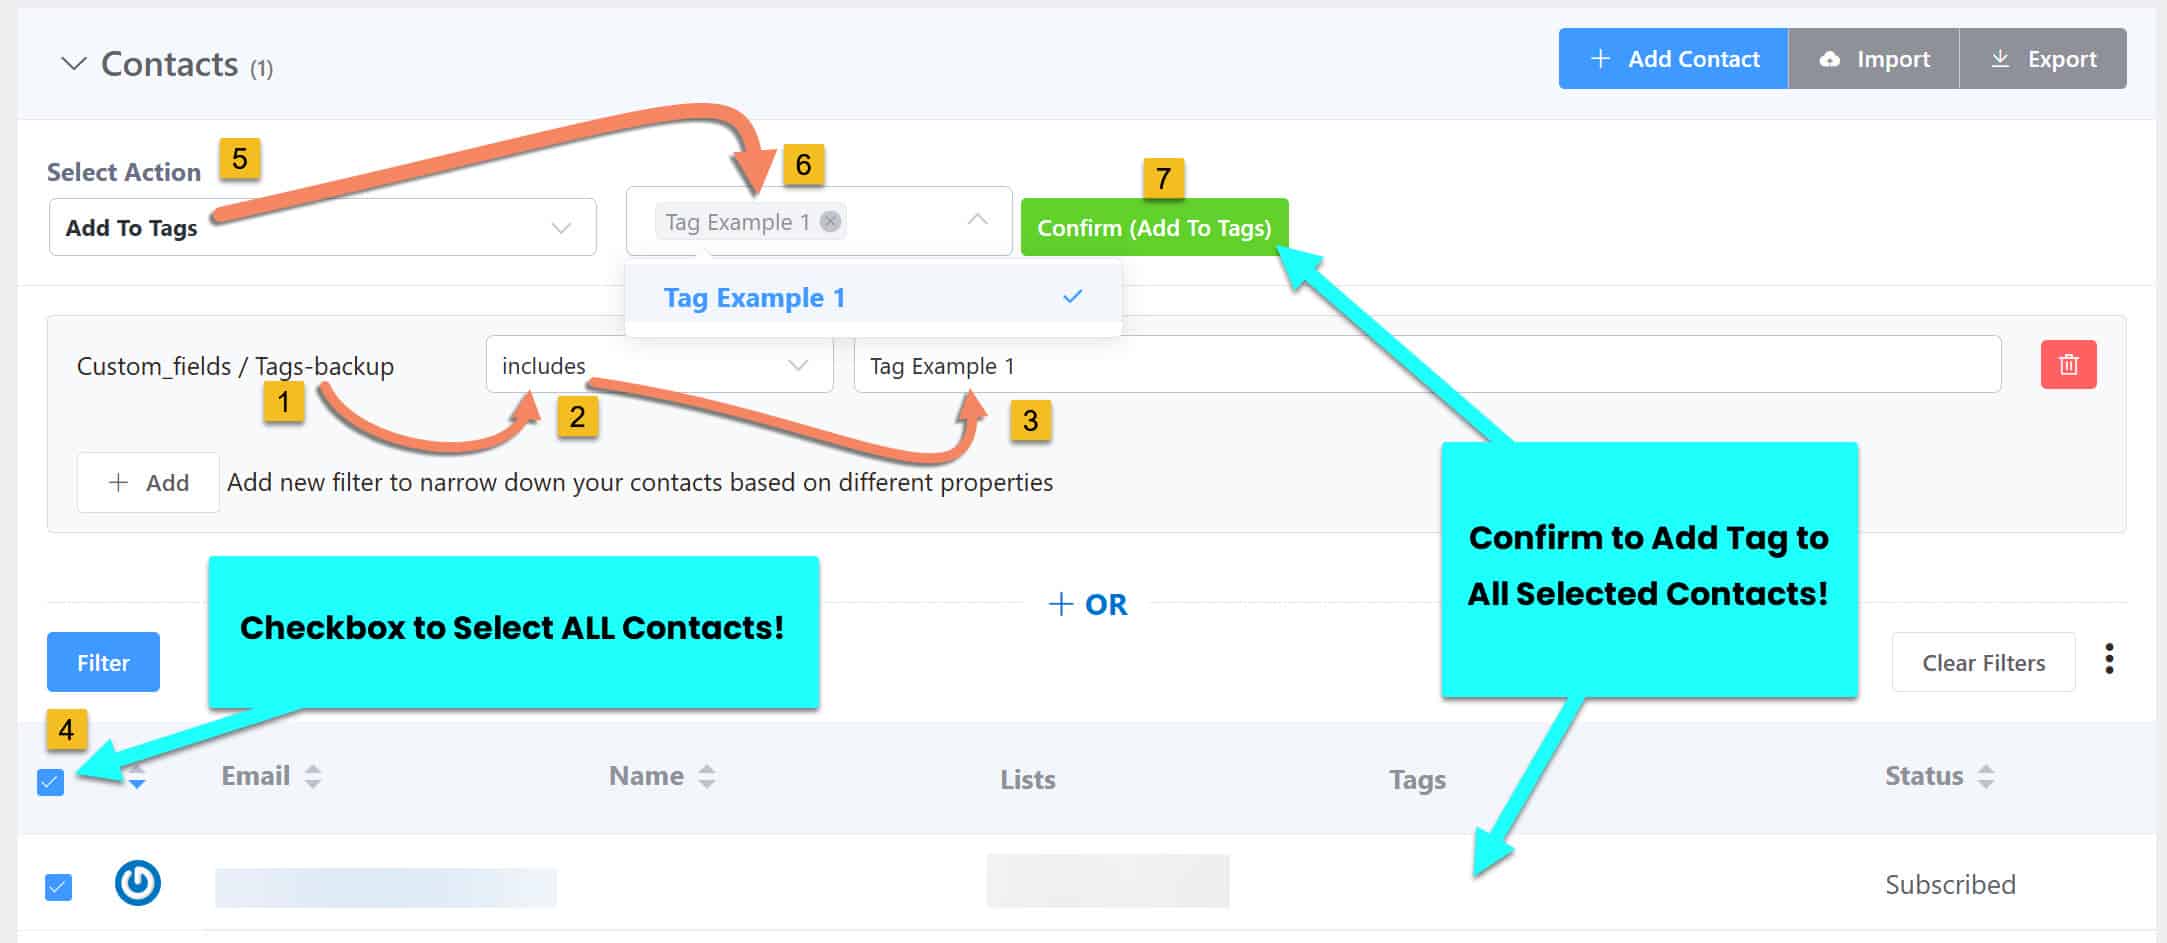
- Use ‘Tags-backup‘ as our advanced filter
- Select ‘Includes’
- Write your tag (I copy/pasted from ActiveCampaign Tag page)
- Check to select all contacts. (Thankfully FluentCRM 2.9.0 introduced ‘select all contacts’, even if it’s more than 600!)
- Under ‘Select Action’, choose ‘Add To Tags’.
- Select the Tag(s) you want to add to all selected contacts
- Confirm to add the tags
You have to do this for each tag.
Double-check test: Make sure the tag has the same amount of contacts in both ActiveCampaign and FluentCRM. Example, go to ActiveCampaign Tags page, and look for ‘Example Tag 1’. Let’s say 10 contacts. In FluentCRM Tags page, you should also have 10 contacts. It’s tedious, but this is your CRM, and we do want that 1:1 migration. Don’t rush it!
#Step #4: Add Contacts to List and Status
This is the last step of the process. (Hang in there!)
We now add contacts to a FluentCRM List and their status (active / unsubscribed).
In short, we click a list in ActiveCampaign, export a .csv of just those “active” contacts, then import each list one-by-one. It’s a quick process.
I suggest manually creating your lists in FluentCRM now. It felt like a safer approach where it wouldn’t touch or create things I didn’t want. Just replicate whatever lists you have in ActiveCampaign.. we’ll migrate contacts to their respective lists.
Important: If a contact was ever in a list with ActiveCampaign, they never leave the list, just their status changes (Active, Unsubscribed, Bounced, etc.). To ensure you’re only sending emails to “Active” contacts, select “Status” drop-down in ActiveCampaign, and export a .csv for “Active”. If you do not do this, you’d be including all contacts and potentially sending emails to unsubscribed emails.. hurting email sending reputation. You can take it a step further and export a separate .csv for “Unsubscribed” and import that afterwards, but I only did this for “Active” contacts.
Let’s quickly recap.
So far we have all our contacts in FluentCRM. Their custom fields and tags are now properly mapped. Now we just want to add that contact to a list and update their status to “subscribed”.
In ActiveCampaign, go Contacts -> Lists.
Select a list, make sure Status is “Active”, and export those contacts into a .csv.
Make sure you’ve created your FluentCRM lists at this point!
Go to FluentCRM, select “Import”, “CSV File”, “Comma Separated (,)”.
Now stop and read close!
We only map email here.
Make sure no other fields are mapped.. (we’ve come too far to overwrite stuff!)
With only email mapped, scroll to bottom of import window, and follow this:
- Lists (Select list for contacts based on your .csv export)
- Tags (do not add any tags)
- Update Subscribers (Yes – Because we initially imported all contacts, they’re already in the system. We want to update them, this is why we only map email, so we don’t touch other fields)
- New Subscriber Status (select “Subscribed” – these were “Active” contacts from ActiveCampaign! Do not add unsubscribed ActiveCampaign contacts as “subscribed”.. they’ll get your marketing emails.. you’ve been warned!).
- Do Not Trigger Automations (Tag and List related Events) (No, do not check this.. unless you want to trigger an automation to send emails or action.. I was only focused on getting contacts in the system properly).
This final step added Active contacts to their respective lists. 👍
You can now confidently send emails to a healthy list of contacts which you know wants to receive emails based on your previous CRM’s status.
#Recap: Step-By-Step AC to FluentCRM Transfer
When I explained the cleaning of contacts, tags, custom fields, and lists, you can totally skip that step. But the process was tricky, and the information I thought would be valuable.
Here’s the fastest way to switch away from ActiveCampaign and move to FluentCRM (REST) with WP Fusion plugin as the link:
- Create custom field ‘Tags-backup‘ in FluentCRM
- Export All Wanted Contacts from ActiveCampaign into a .csv and only map custom fields (‘Tags-backup‘ is crucial to ensure all contacts get their tags).
- Use AC to FluentCRM Migrator Tool to automatically create tags in FluentCRM, but only map “email” field.
- Go to FluentCRM Contacts page, create an Advanced Filter looking for ‘Tags-backup‘ custom field, and select ‘includes’. Write the text name and search. Select all contacts, and add the tag manually.
- In ActiveCampaign, click each list, export the .csv of “Active” contacts, and add them to the list and set status as “subscribed” for a healthy email list
#Closing Out: Am I Happy with FluentCRM?
I’m so grateful Jack nudged me to take the leap.
I looked very close at WP Fusion’s CRM Compatibility list.
I was considering another Cloud-Based CRM, but the time of re-writing emails, setting up automations, the fact cost is based on subscriber count, and the risk of price hikes.. I don’t want to go through that again..
I heavily considered Mautic (self-hosted), but kept reading Mautic forum users having database issues, and it’s a different codebase than I’m used to… then Jack released his AC to FluentCRM (REST) post..
I first tested FluentCRM on same site (non-REST) to see how I liked it, but discovered quickly this is not the solution if you’re looking to scale. Also FluentCRM doesn’t store everything in custom tables (some stuff is in wp_options)… so exporting FluentCRM to another site didn’t seem seamless, plus there’s no “full FluentCRM site export” at the moment.
The option (for me) was VPS with FluentCRM (REST) 👍
✅ FluentCRM is very similar to ActiveCampaign.
✅ FluentCRM is WordPress based, so I’m comfortable with customizing stuff with PHP, filters, hooks, etc.
✅ FluentCRM is self-hosted so no “success tax” based on active subscribers, and the WordPress Headless CRM approach allows for scaling performance. If you select a good VPS Provider, upgrading cores, ram and storage is just 1-click!!
❌ At the time of writing FluentCRM can’t use WPFusion’s enhanced ecommerce, but honestly, the tagging is most important.. and it keeps database lighter, too. So not as bad as you may think 👍
Also, WP Fusion created a couple free FluentCRM Add-On Plugins for a more ActiveCampaign experience, like Recent Activities and Custom Field conditionals.
I’ve been able to setup all my FluentCRM automations the same way as in ActiveCampaign.
Thank-you Jack (WP Fusion) and WPManageNinja for your help, support, advice, and product.
Yes, this is a huge on-taking, but you self-host WordPress anyways, right? Make sure you have a good host (that can scale when you’re ready), and your backups are in place. 👍
#Cleaning Up Afterwards
A couple things you may forget when you’re done:
- Update your DNS Records to remove ActiveCampaign
- Remove any ActiveCampaign bookmarks in browser (replace with FluentCRM!)
- Ensure your VPS has an automatic backup system
#Have you Switched to FluentCRM?
Share your story of the $$ you’ve saved.. the convenience it will bring in the long-run so you can focus more on your customers.
Oh.. and if you leave many comments, maybe Jack can bring me back for how to customize FluentCRM to make it feel like your own self-hosted CRM.. it takes about 30 minutes and feels so rewarding logging in and using the interface.
Thank-you Jack for allowing me to guest blog this FluentCRM to ActiveCampaign tutorial.