Are you new to working with WordPress?
Do you want to create a course and market it, but doing so feels intimidating?
As someone who only recently started learning about online marketing and the ins and outs of WordPress, I understand this feeling. It might feel like an uphill battle, but really, it’s more of a learning curve.
With the right guidance, clear instructions, and user-friendly software, you can quickly create a course and easily market your course through email. I have full confidence in you, because I went through this process and successfully did this, and I only learned what a plugin was a few weeks ago. If you don’t know what a plugin is, don’t worry, this post is for you.
WP Fusion and LifterLMS are both plugins and essentially, they’ll make your WordPress journey a little bit easier.
I’m going to guide you on how to install LifterLMS and WP Fusion in your WordPress dashboard, and then explain how to use these plugins to create your online course and connect your students to your email marketing list using Brevo as your CRM. If you already have a few or a lot of questions, that’s okay, answers will follow. But first, let me give you a quick outline and tell you a little bit about the benefits of using LifterLMS and WP Fusion.
Central Points of this Post
- Advantages of using LifterLMS and WPFusion
- Creating your course with LifterLMS and setting up access plans
- Using WP Fusion to connect your students to your email list and setting up a welcome email
#Advantages of Creating a Course with LifterLMS
#Ease of Use
Using LifterLMS to create a course is straightforward to do, and LifterLMS offers multiple resources to guide you through this process. LifterLMS is therefore the perfect plugin for a beginner creating their first course or website but is also suitable for veteran website developers and online course-content creators who will also reap the benefits of LifterLMS because its straightforward interface saves time and energy. This saved time and energy can be directed into creating course content instead of figuring out technicalities (which is, personally, the bane of my existence).
#Versatility
LifterLMS appeals to a wide audience of users. Whether you’re an academic wanting to create courses to enrich your student’s learning, a company onboarding new hires, or a small business owner wanting to share your knowledge and grow your business, LifterLMS meets your needs. If you encounter any issues along the way, LifterLMS has a support team committed to helping you achieve your goals and assist you.
#Customizable
LifterLMS provides multiple opportunities for course personalization, including options for integrating videos or audio into lessons and adding assignments and quizzes to optimize student learning. After completing a course, your students can also receive certifications, and these certifications can be personalized by you. LifterLMS’s customizability goes beyond enhancing course content by also offering integration with other tools you might already be using, allowing you to maximize success and still have plenty of choices.
Get automated. Get LifterLMS.
Start your first course today, for free, with the LifterLMS plugin.
Download now#Benefits of Using WP Fusion to Connect Students to Your Email List
#Seamless Integration
WP Fusion integrates your Lifter LMS website seamlessly with your CRM or email marketing platform, and this seamless integration includes integration with many marketing automation platforms. You can then automate marketing workflows based on how users interact with your WordPress website.
#What exactly does that mean?
If a user signs up for free access to a course, you can use WP Fusion to ensure that they automatically receive an email welcoming them, and these users are categorized as members who received this welcome email. Heads up, these categorizations are called “tags” in WP Fusion lingo. Similarly, when users sign up for the paid version of the course, there is the option to categorize these users as members who paid for the course by giving them a tag like “Purchased Paid Course” or something similar.
Following these actions, you can then restrict the paid content to members who fall into this latter category i.e. members who have paid for the course. This was one of the trickiest steps for me, but I’ll walk you through it nice and easy.
#Targeted Engagement
Once your CRM is integrated with your WordPress website using WP Fusion, you can create automated personalized engagement campaigns to foster meaningful interactions with members.
These campaigns build visibility, allow for better customer retention, and create stronger connections with your members. These campaigns can be easily automated so that your course operates smoothly without having to monitor your member’s behavior as closely.
This automation then ensures you have more time on your hands to attend to other important objectives like knowing exactly what a CRM is and how to explain it to someone who’s never heard of it before. Ultimately, the automated emails give you more free time and improve workflow efficiency.
#Step by Step: Creating Your Course & Setting Up Your Access Plan
#Install LifterLMS
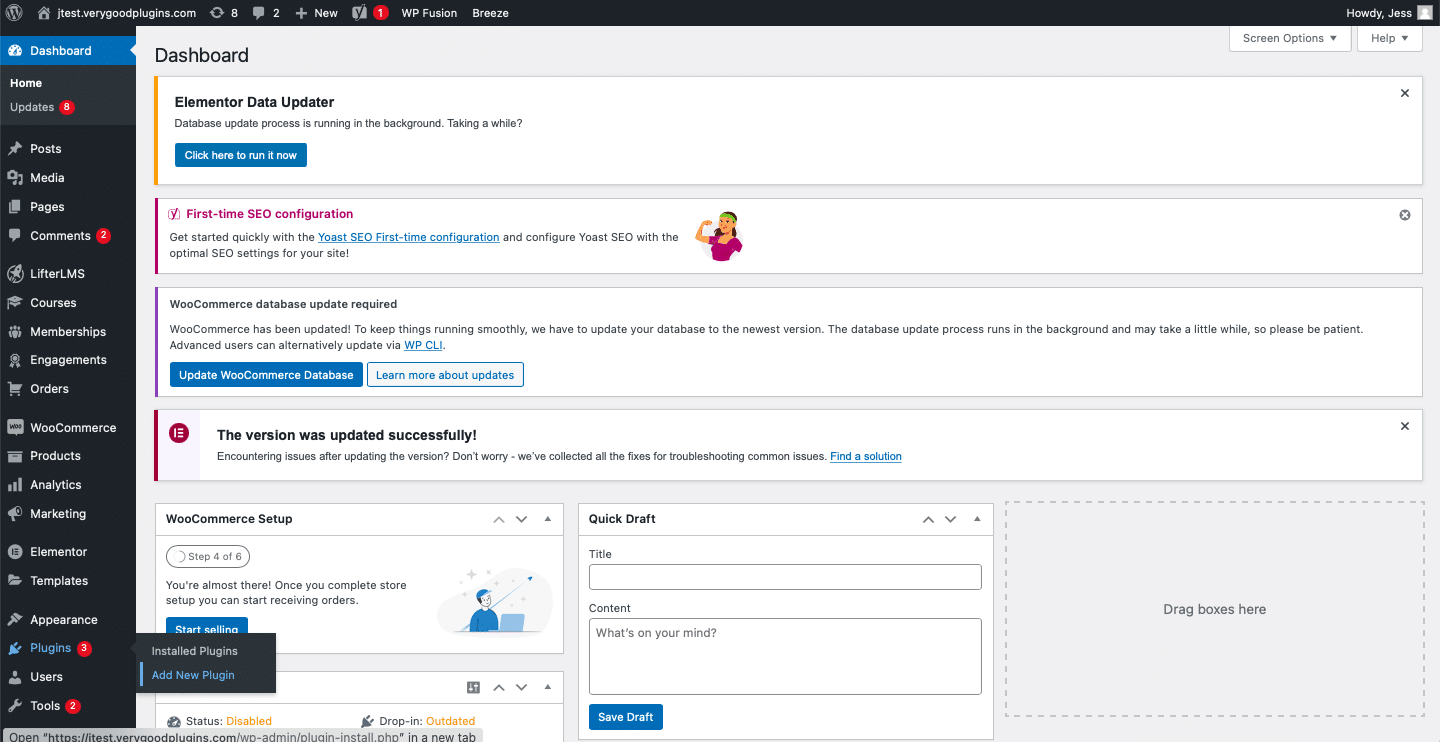
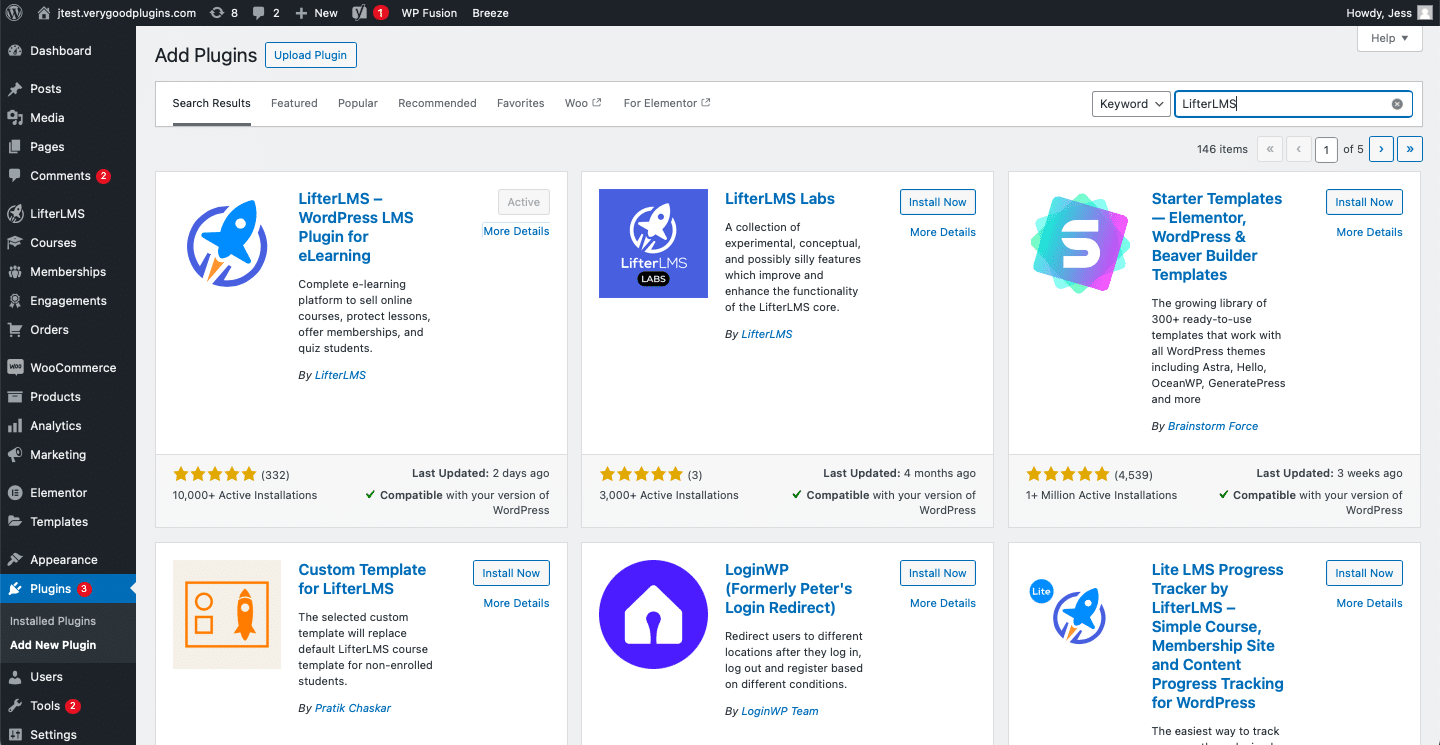
First, you’ll need to download and install the LifterLMS plugin in your WordPress dashboard. Do this by navigating to “Plugins” on the left-hand side of your WordPress dashboard and then clicking “Add new.” Then search for “Lifter LMS” and select “Install Now.”
#LifterLMS Setup Wizard
After installing the LifterLMS plugin, go through the LifterLMS setup wizard. There will be a welcome page, and you can then create the default LifterLMS pages, set up payments, and install sample courses.
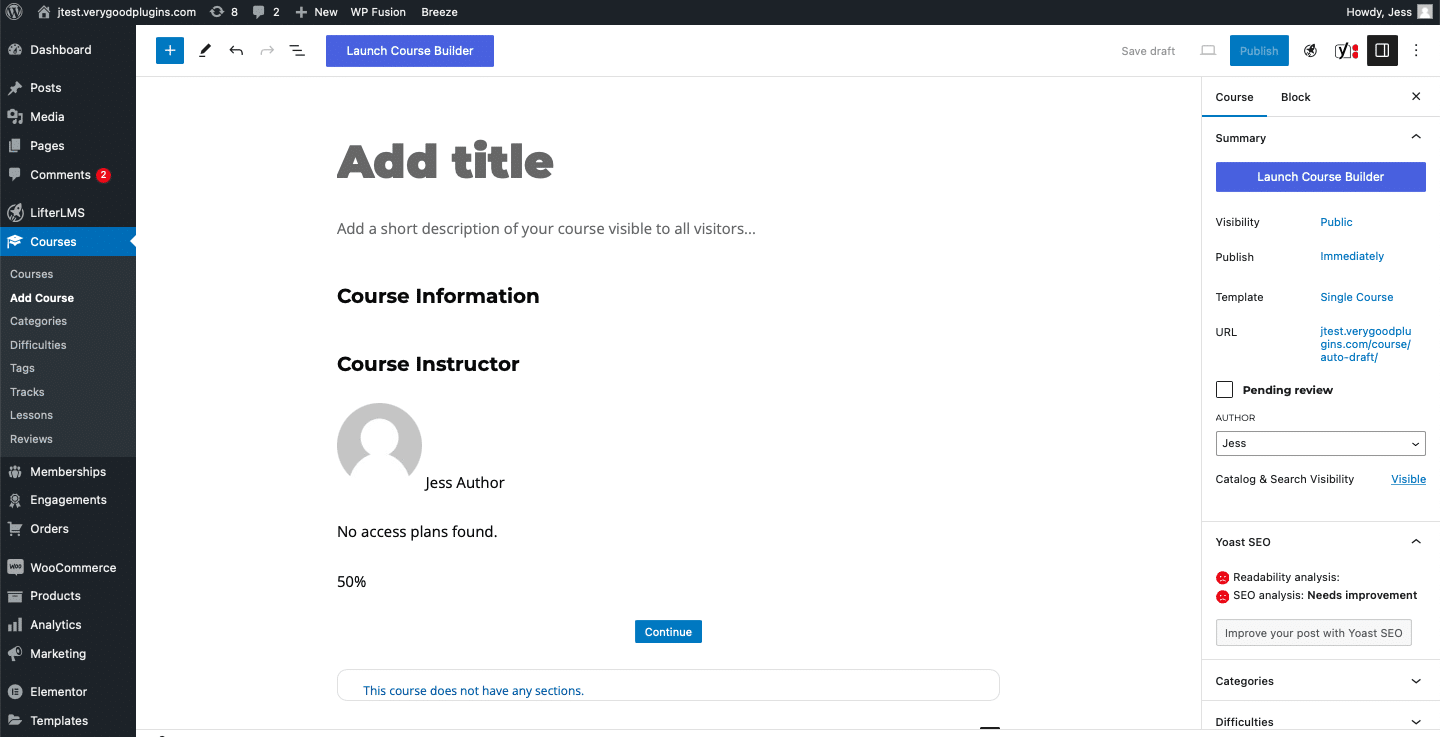
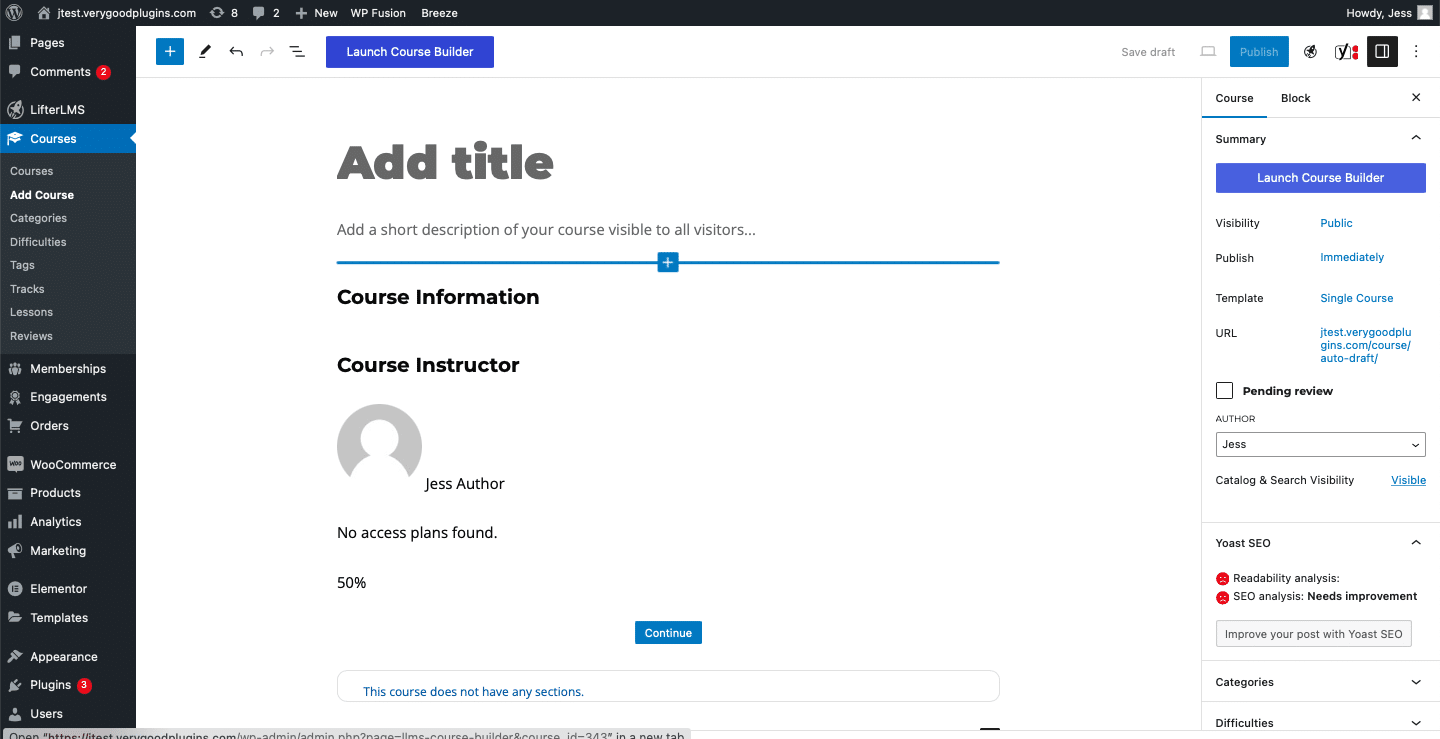
#Create Your New Course and Configure Settings
Under “Courses” on your WordPress dashboard, you’ll see the option to “Add course” at the top of the page. After this step, you can customize your Course Title, Course Information, and write a short bio about you, the instructor, for your students.
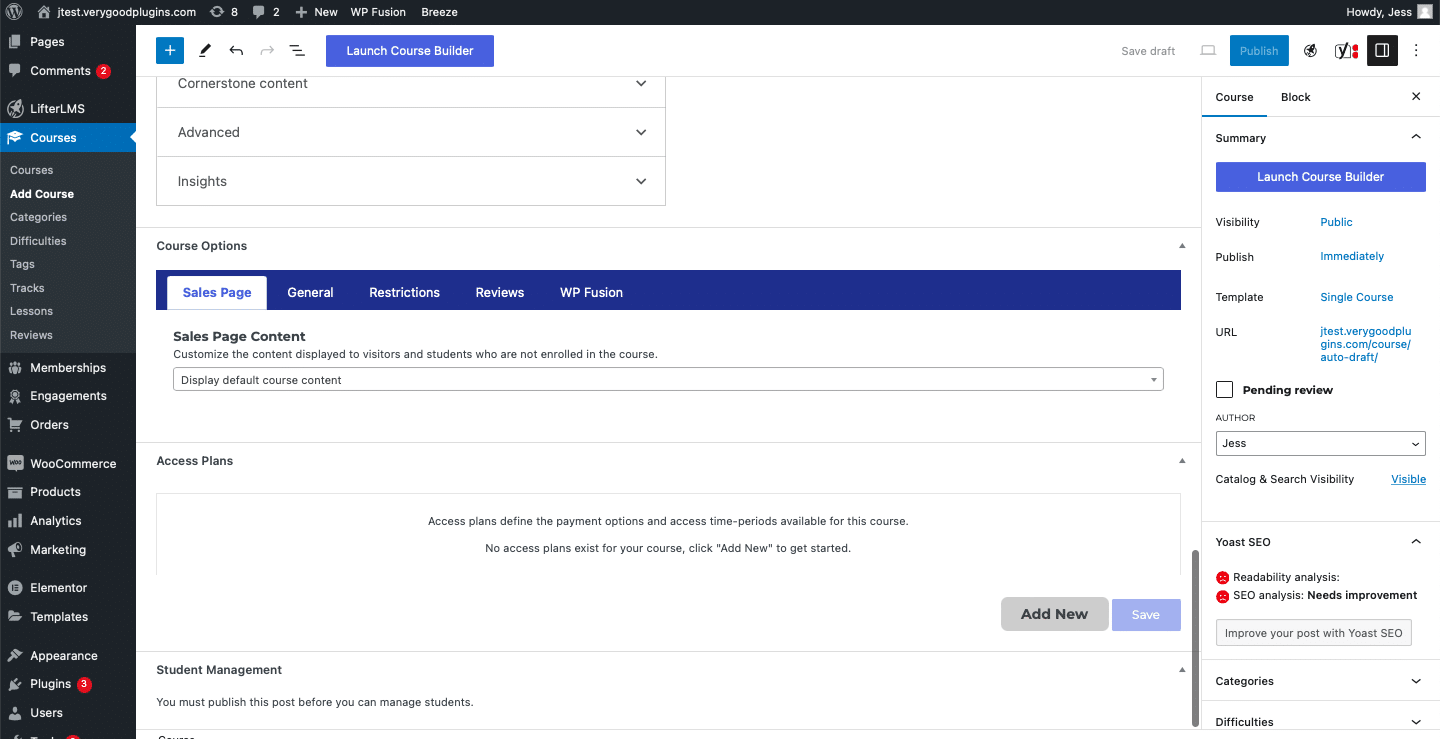
#Establishing Your Access Plans
- Access Plans allow for different tiers of accessibility to your course for potential students. Typically, instructors use a three-tier structure to start off, but this feature is customizable.
- You can find the Access Plan set up by scrolling down on your course page and locating the heading “Course Options” and below that, “Sales Page.” Click “Add New” on the lower right-hand side, and then choose your Plan Title, name your price, and customize any other options. For this tutorial, we suggest creating one Access Plan titled “Free Access” and having the others be paid versions. This step will be important later, so don’t skip it!
- Be sure to click save once you’re done. You can then immediately view your access plan when you scroll back up to the top of your course page.

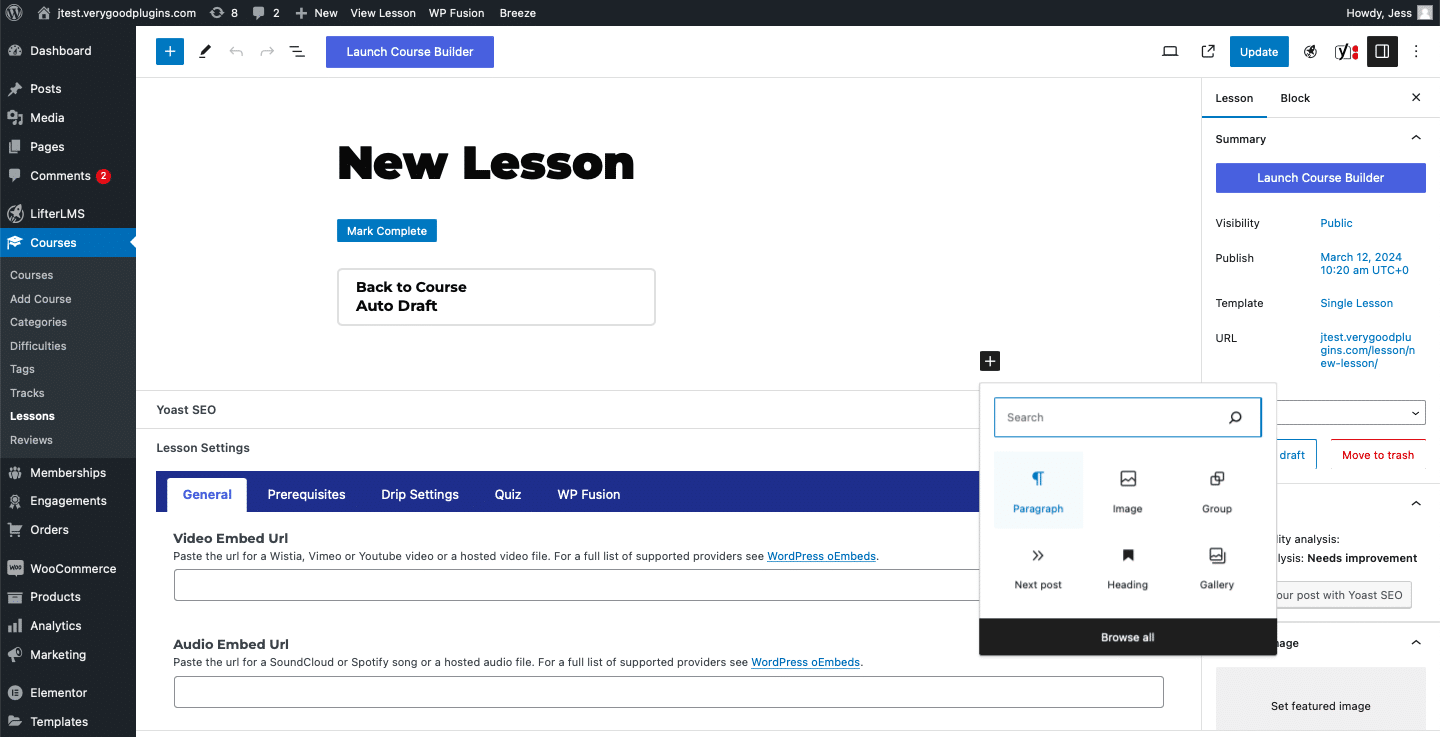
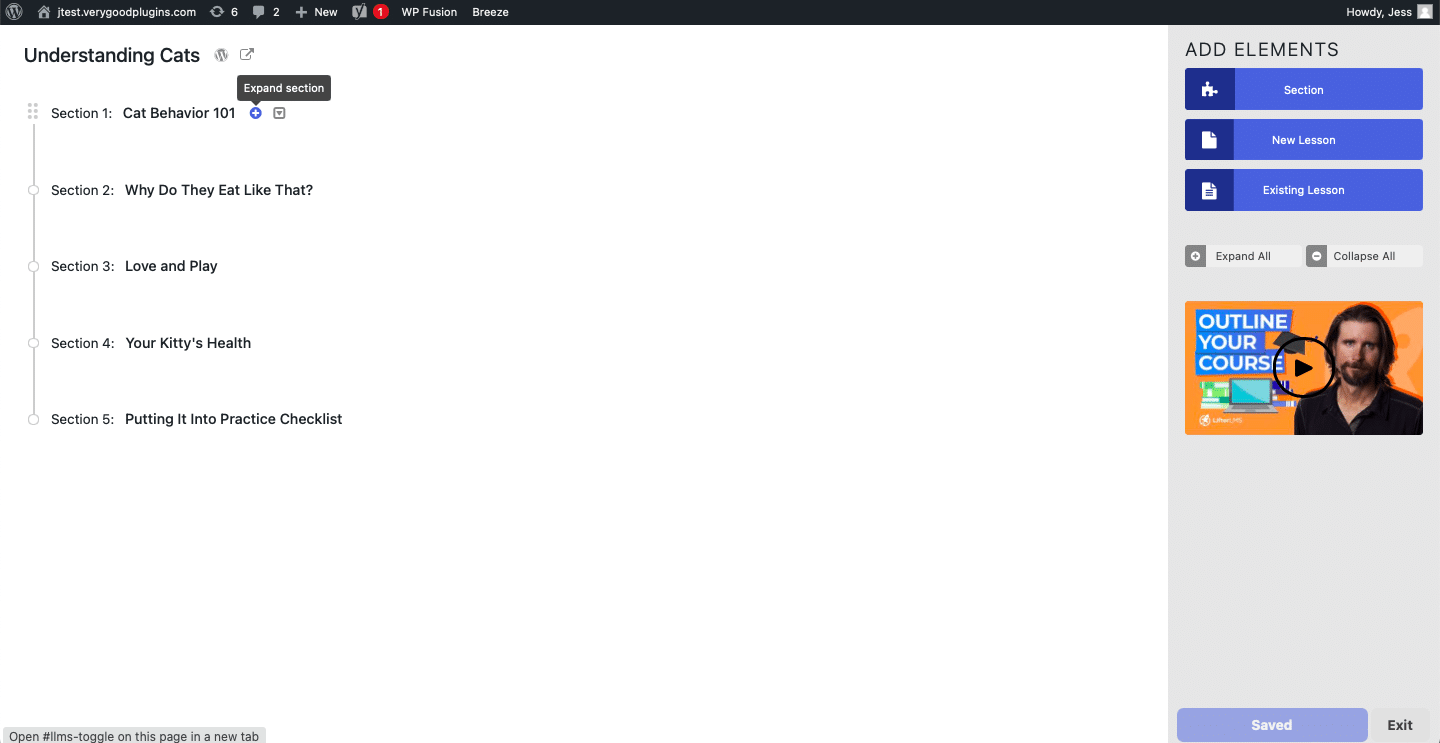
#Build Your Course
- To add and customize lessons for your course, select the blue button “Launch Course Builder,” at either the top or right-hand side of your course page.
- On the right-hand side of the following page, you’ll see the option to “Add Elements.” Using this feature, you can add sections to your course and lessons within those sections and title your sections and lessons.

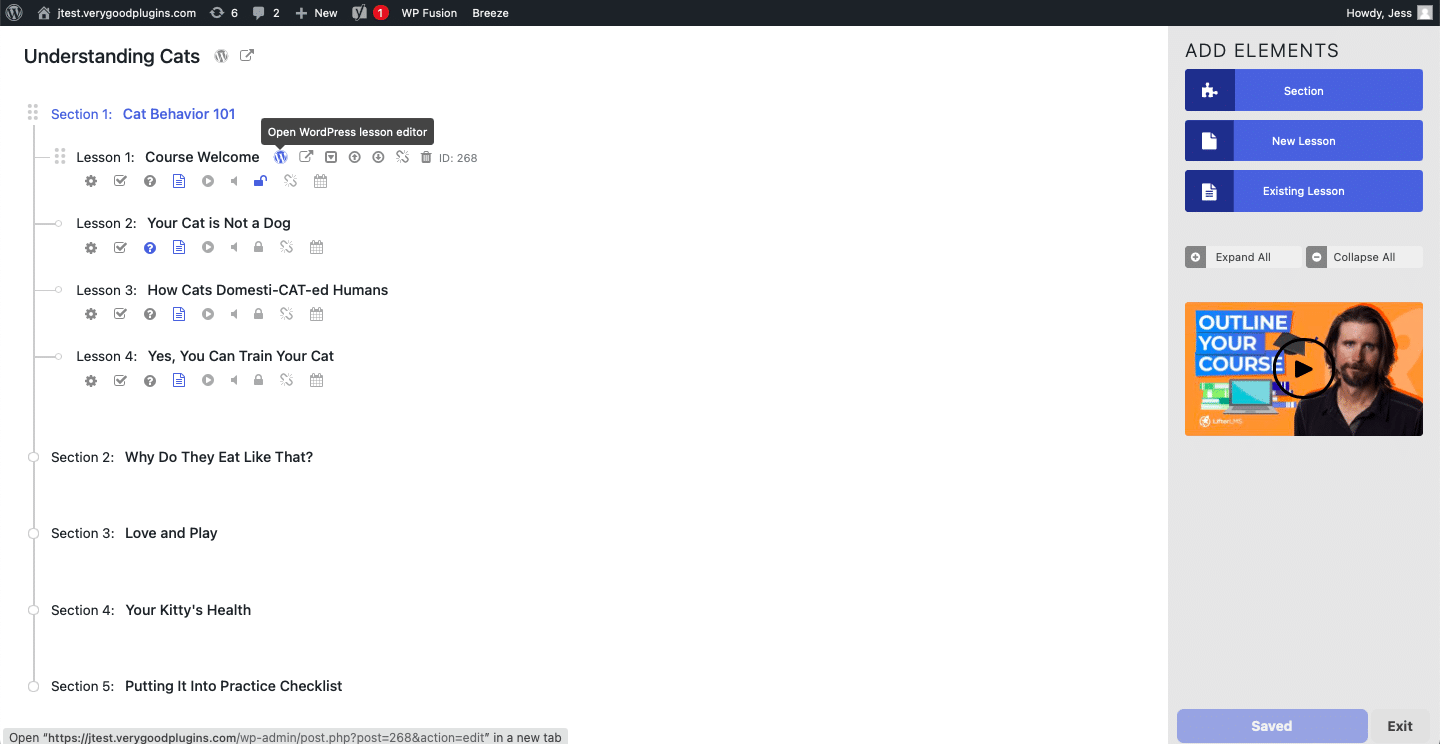
- To add content to your lessons, hover your cursor over the lesson name you just created, and you’ll see a few small icons appear. The first icon is of the WordPress “W,” and by clicking this icon you can open the WordPress lesson editor. Then you’re free to add content to your lessons.
- Take your time and have fun creating the content for your course. You don’t have to follow this step, but I highly recommend it. This was my favorite part, and I think enjoying the creative side of work like this is what can really keep you motivated later when you might encounter some hiccups on the technical side of things.
#First Preview, then Publish
Previewing your course is important to ensure that everything is ready for your users.
- To preview your course, navigate to the upper right-hand corner of your main course page. You’ll see a little hollow rectangle, a little square with an arrow, and the blue “Publish” button. Click the little rectangle to preview your course (it’s meant to resemble a laptop).
- You can choose to preview your course on the desktop, tablet, or mobile view, and then you will select “Preview in new Tab.”
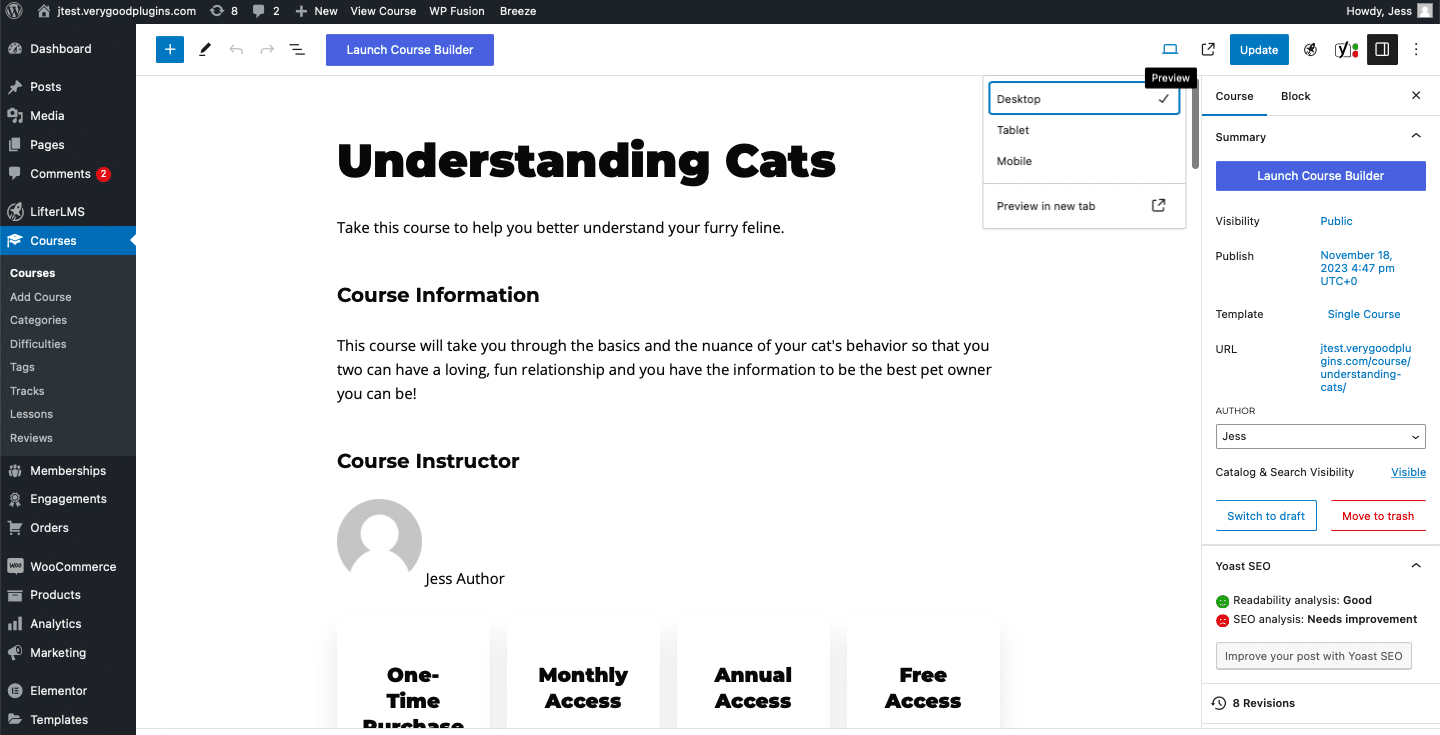
- Look through your content closely for typos and achieve your optimum aesthetic. Perhaps even get someone else to read through your content so that you can be sure everything is user-ready. Then you can also show off what you’ve completed so far. 😎
- To Publish, navigate back to your main course page and select the blue Publish button in the upper right-hand corner. Congratulations on publishing your first course!
Need more assistance? We’ve got you covered.
If you feel you need more help building your course, here are links to another written instructional guide. This video tutorial is great if you’re new to WordPress and learn best with lots of visuals. I used this when I created my course, and I found it very helpful.
#Step by Step: Connecting Your Students to Your Email List and creating a Welcome Email Using WP Fusion
#Install WP Fusion Plugin
After making an account and purchasing WP Fusion, you can download the software/plugin.
- Navigate to your WP Fusion account
- Scroll down and locate the orange “Download WP Fusion” button. Click this button.
- Once you have downloaded the plugin, navigate to your WordPress dashboard, and then navigate to Plugins on the left sidebar and select “Add new plugin.”
- On the following page, select “Upload Plugin.”
- Next, locate and upload the WP Fusion .zip file. After this, select “Install Now.”
- Return to your plugins page by clicking “plugins” on the left sidebar. Plugins are listed in alphabetical order, so you might need to scroll down to the bottom of your plugins list to see the WP Fusion plugin.
- WP Fusion is now an active plugin on your WordPress site! Congratulations!
#Connect WP Fusion to your CRM
- WP Fusion has installation guides for connecting various CRMs and WP Fusion.
- And here is a specific guide for connecting Brevo and WordPress, which is the guide I followed.
Get automated. Get WP Fusion.
Sync your LMS students with your email list using WP Fusion.
Buy WP Fusion#How to set up Automation for welcome email with Brevo
#Create a List
- From your Brevo homepage, navigate to Contacts > Lists. Then select “Create List” in the upper right-hand corner of this page.
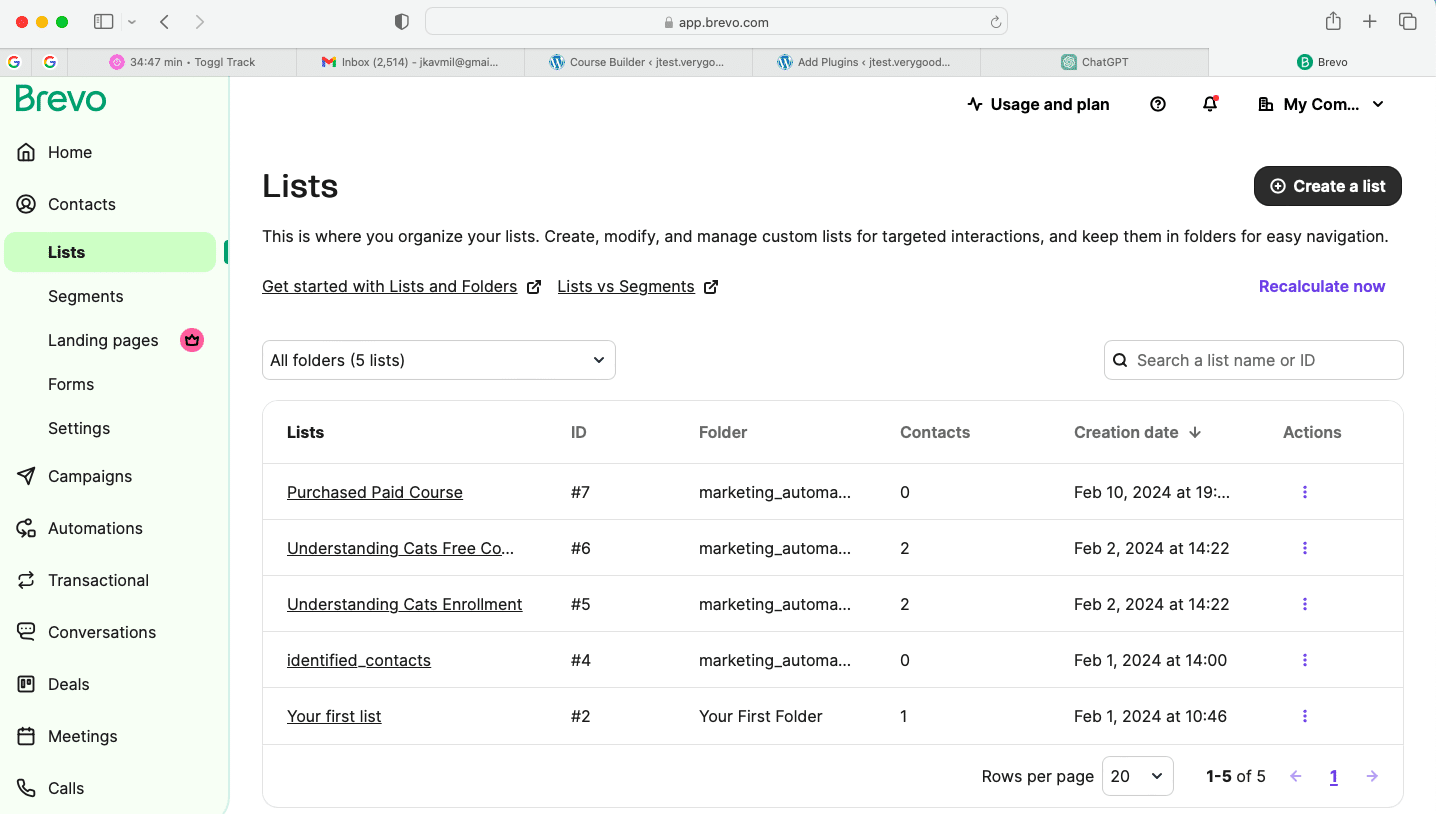
- Name your List according to what kind of customers you want to target. For example, if you want to send a specific email to customers who purchased specific courses, you could create the List “Purchased Course A.”
- For the purposes of this tutorial, we suggest creating three different lists titled “Free Access Enrollment,” “Free Course Completion,” and “Purchased Paid Course.” These list titles will be essential when you set up your payment gateways later.
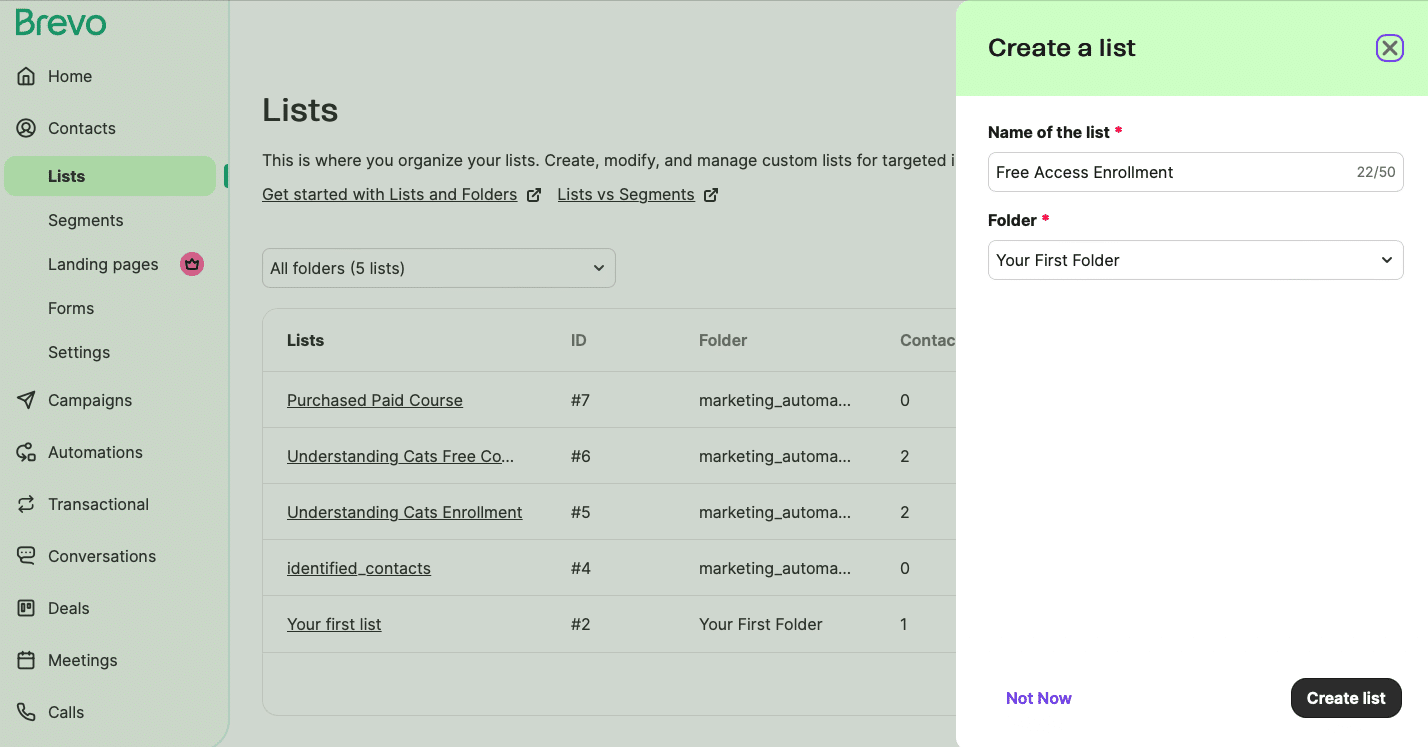
- Important FYI: These “lists” that you’ve created are the same thing as what WP Fusion calls “tags.” Keep this in mind for later. Just like tags, lists allow you to categorize your customers and members. This categorization then helps you later when you want to automate certain marketing emails, which is a step I’m going to walk you through later.
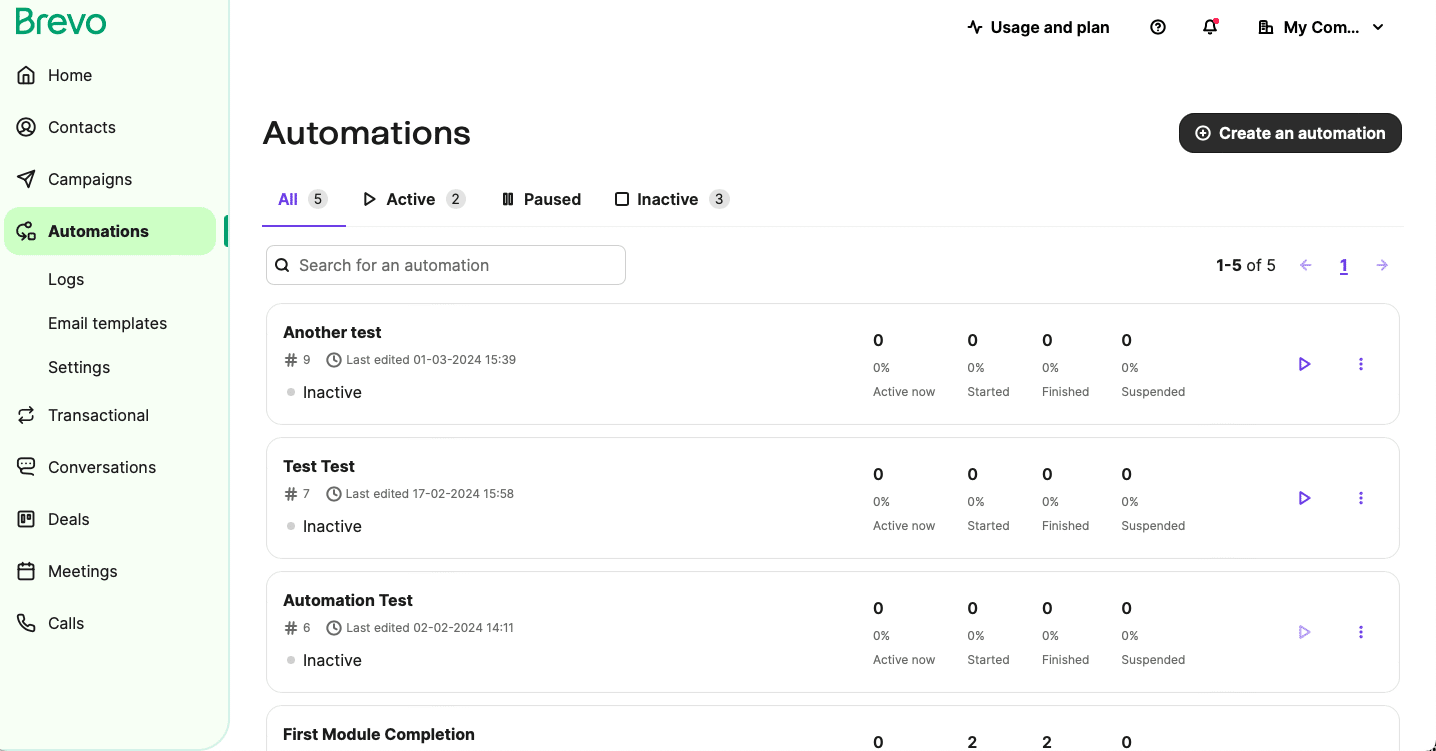
#Create an Automation
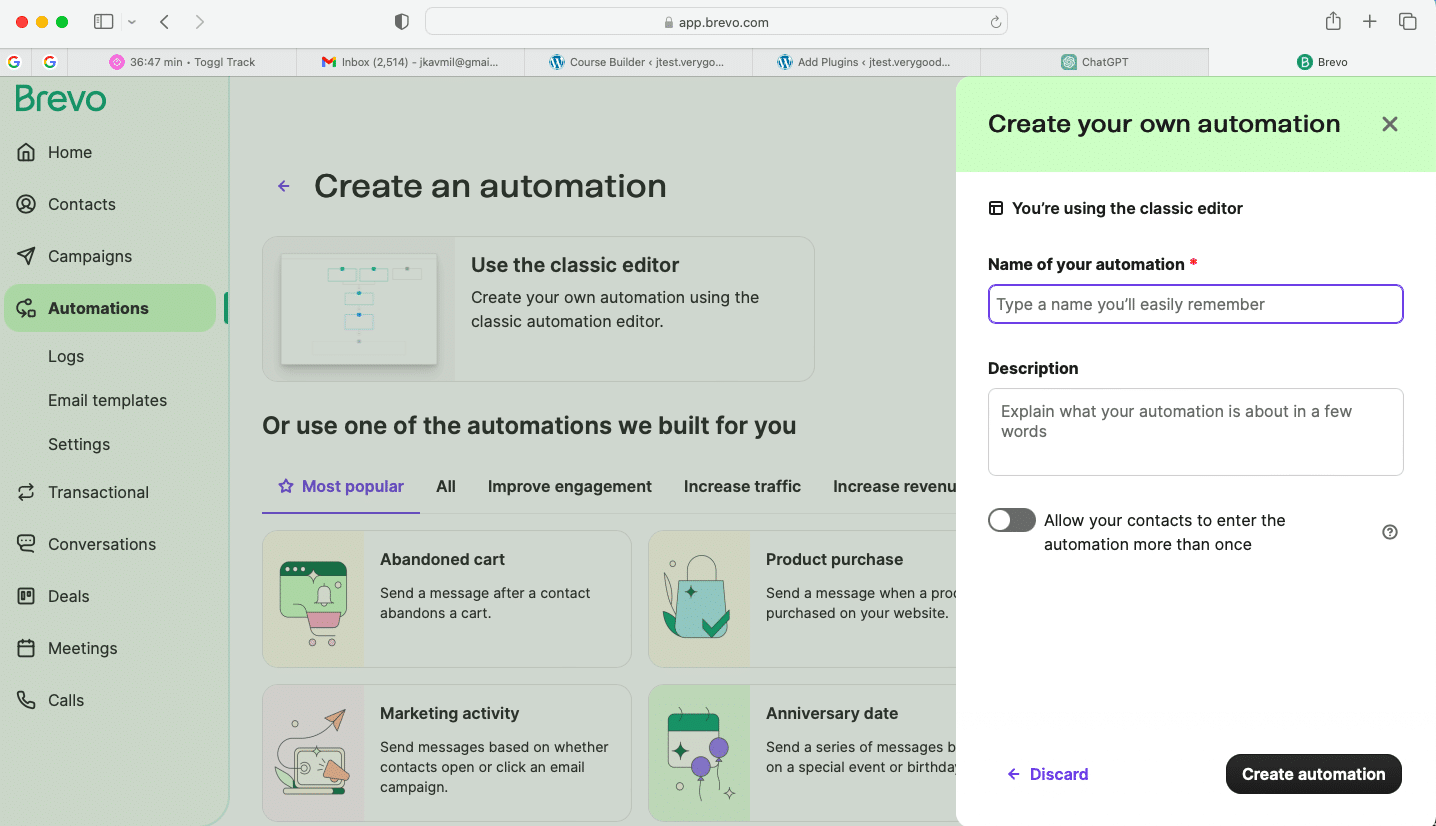
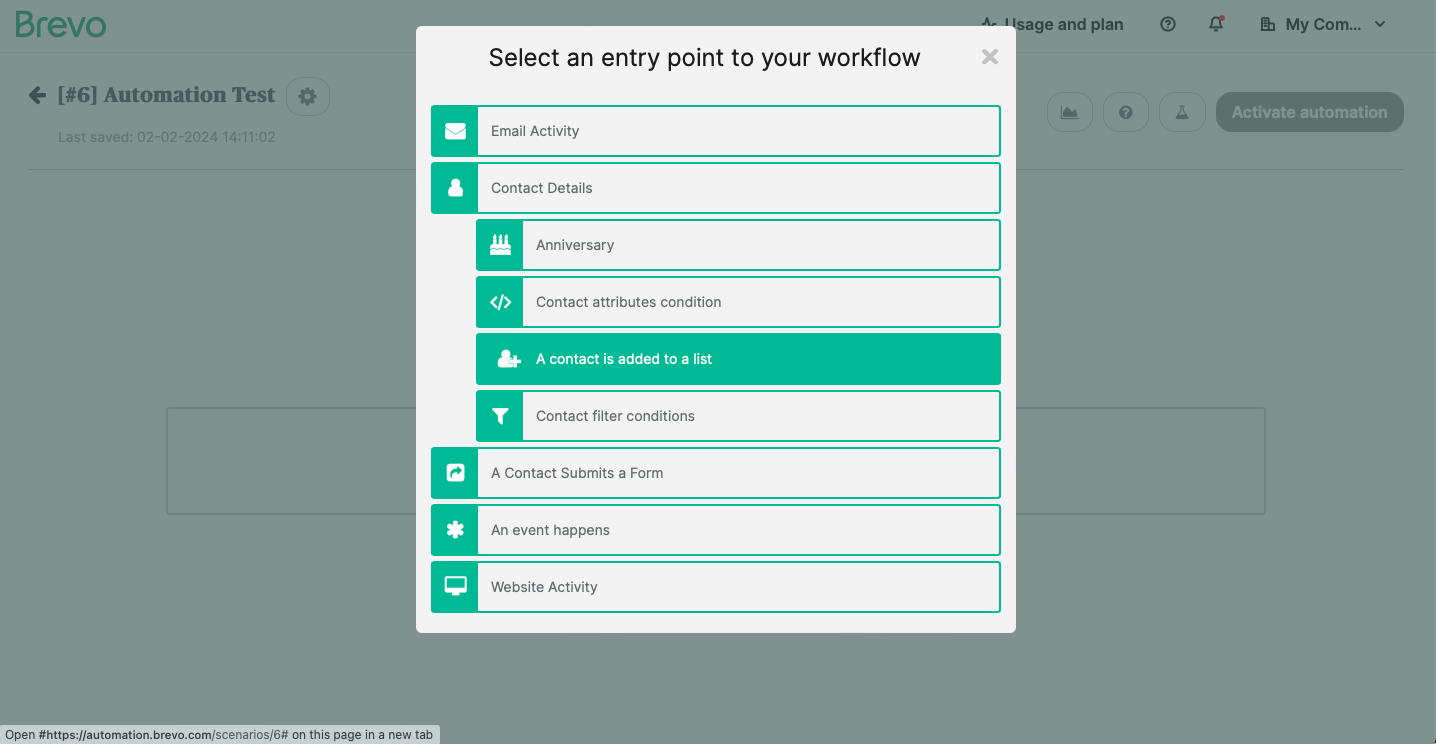
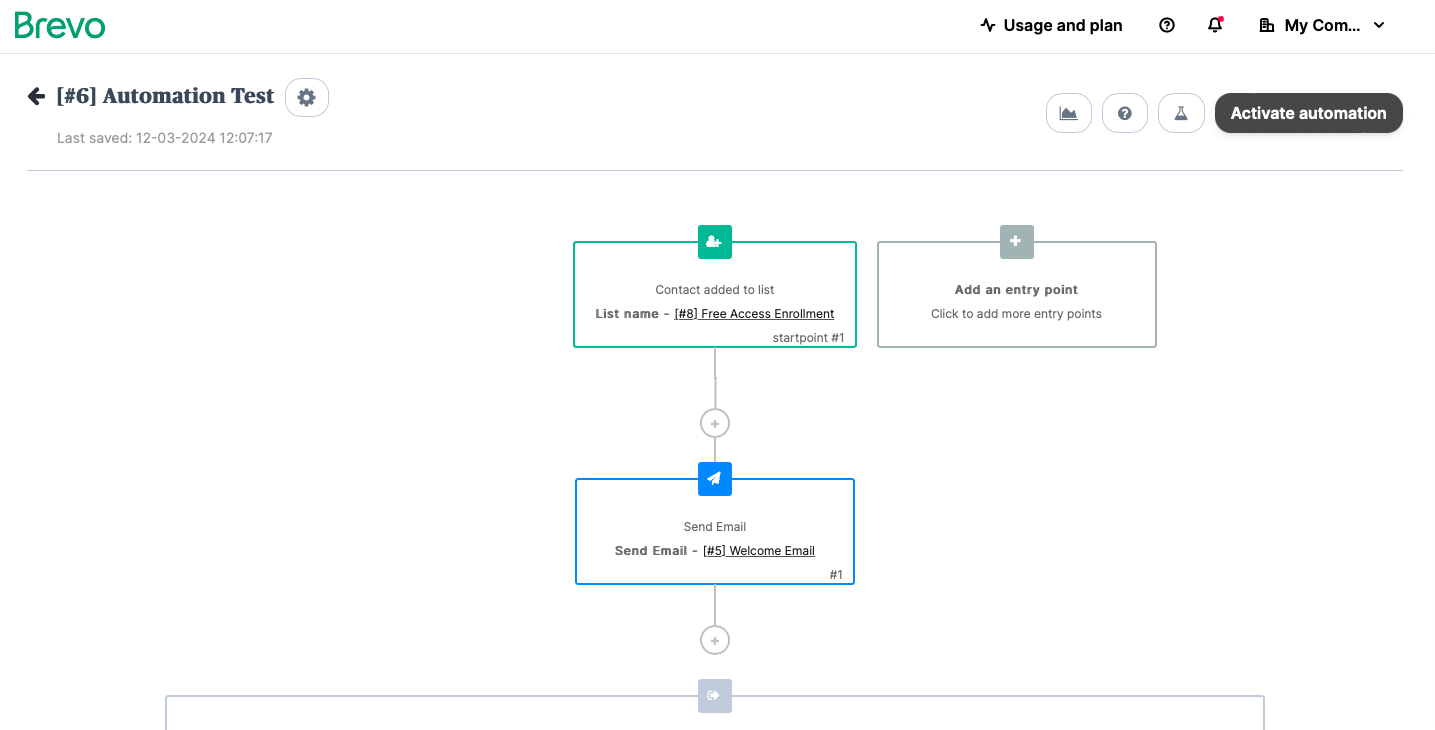
- After creating your Lists, navigate to Automations > Create an automation. You’ll then see a few options for what kind of automation to create. The “Use the Classic Editor” option is a good place to start as you get the hang of things. Then, you’ll name your automation and write a short description for your reference.
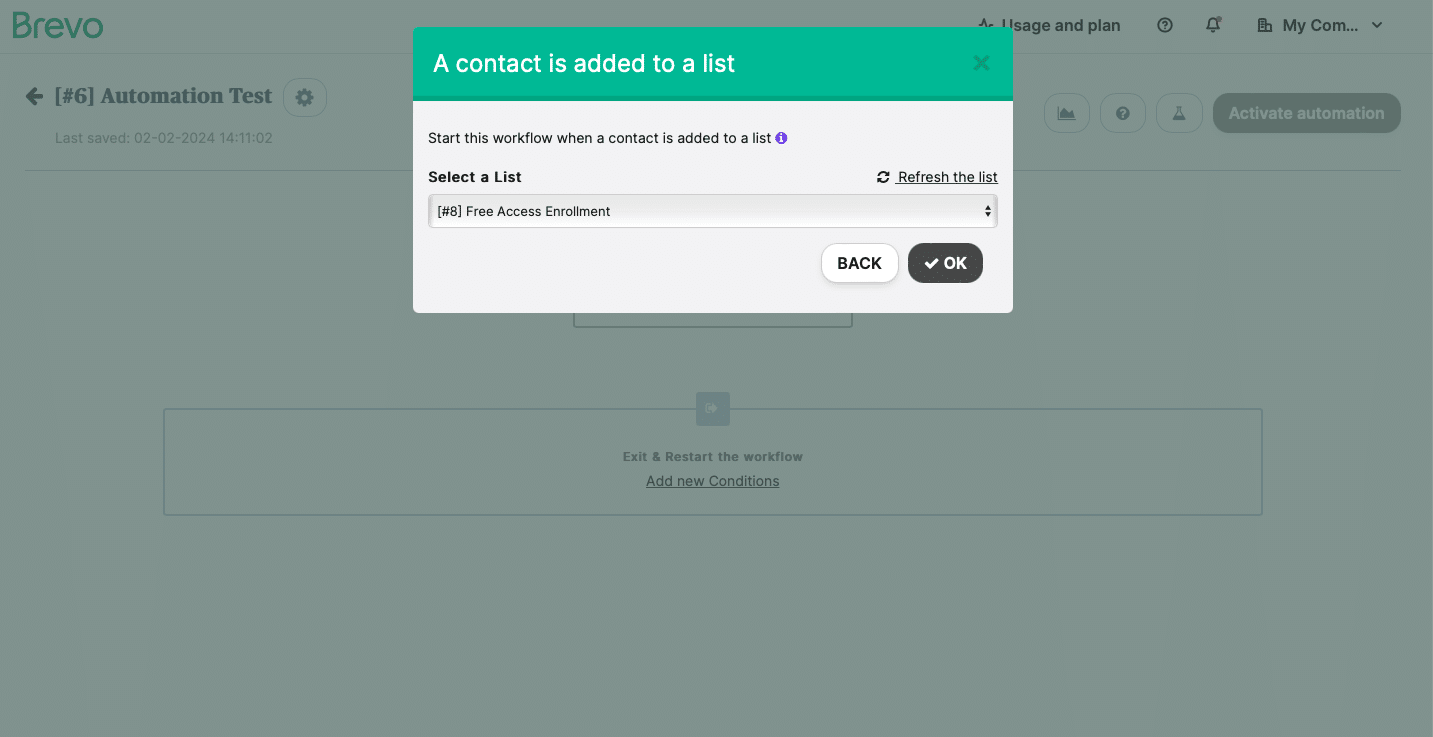
- Next, you’ll need to add an entry point to allow for automation triggers. Click the “Add an Entry Point” box and then select Contact Details > A contact is added to a list.
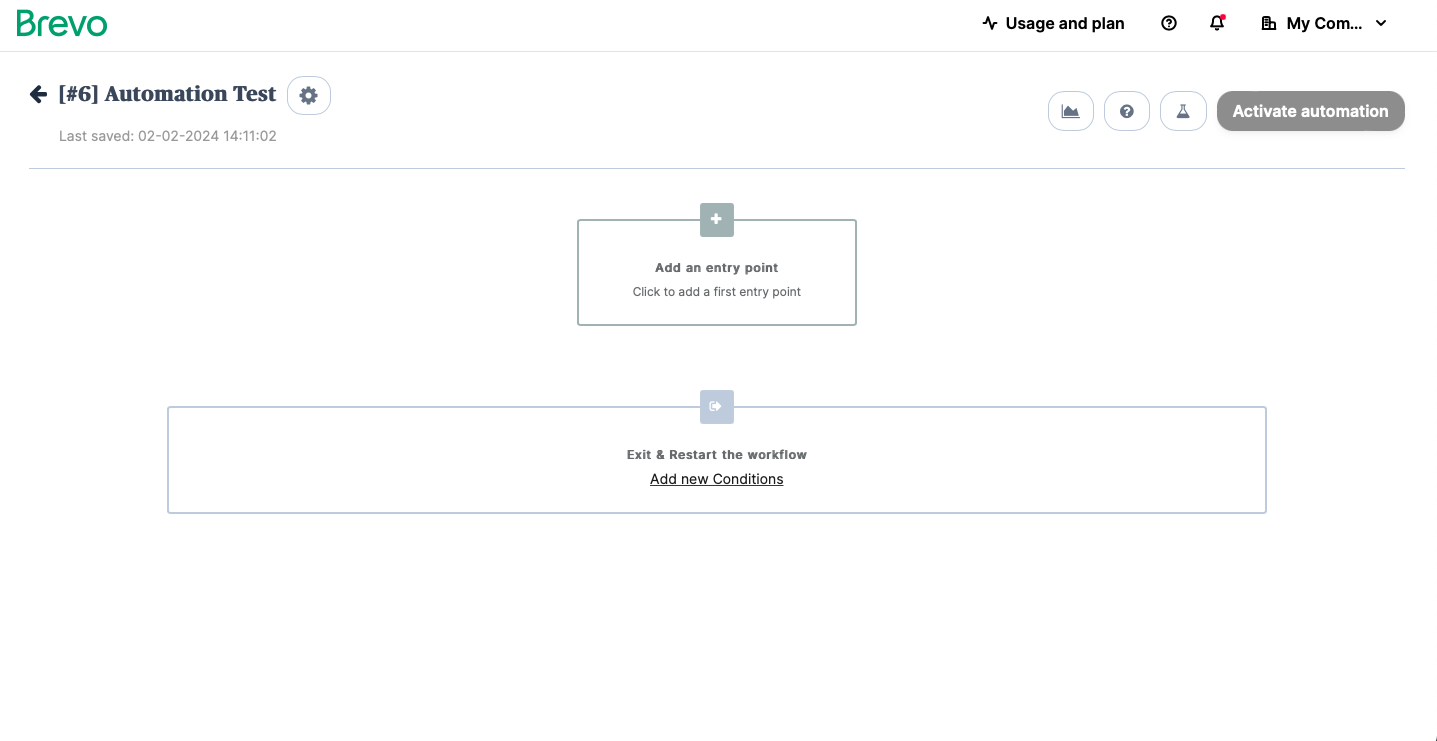
- You’ll then be asked to select a list. We suggest choosing the “Free Access Enrollment” list first, and then you can work on your welcome email.
#Create Your Email Template
- After adding the entry point, you want to create the content that members will receive when they sign up for the free version of your course. To do this, you’ll need to create an email template.
- Navigate to Automations > Email Templates from your Brevo Homepage.
- From the Email templates page select “New Template” in the upper right-hand corner.
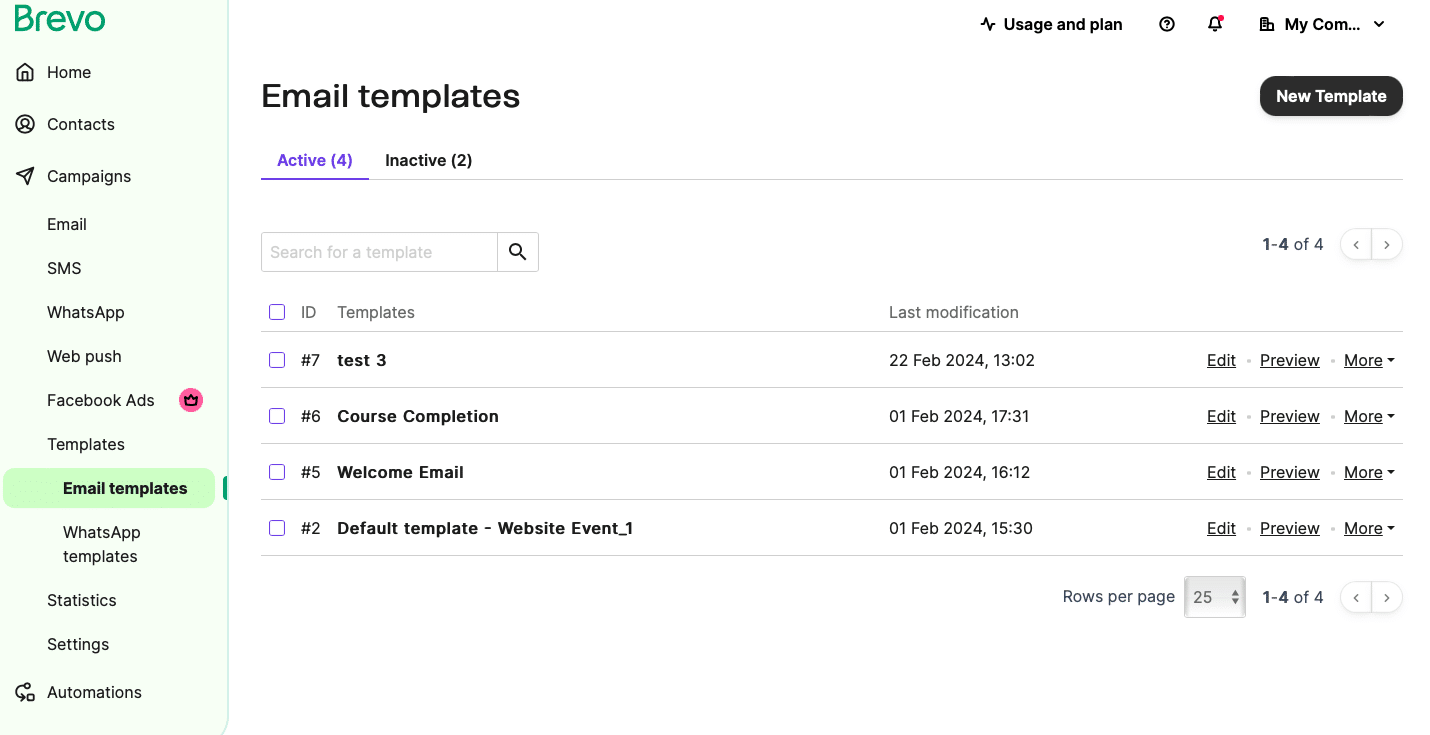
- A new tab will open and you’ll be asked to populate the basic info about your template i.e. Name, Subject, Preview Text, and who the email is from. We suggest creating your welcome email first, so go ahead and name this template “Welcome Email” and customize the other fields to your preference. Then you’ll click “Next Step” in the upper right-hand corner.

- On the next page, design choices will appear. You can have fun browsing through the template gallery, or just start with the basics with the default template to get familiar with the process.
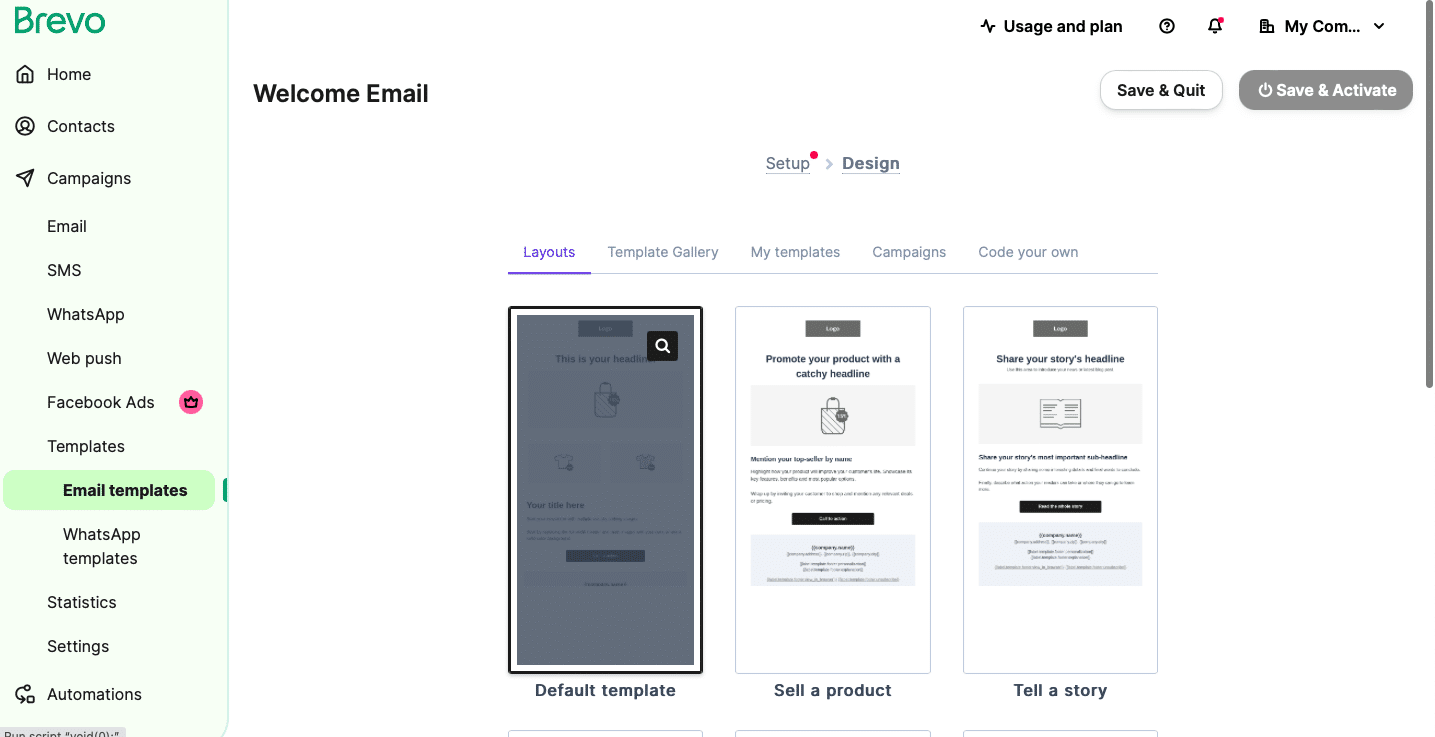
- Once you select a template, many customizable options will be available. You can add text, images, videos, logos, payment links, and more. Take some time to play around and create your welcome email – this is another fun part of all this technical stuff.
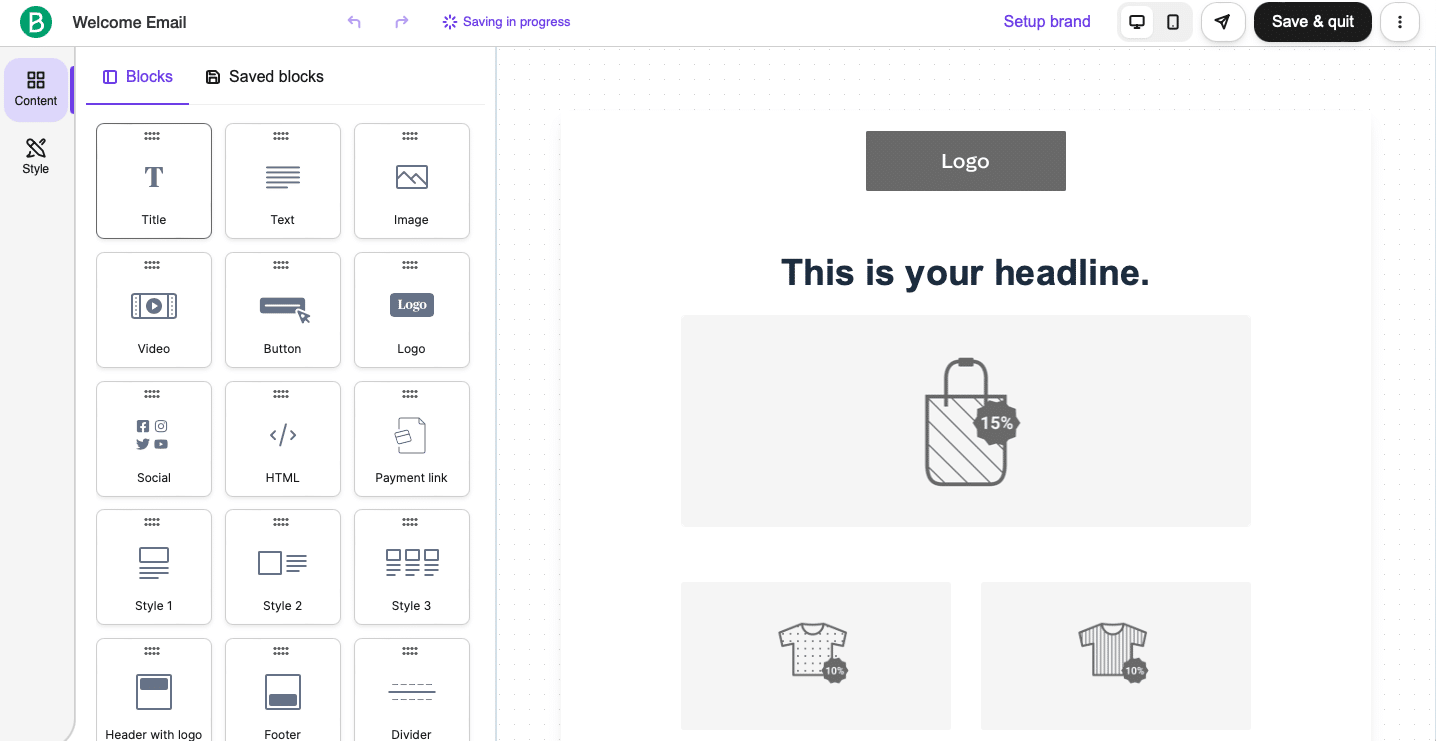
- Once you’re done, select “Save & quit” in the upper right-hand corner. You can then preview your email and click “Save & Activate” to activate your template.
- Next, return to your automation page, and the template you just created should appear on the drop-down menu. You’ll select this template and click okay.
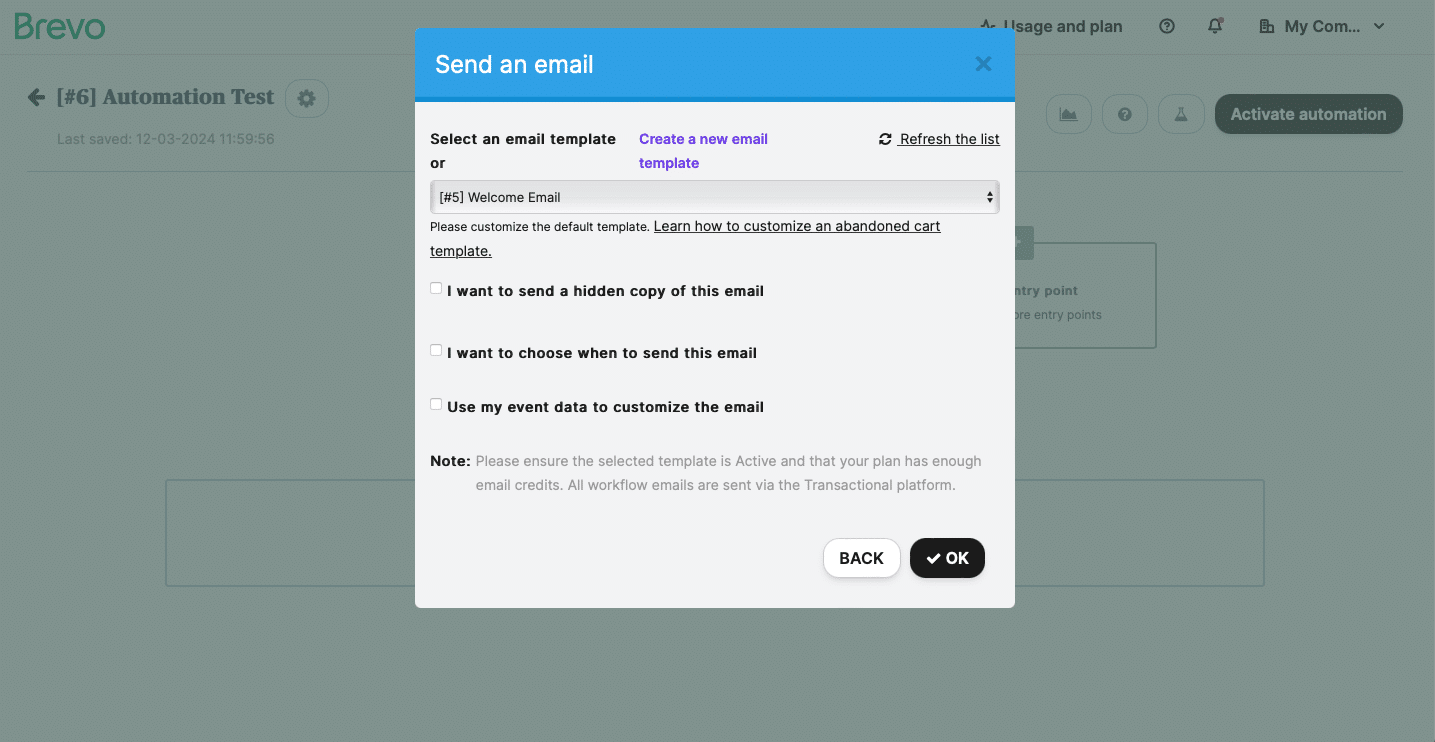
- After this, you can select “Activate automation.”
#Check Lists on WP Fusion
- At this point, you’ll want to check the backend of your website and WP Fusion settings. Go to the WP Fusion plugin from your WordPress dashboard and navigate to “General Settings > Assign Lists. When you click your cursor in the text box next to Assign Lists, the list “Free Access Enrollment” should appear.
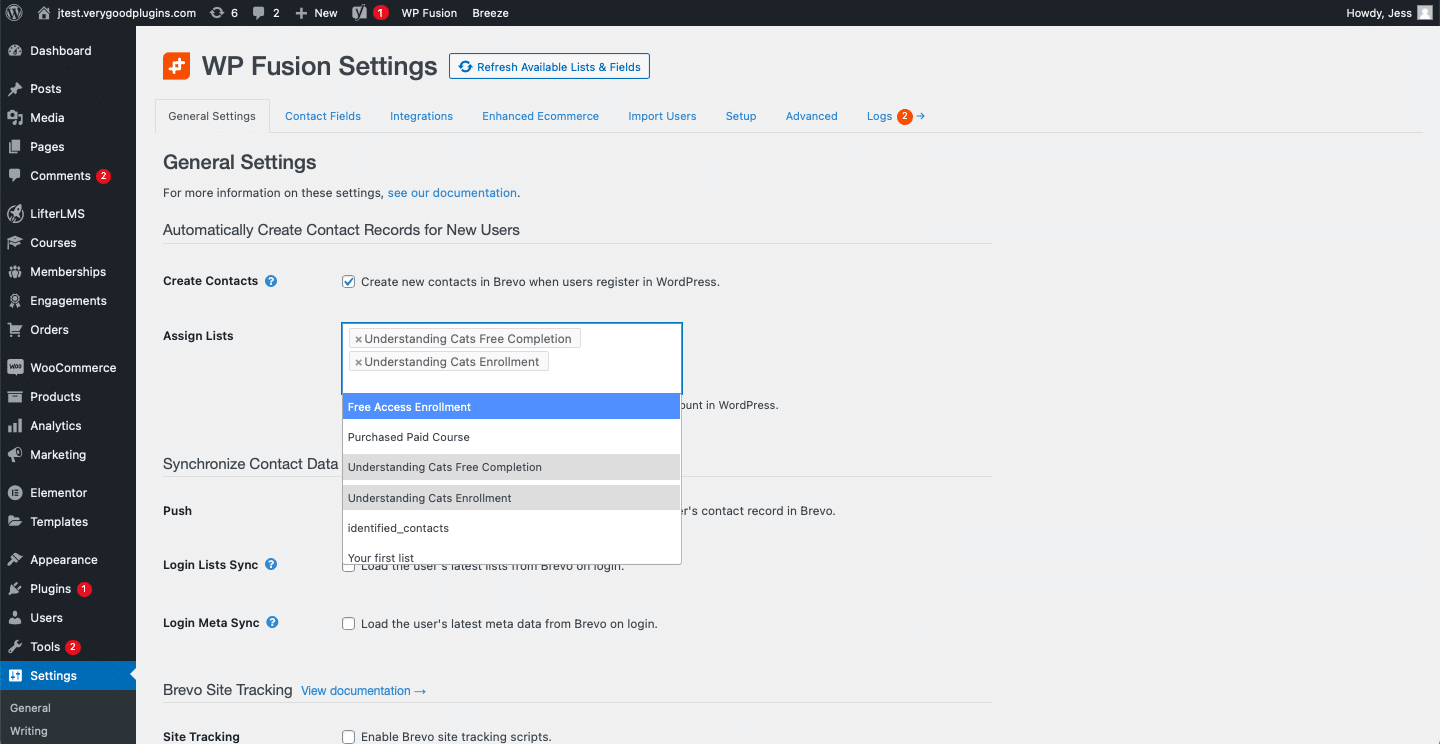
- If you don’t see the List you want to assign, you can click “Refresh Available Lists and Fields” at the top of the page. Additionally, you can type the first few characters of the list you couldn’t find in the search bar and text should appear that says, “No results found: click to resynchronize.” Then you’ll click this field to resynchronize.
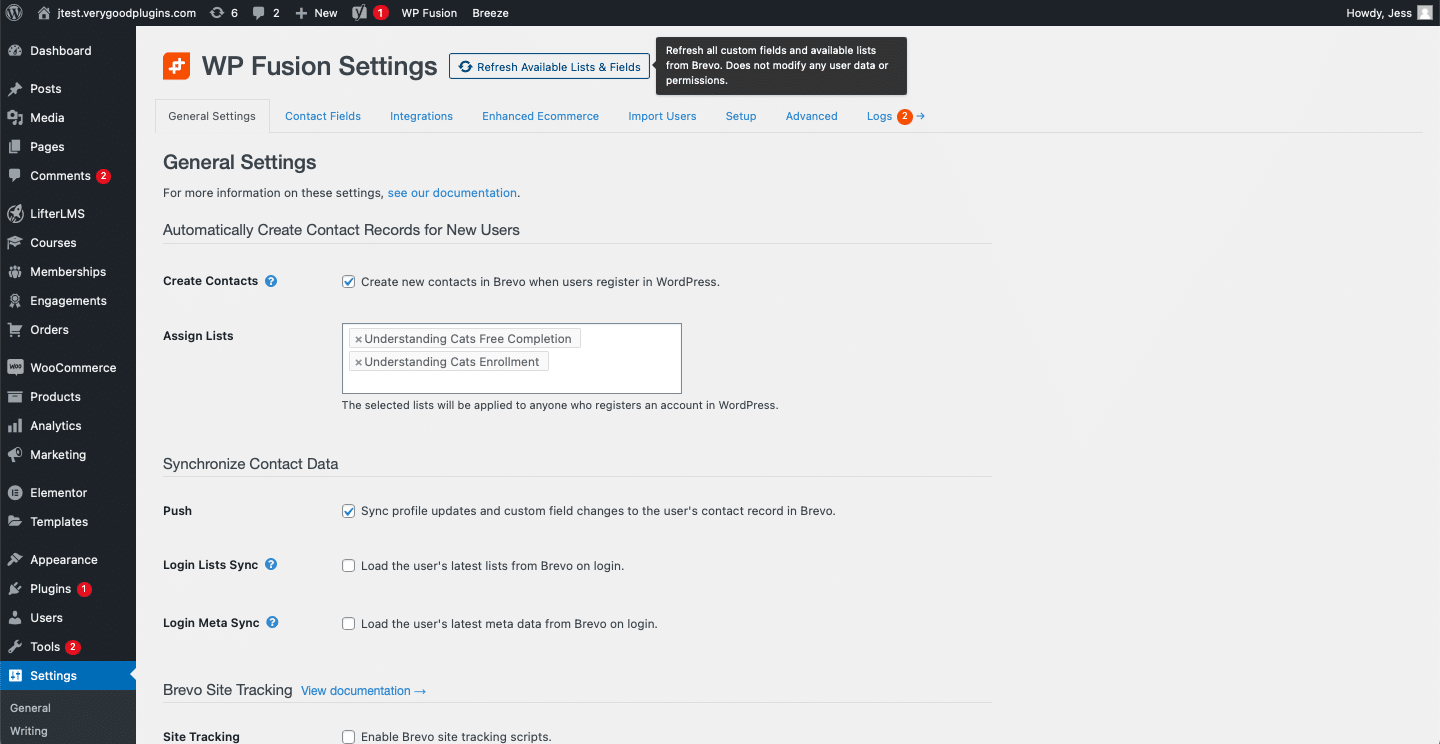
- Following this, your lists should appear in the Access Plan section in your LifterLMS course.
#Restricting your course for free enrolled or paid members
This step was a little bit tricky for me to figure out, so I’m going to explain the process first in plain language before walking you through the steps. To create a payment gateway and restrict access to some modules of your course, you’ll first need to apply the lists you created to your Access Plans. This allows your members to be categorized, for example in the “Free Access” group. A member will sign up for the “Free Access” plan, and then be categorized into this group of members. Following this, you apply the corresponding lists to your course modules and this creates the payment gateway. Members who signed up for the Free Access Plan are now on the “Free Access” list, and then you apply the “Free Access” list to the course module/s that you want to be available for free. If you’re still a little lost, don’t worry, the instructions below are simple and easy to follow, and it will all make sense in the end.
There are a few previous instructions that I gave beforehand which should help you to move through this process easily. Just to make sure that you’re prepared for what’s next, let’s double-check that you have a few elements already established.
- Did you set up different tiers of Access Plans including one that is titled “Free Access”?
- Did you create lists with titles like “Free Access Enrollment,” “Free Course Completion,” and “Purchased Paid Course”?
If those elements are set up, then you’re ready to go!
#Apply Lists in Access Plans
- Now that you’ve created a Welcome Email and lists for free enrolled and paid members, it’s time to apply these lists to your access plans and your course modules.
- Navigate to your LifterLMS course from your WordPress dashboard.
- Once you’re on your LifterLMS course homepage, scroll down and navigate to your Access Plans.

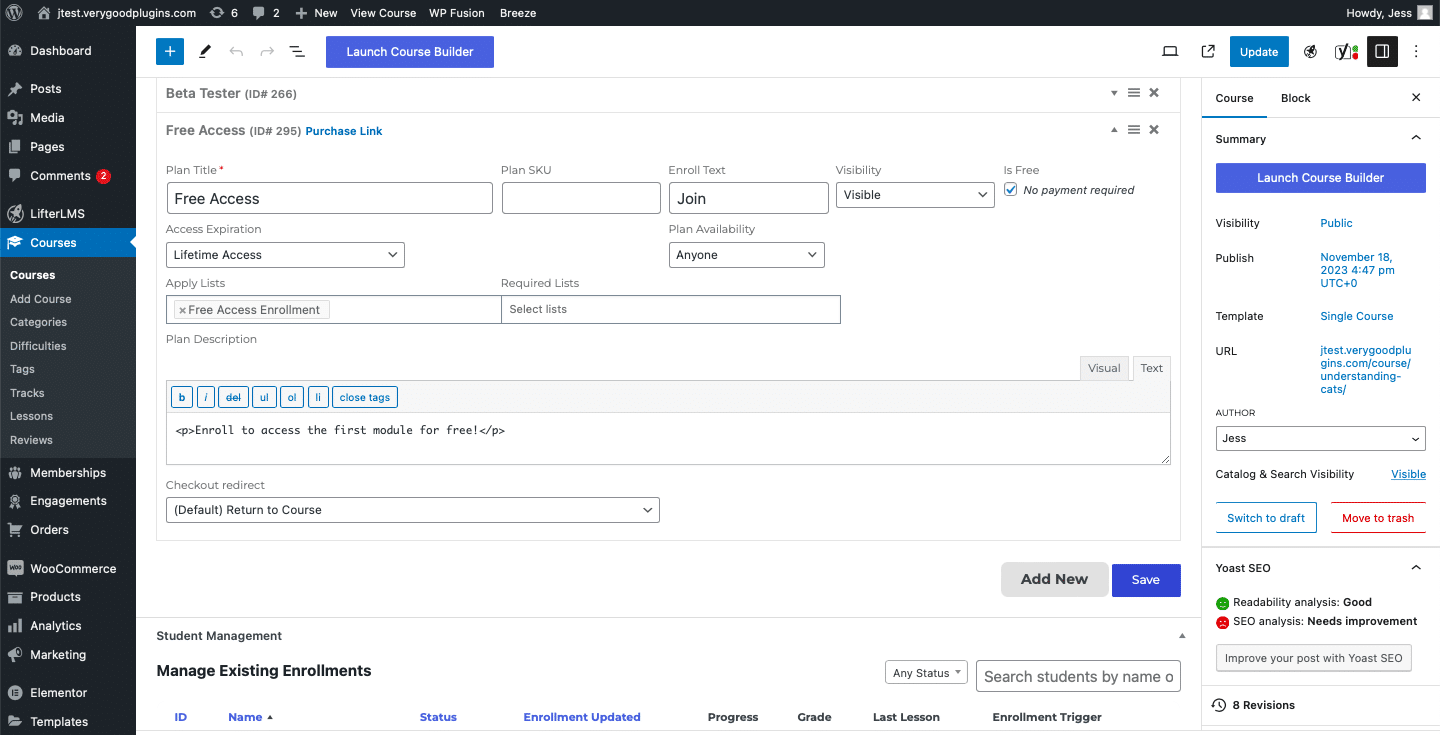
- Then, click the Access Plan that is free. Navigate to the heading “Apply Lists” and click the text box beneath this heading.
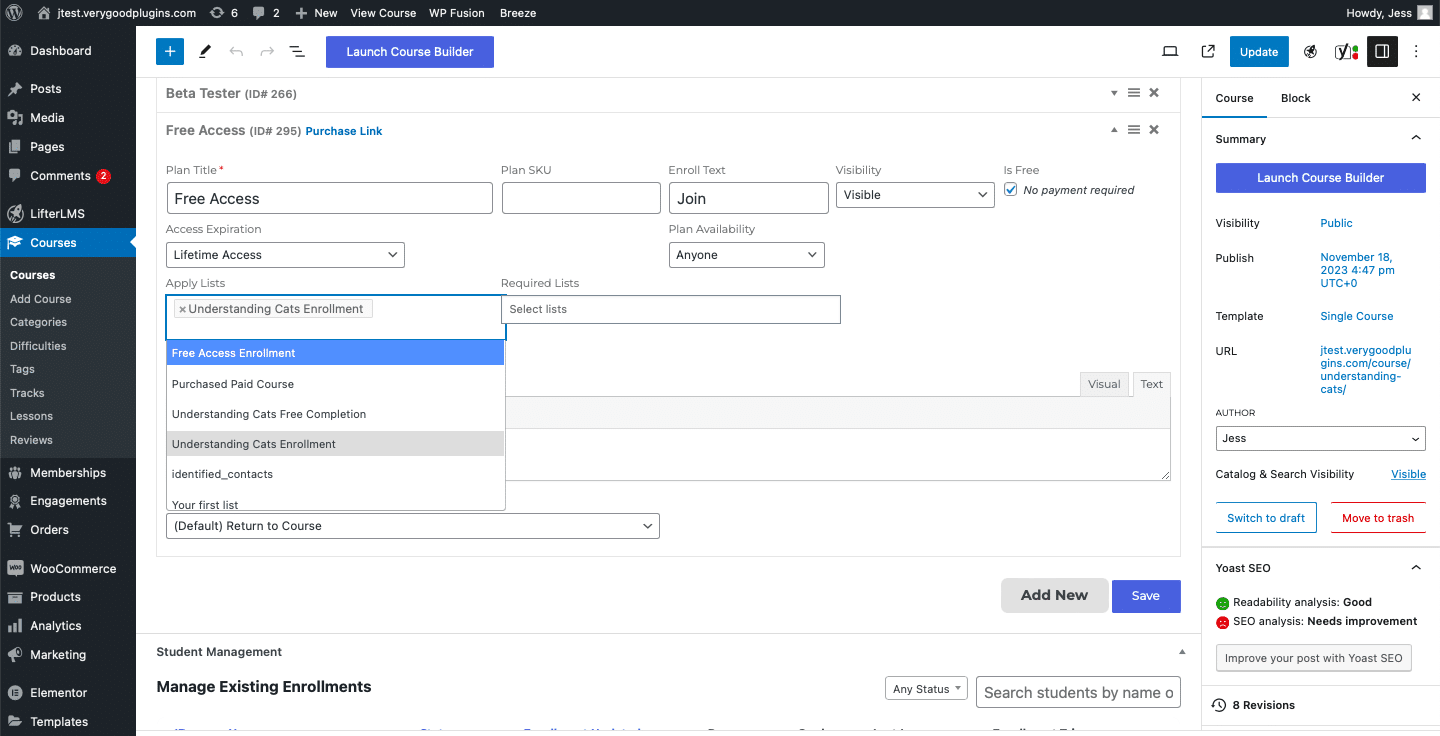
- The lists you created should appear. Select the “Free Access Enrollment” List. Next, click the blue “Save” button below the Access Plan details in the lower right-hand corner.
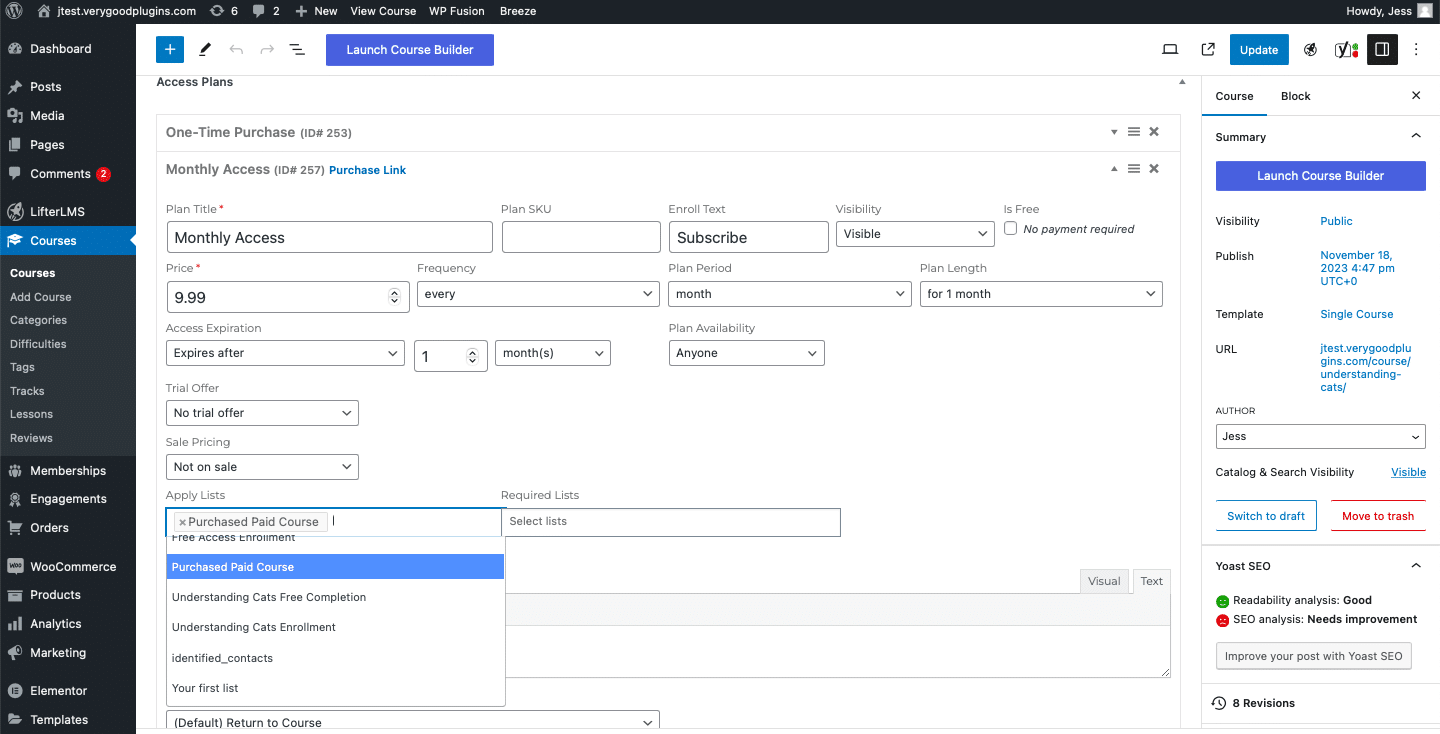
- Select one of your paid Access Plans. Go through the same process as described above but apply the “Purchased Paid Course” List instead. Repeat this process for all your paid access plans. Be sure to save after applying your lists! I forgot this step at one point and it caused some issues.
#Apply Lists in Course Modules
- Launch your course builder and expand the first section of your course. We suggest making the first section of your course part of the free access plan, but you can customize this.
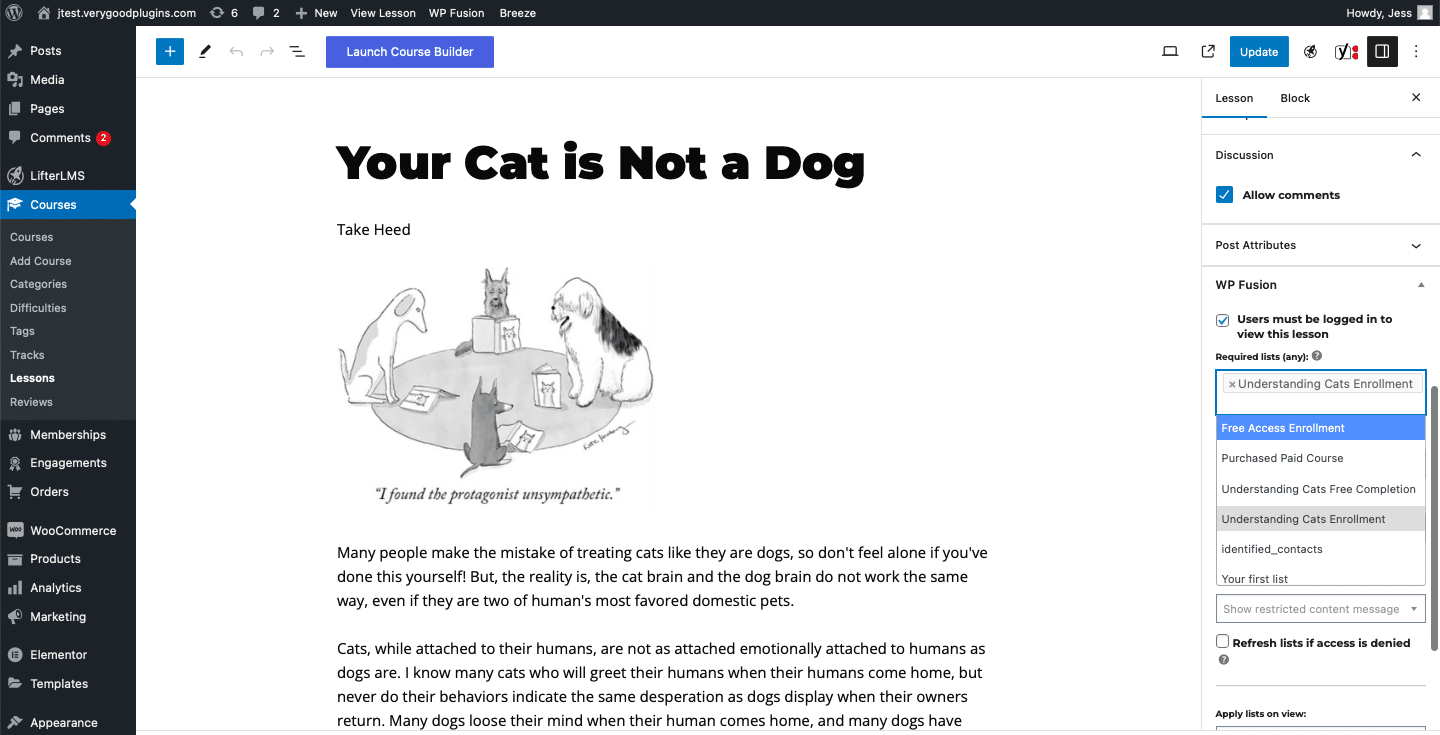
- Navigate to Lesson 1 in your course and open the WordPress lesson editor by hovering your cursor over “Lesson 1” and clicking the “W” icon that appears to the right of the lesson.
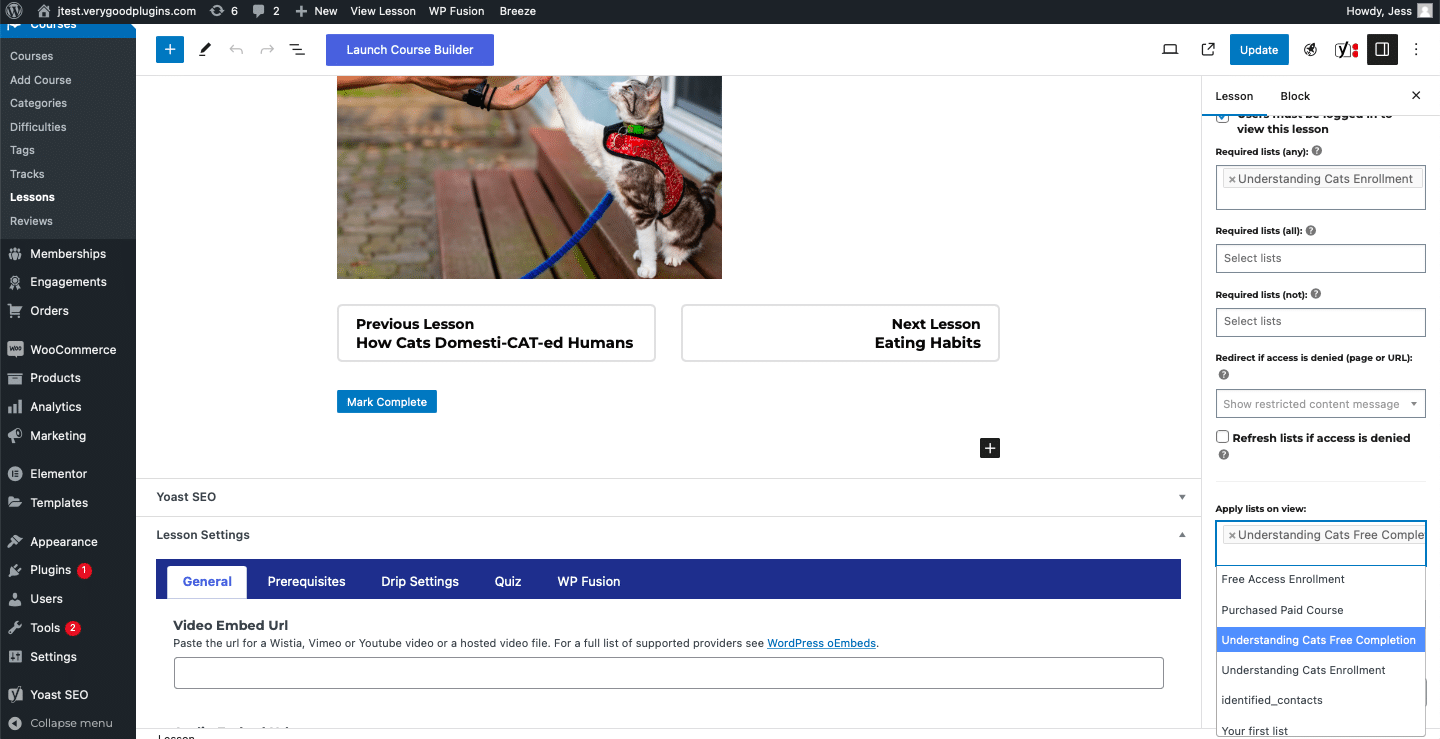
- Then, go to the sidebar on the right-hand side and scroll down to the WP Fusion heading. First, click the box that says “Users must be logged in to view this lesson.” Next, there is a heading titled “Required Lists” with a text box beneath it. Click your cursor in the text box and your list of options should appear. Select your “Free Access Enrollment” list and click the blue “Update” button at the top of the page.
- Repeat this process for every lesson that you want to be included in your Free Access Plan.
- Then, for the lessons that are part of the paid access plan, repeat this process, but choose the “Purchased Paid Course” list instead. Be sure to click the blue “Update” button after choosing each list.
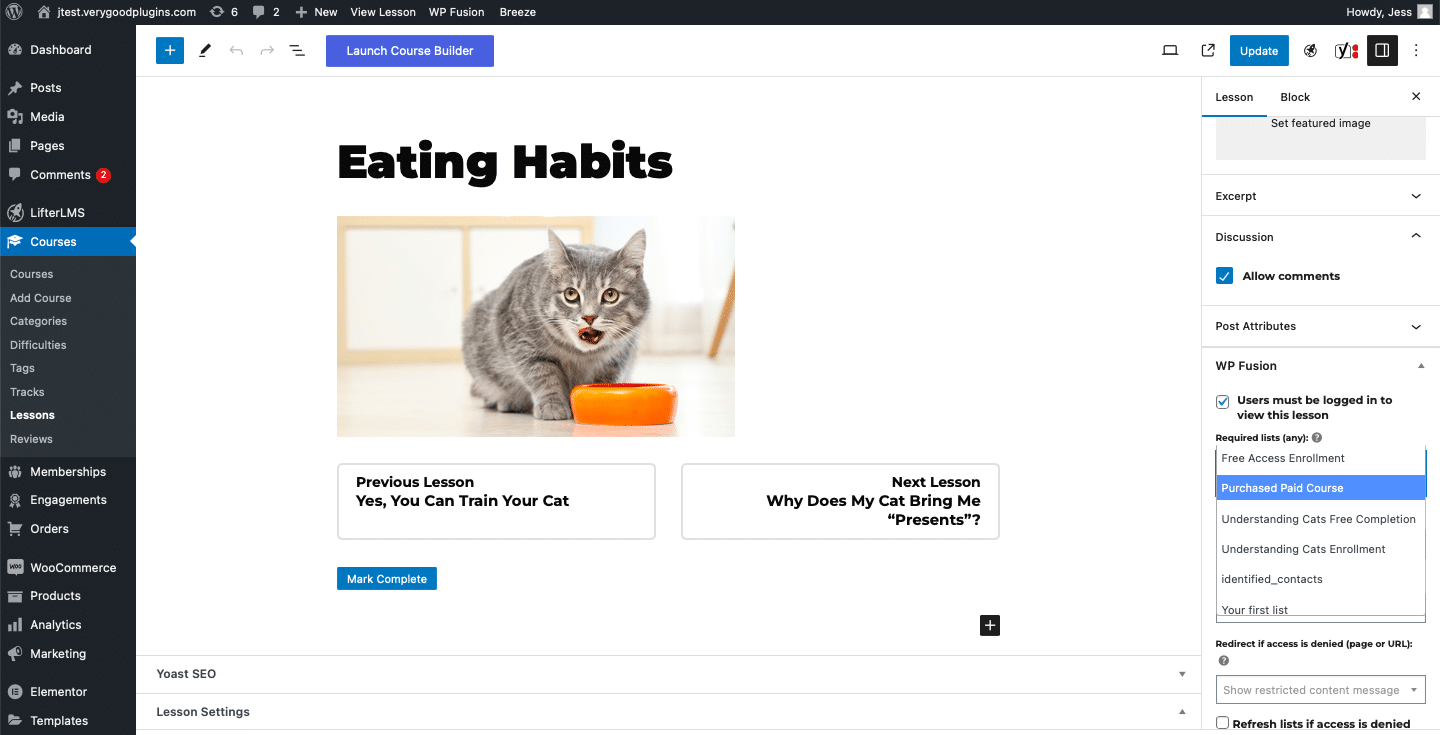
- You’ve now restricted your content to enrolled and paid users!
#Create email automation for Members that complete your course
- Now we’re going to create an automated email congratulating members when they complete your free course. First, navigate back to your Brevo homepage.
- Repeat steps 2. Create your Automation and 3. Create your Email Template, but title this automation “Free Completion Email” and choose the “Free Course Completion” list to be associated with the “Free Completion Email” automation.
- Additionally, when you create your email template, create content congratulating members on their free completion.
- Now we’re going to apply the “Free Course Completion” List to a lesson in your course. Navigate back to your LifterLMS course.
- Next, in the LifterLMS course builder, navigate to the last lesson that you want to be included in the Free Access plan of your course. Now you have two options of when to send the completion email.
Option 1
- Below the course content you’ll see headings in a blue bar titled “General,” “Prequisites,” “Drip Settings,” “Quiz,” and “WP Fusion.” Click WP Fusion.
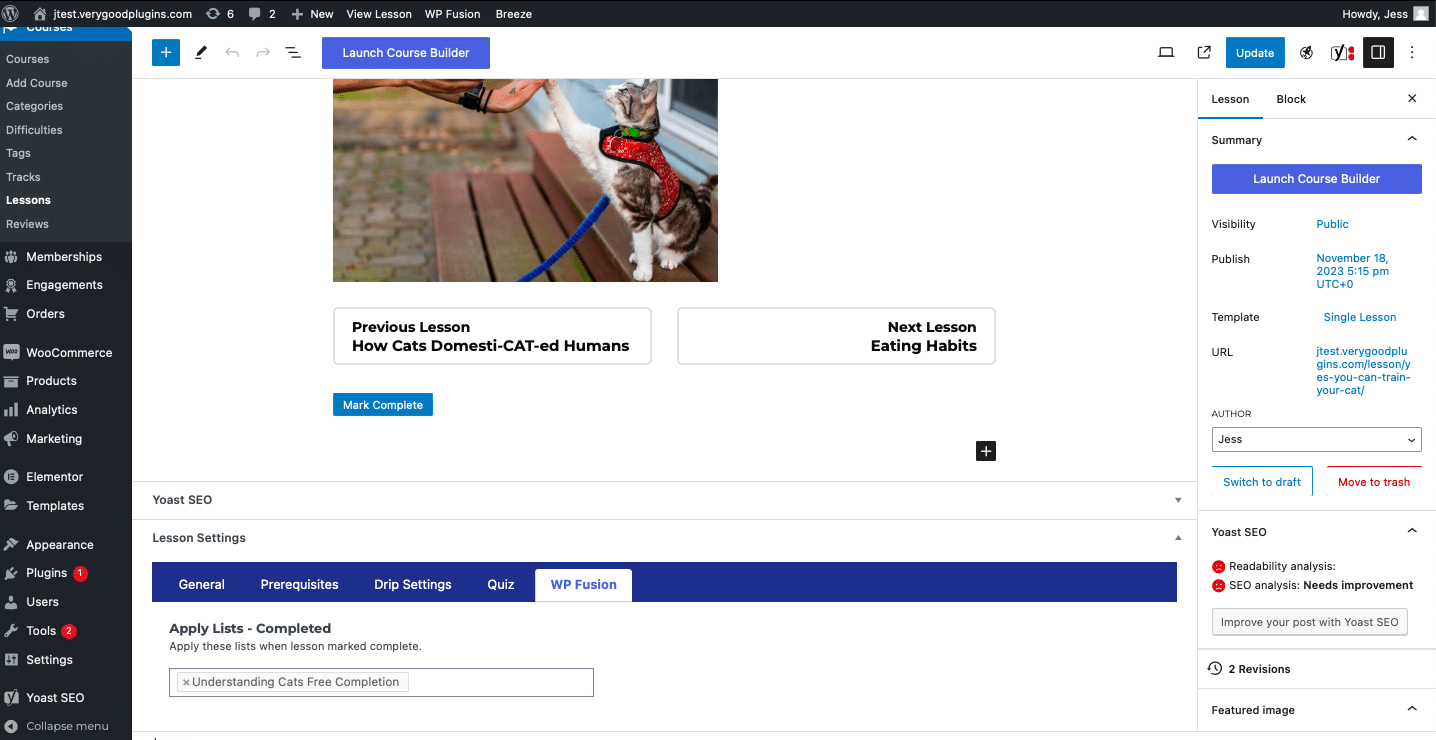
- You’ll then see the drop-down menu to Apply Lists. Click this box and select the “Free Course Completion” List. This will cause your members to get the completion email when they select the “Mark Complete” box at the bottom of your course content for this lesson.
- Update your changes by clicking the “Update” button in the upper right-hand corner of your webpage.
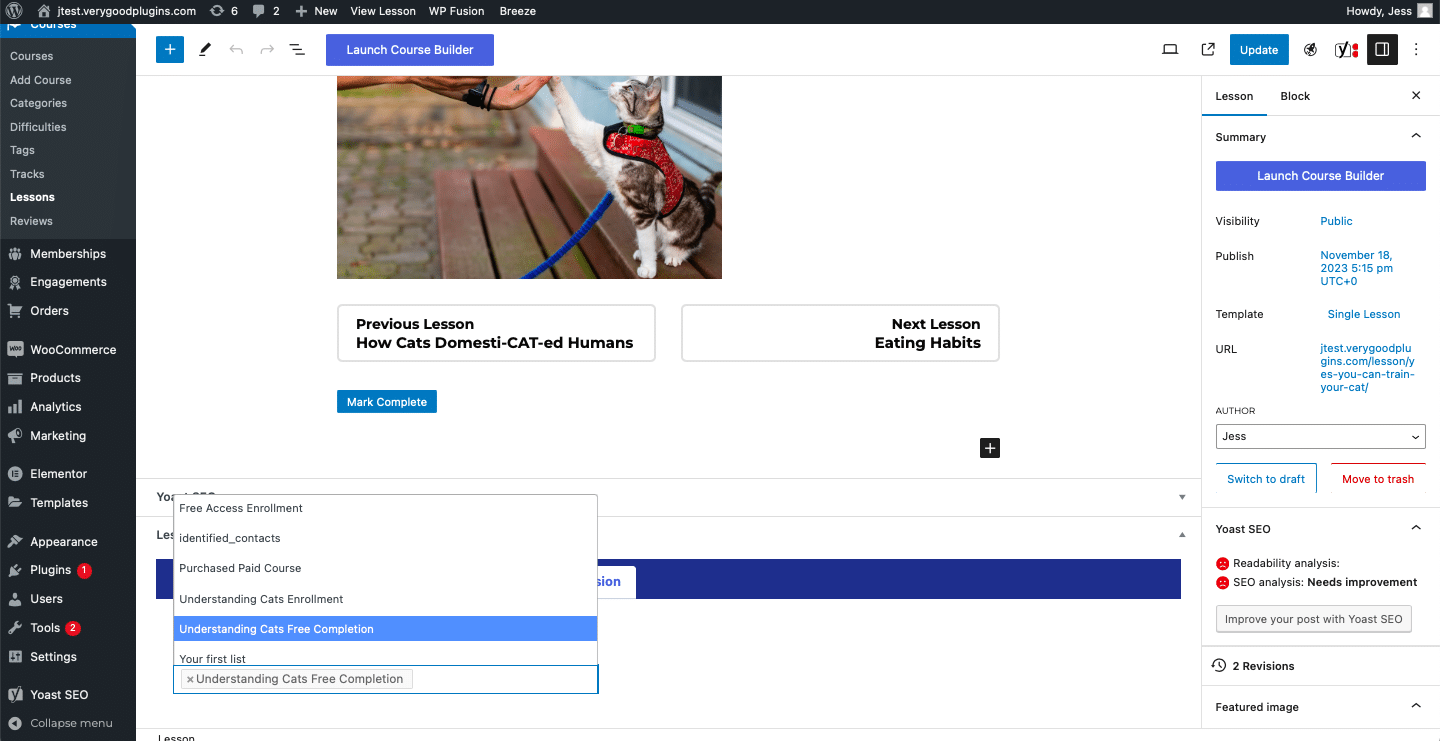
Option 2
- Navigate to the right-hand sidebar in the same lesson. Scroll down until you see the heading “Apply lists on view.”
- Click this box and select the “Free Course Completion” List. This will cause your members to get the completion email when they simply see this page for the first time. Update your changes by clicking the “Update” button in the upper right-hand corner of your webpage.
- I chose this option because I figured some people will just forget to click the “Mark Complete” button, and I want to make sure they get the email congratulating them and informing them about the paid versions of the course. But this is up to you!
#Test out Your Automated Email (Final Step!)
- Log out of your WordPress account and go to your website. Then navigate to where customers would enroll in the course and use a test email to sign up for your course.
- Check the inbox of the email used to sign up for your course for the welcome email you created.
- You should receive your welcome email.
Congratulations on creating your first course, connecting your students to your email list, and creating a welcome email!
Promoting Your Course
When creating a second course on your website, first and foremost inform all of your current students about your new course with an email – which is exactly what WP Fusion supports.
If this is your first course, there are other methods to promote your course. However, these options will still apply to instructors marketing their subsequent courses.
Email Marketing
First, you can create a lead magnet to attract potential students. This might include free resources like guides or worksheets, and you can offer this for free in exchange for an email address. Then they are on your email list, and you can send them targeted emails promoting your course.
Free Trial or Partial Access
A free trial or partial access allows you to showcase your course content and lowers the barrier of entry, which ultimately attracts customers. It also builds trust and reduces purchase anxiety, as free access demonstrates your confidence in the value of your course and users feel more comfortable having a risk-free opportunity to explore your course.
Collaborate
A great way to promote your course is to include others with an online presence in your course. This way, they can advertise your course to their customers.
Content Management
Create engaging content for your target audience with blog posts, articles, or videos to establish your expertise and attract potential students. This takes a little more time than some of the other promotional methods but ultimately is worth it.
You’re Done!
Hurrah! Thanks for sticking with me on this journey and I hope you found this tutorial helpful. If there’s anything you still find confusing, our customer service is ready to support you. We also have a list of FAQs if you’d like to check those out as well. Last but not least, leave a comment if you found this tutorial helpful or if you would like more clarity on one of the steps. My goal is to help beginners not feel intimidated by technology that might be out of their comfort zone, so I appreciate your feedback.
Get automated. Get WP Fusion.
Sync your LMS students with your marketing lists in real time using WP Fusion.
Buy WP Fusion