#Learn how to use GravityView and WP Fusion to create and support your business directory
Are you using WordPress to create a business directory for the first time, but don’t know exactly where to start? Maybe you’re comfortable using WordPress, but don’t have much experience working specifically with GravityView and WP Fusion. Or perhaps all of this is new to you, and WordPress is completely uncharted territory.
Regardless of your expertise, this tutorial will guide you through the steps of how to create a business directory using Gravity Forms and GravityView and then walk you through using WP Fusion to integrate it with your CRM.
Before we get started, I’ll give an overview of the central software we’ll be using and what you’ll have accomplished by the end of this tutorial. Onward!
#Quick Note on Terminology
Some of you reading this will be fully immersed in the field of tech and understand all of the language I use in this post, but not all of you will. For some of you, some terms will perhaps be brand new to you, or maybe you just haven’t memorized exactly what all these terms are.
With these newbies in mind, there is a short glossary at the end of the post with clear and concise definitions.
Terms in the glossary will be underlined and in blue text like this throughout the post. You can click the word and it will take you to the glossary at the bottom of the page. I’ve also included a few terms used in other instructional guides featured in this post. Heads up, CRM is the first glossary term in this post, which I used in the previous paragraph.
#Gravity Forms and GravityView at a Glance
Gravity Forms is a WordPress plugin that gives users the ability to easily create complex forms. Many WordPress site owners use this plugin because it is efficient, very flexible, and has advanced form functions that similar plugins don’t have.
GravityView is also a WordPress plugin, and it enhances the functionality of Gravity Forms by giving users various options to display the form entries on their websites without having to use custom coding. Essentially, GravityView allows the entries you collect with Gravity Forms to be used to create listings, tables, directories, maps, charts, and more.
#WP Fusion Overview
WP Fusion is also a plugin for WordPress, and it allows you to integrate your website with your CRM, which in turn enables site owners to sync user data, track user interaction, and automate marketing workflows.
By syncing user data and automating workflows, WP Fusion helps streamline marketing efforts, improve customer relationships, and create personalized user experiences. We’ll mainly focus on the automated marketing through emails in this tutorial.
#Goals of this Tutorial
By the end of this tutorial, you will have a fully functional business directory established on your website and three automated emails that will be sent to users who enter their business information into your business directory.
The first email will let the applicants know that their entry is waiting to be approved, the second email will inform them when their entry is approved, and the third email will ask them if they need to update any information in their entry. We will set up the automation so that this third email is automatically sent to approved applicants every year.
These automated emails are made possible by integrating WP Fusion with GravityView.
Let’s get started!
#Building a Business Directory with Gravity Forms
This tutorial will walk you through the first few basic steps of building your business directory, but GravityKit has a great instructional guide to complete the process. The link to this guide is also included in step five below.
- First, on your WordPress Homepage, navigate to Forms and then New Forms.
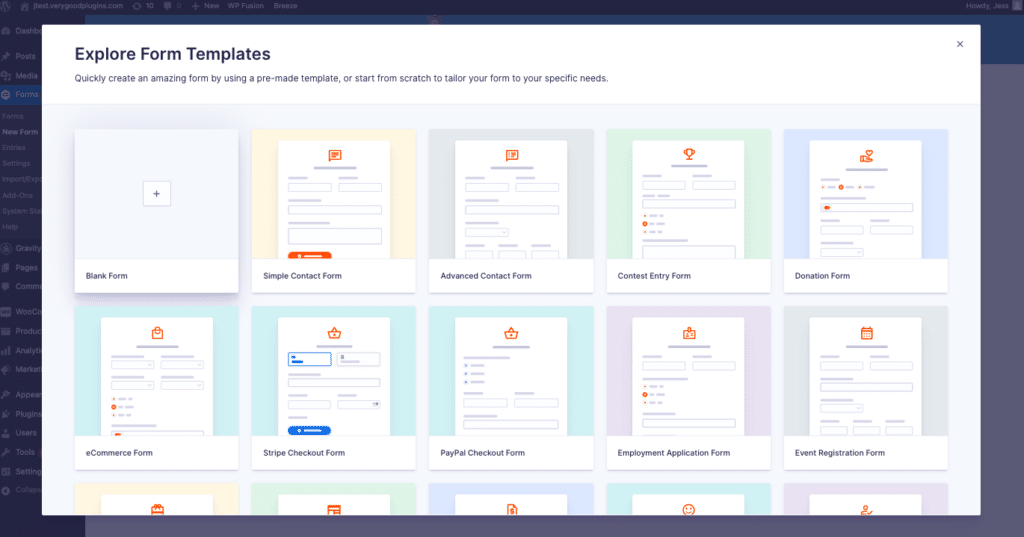
- You will be asked to explore form templates, but you can select “Blank Form.”
- You’ll then be asked to give your Form a title and a short description. You can title this form “Business Directory.”
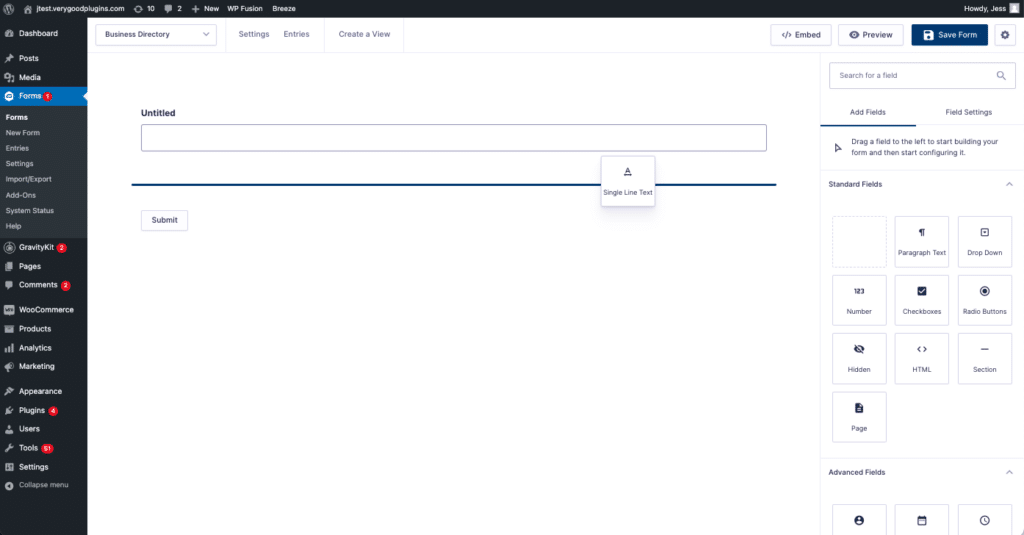
- Now you’ll be able to drag and drop the relevant fields for your form. You’ll need to add fields for all of the relevant information that you want to display in your directory.
Note: As you add new fields to your form by drag and drop, you have to drop the new field you want to add above the “submit” button.
- Here’s the instructional guide from GravityKit to finish the process of creating the directory listing form using Gravity Forms.
- After you’ve added all relevant fields, be sure to click the dark blue “save form” button in the upper right-hand corner before moving forward.
- You can continue to follow the instructions in this post for Creating a View to display Gravity Forms entries.
#Setting Up Your CRM
Now we’re going to create a few tags and an automation with Active Campaign. This will ultimately allow emails to be automatically sent to users with entries in your business directory.
We’re going to create an email letting users know their entry is pending approval, a second email letting them know when the entry was approved, and a third email reminding them to update their entry a year later.
WP Fusion lets you connect the automation you create in Active Campaign to your website’s business directory. The tags you create in Active Campaign will be synced with Gravity Forms by WP Fusion, and these tags will allow the emails to be sent automatically to leads and users.
#Creating Tags
- We’re going to create two tags. These tags will be titled:
- Business Directory Application
- Business Directory Application Approved
- First, navigate to the lefthand sidebar in Active Campaign and select “Contacts.”
- After selecting “Contacts,” you’ll select the “Tags” subheading under the heading “Manage.”
- Now you should be on the Tags page and can add a new tag by clicking the blue “Add tag” button in the upper righthand corner.
- In the field box, write out the tag names “Business Directory Application” and Business Directory Application Approved.”
- We’ll come back to these tags soon when we’re bringing everything together.
Get Automated. Get WP Fusion.
Integrate GravityView with your email marketing list today
Get WP Fusion#Creating Your Automation in Active Campaign
Now we’re going to create the automation, which will include designing three emails 😎
#Creating an email notifying users their entry is pending approval
- Navigate back to the sidebar on the lefthand side. The fifth icon below the top arrow is the Automations button. Click it.
- Once you’re on the automations page, you’ll select “Create an automation” in the upper righthand corner.
- You will see a number of options for your automation. Select the first option “Start from scratch.” Then click “continue.”
- Next, you’ll be asked to select a trigger. Select “A tag is added.”
- Now you’re going to choose which tag will trigger the automation. On the next page title “Action Option,” click your cursor into the box next tot he heading “Tag” and type “Business Directory Application.” The tag you created a few steps ago should appear. Select it, and then click “Add start.”
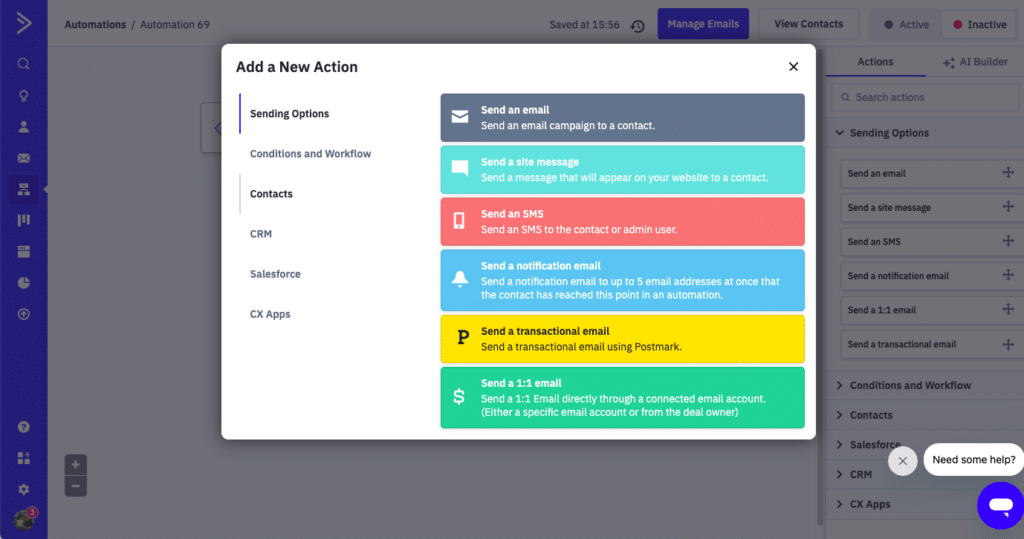
- After this, another window will appear titled “Add a new Action.” You want your users to receive an email saying that their entry request has been received, so now you’ll choose the action, “send an email.”
- Then you will be asked to create an email. You can title this email, “Your Entry is Pending Approval.” Below the email title is the heading, “Design your email.” Click “Start with a template.”
- This will automatically take you to another page that will ask you to choose a template type. Select “email designer” and then click continue.
- The next page will give you multiple templates to design your email. They will have titles like “New Blog Post,” “Product Back in Stock,” “Subscription Alert” etc. You can play around with this and choose whichever template you like. I chose “New Blog Post” for my template because I found it the most appealing.

- Then a window will appear titled “Sender Details” and you’ll be asked to give an email subject, which will also be “Your Entry is Pending Approval.” After titling the email, click continue.
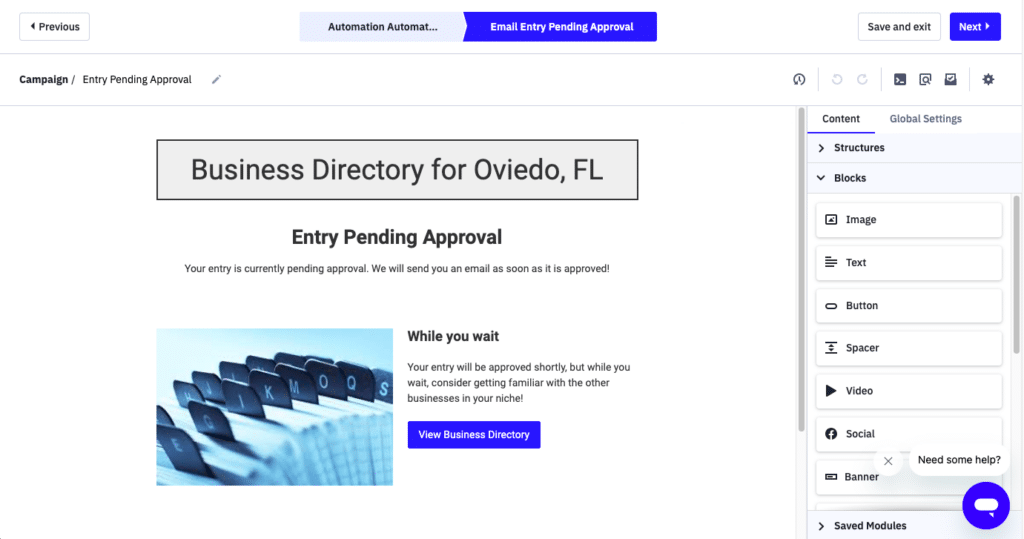
- Now you get to design your email! When designing, be sure to include information letting the recipient know that they will receive an email once their entry is approved. If you’re interested in getting some guidance to design your email, you can check out some of these tutorials from ActiveCampaign.
- Once you’ve finished designing your email, click the blue “next” button in the upper right-hand corner.
- You can then choose a preheader for your email. Then, click “Finish” in the upper right-hand corner.
- Another small window will appear with the heading “Select an email to send.” Make sure you select “send immediately” and click save.
- You’ll then be taken back to the overview of your automation.
- Next, you’re going to select “View all automation actions.”
- When you click this a window titled “Add a new action” will appear, and you’ll select “Conditions + Workflow” on the left-hand side and then the option “Goal.”
- Then, a new box will appear with the heading “Add a Goal.” In the text box with the words “(select a condition)” type in “Tag” and select Tag in the drop-down menu. In the second box to the right, make sure the option “exists” is selected. In the next box, type in “Business Directory Application Approved” and select this tag in the drop-down menu.
- In the other two drop-down menus below, select “Below contacts position” and “Wait until conditions are met.” Be sure to click “save” at the end.
#Creating an email notifying users when their entry is approved
Now we’re going to go through this process of creating an email again, but it will include slightly different content.
- Below the “Goal: Application Approved” part of your automation, you’ll see a little “+” symbol. Click this in order to begin creating your next email.
- After clicking the “+” symbol, a window will appear titled “Add a New Action.” You’re going to select “Send an email.”
- Next, you’ll be asked to title the email and the title of this email should be “Your Entry was Approved.” Then select “Start with a template,” which will automatically take you to the “Choose a Template Type” and you’ll select “Email Designer,” and click continue.
- As before, I selected the “New Blog Post” template. You can choose any template you like. Next, you’ll be asked to give the email a subject, which should be, “Your Entry was Approved.” Then click continue.
- Now you’ll design your second email. Be sure to mention that the user can visit the directory at any time to edit their entry.
- You can also include a link in this email giving users the option to have their entry featured, which would increase the views of their entry. To enable this, download and install the Featured Entries addon from GravityKit. This addon allows users to pay for a featured position in your business directory.
- Again, be sure to click “Save + Exit” in the upper right-hand corner.
- When the “Select an Email to Send” window appears, choose “Your Entry was Approved” and select “send immediately.”
#Creating the last email reminding users to update their entry
- This last email will remind users to review their directory entry. Remember, when users review and update their entries this ensures that the information is current and accurate, which enhances your directory’s reliability. And this reliability is the foundation for an improved user experience, enhanced communication between businesses, increased engagement with the directory, and an overall professional image and credibility.
- At this point, you’ll be back at your automation. You should see a box below the “Your Entry was Approved Email” titled “Suggusted Next Steps” and the option to “View all automation actions.” Select “View all automation actions.”
- In the “Add a New Action” window, select “Conditions + Workflow” on the left-hand side, and then select the white “Wait” button at the top.
- Now you’re going to add a wait condition. You can select “wait for a specified time period” and then choose “1 year(s).” Click “save” when you’re done.
- Now we’re going to go through the same process as earlier to create your last email.
- Click “+” symbol
- Add a new action
- Select “Send Email”
- Title your email “Is Your Listing Up to Date?”
- Select “Start with a Template”
-
- Select “Email Designer” and click continue
-
- Choose your own template.
- In the “Sender Details” window, give your email the subject “Is Your Listing up to Date?” and click continue.
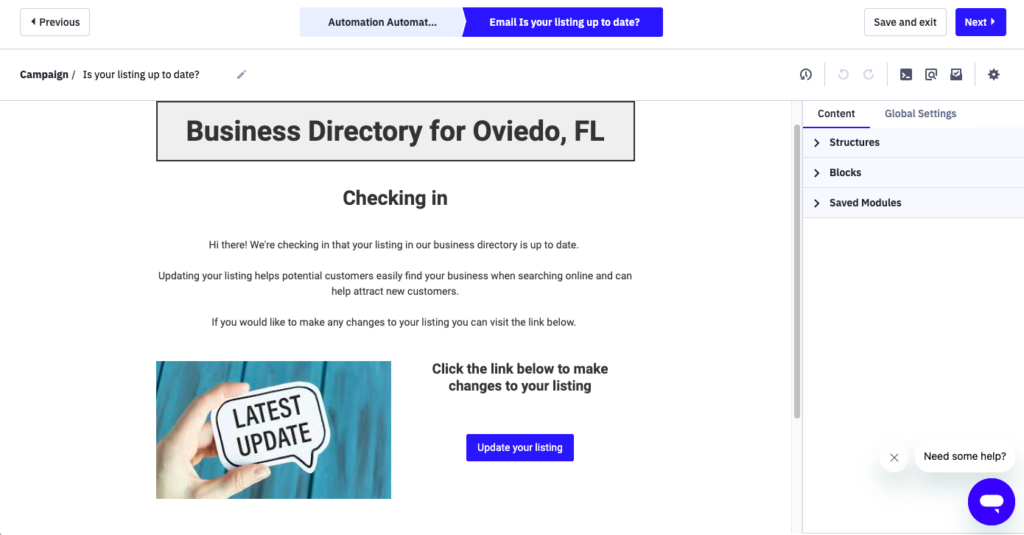
- In the email design, be sure to let users know the advantages of updating their listing and provide a link in the email that takes them to the directory so they can easily update their listing.
- To include the link to the directory, you’ll need to navigate to your website to retrieve the link to your business directory. Once you have the link to your business directory, you’ll have to create a button and make the button a link.
- Navigate to the right-hand side and select the drop-down menu “Blocks.” You should then see the “Button” option.
- Click and hold and drag the button option to wherever you want it to appear in your email.
- Next, click the “Button” block and you should see the option to add a link.
- This is where you’ll paste the link from your business directory mentioned earlier in step seven. Be sure that the drop-down option is selected to “Site” next to where you copy and paste the link. Now users will be able to edit their entry directly from this reminder email.
- At this point, you can play with the design of your button, like the label, font, color, alignment, and margins.
- Once you’re done with this step, remember to click “Save and exit”!
- When the select email to send box appears, make sure that the “Is Your Listing up to date?” email is selected and choose “Send immediately.”
- Now we’re going to create a loop that will send users this email reminding them to update their listing every year automatically.
16. In the “Suggested Next Steps” window select “View all automation actions.”
17. Select “Conditions + Workflow” and click the orange heading “Go to another action” option.
18. Now you’ll be taken back to your automation page. You should see a little green dot under “Go to another action” and an instruction to “click +drag to connect to another action.”
19. Click the green dot and drag the “string” to the little gray dot that is just above the “Wait for 1 year” action.
20. You’ve completed your automation! Users who create entries with your directory will be automatically informed via email when their entry is waiting to be approved, when it is approved, and when they should review and update their entry. By establishing this automation, you’ve streamlined your workflow and can now track your users’ behavior, both of which enhance efficiency.
Get Automated. Get WP Fusion.
Integrate GravityView with your email marketing list today
Get WP Fusion#WP Fusion configuration
The last step in the process is to configure WP Fusion with GravityView so that we can apply tags when entries to your business directory are approved. WP Fusion has two posts that will guide you through the first steps of this process. If you need more information about installing WP Fusion and connecting it to your CRM, see my tutorial: Step-by-step tutorial: Create and market an online course in WordPress.
- First you’ll need to integrate WP Fusion and Gravity Forms to create a WP Fusion feed for your form.
- Next, you’ll learn how WP Fusion integrates with GravityView to apply tags to contacts in your CRM. This post will give you an overview, and the following steps will give you additional detailed instructions.
- Once you’ve gone through these steps, navigate to Forms on WordPress. Click the “Directory” form you made earlier.
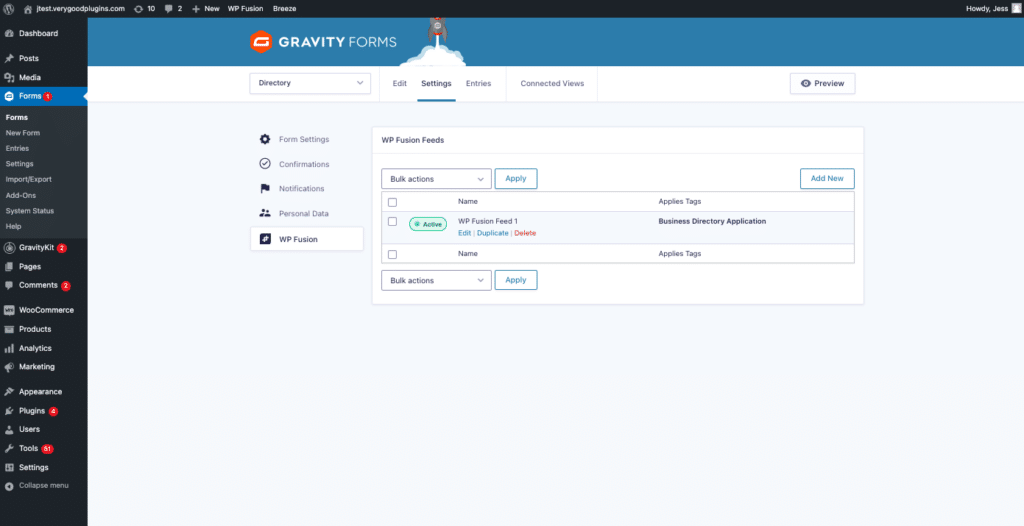
- At the top click “Settings” and then on the drop-down menu select “WP Fusion.
- The next page should show the WP Fusion feed you created when you configured WP Fusion and Gravity Forms in step 1. Select the feed you created.
- At the top of the next page you’ll see the headings “Feed Settings” and “Feild Mapping,” but scroll down to the “Additional Options” heading.
- Under “Additional Options” you’ll see the heading “Apply Tags.” Click your cursor into the box below this heading and select “Business Directory Application.”
- Below the “Additional Options” heading, you should see a heading titled “GravityView” and below this the sub-heading “Apply Tags – Approved.” In the box below this sub-heading, search for and select the tag “Business Directory Application Approved.”
- Be sure to select “Save settings” at the bottom of the page!
#The Last Steps!
Now we want to make sure that users can edit their own entries.
- Navigate to your WordPress homepage, to GravityKit, and then to All Views
- Select the Business Directory View you created earlier.
- On the next page, scroll down to the “Settings” heading at the bottom of the page.
- On the left-hand side bar under Settings, select “Edit Entry” and make sure the box next to “Allow User Edit” is checked.
- Scroll back to the top of the page, and save your draft.
- At this point you can preview your business directory on your website, and if everything looks good, you can publish!
#Can GravityView support me in creating other types of directories?
Absolutely! Although this tutorial is specific to creating a business directory, most of this process is similar to creating other types of directories, too.
For example, if you’re hosting an event and have a website for it, you’ll want to keep track of who registers so you know how many people are attending and be able to plan accordingly.
Educational institutions can also build student registration systems and application review systems for grants using Gravity Forms and GravityView. And if you’re a company needing a client portal so your clients can submit requests, you’ll follow a similar process as the one in this tutorial. All this to say, what you’ve learned/you’ll learn in this tutorial can be applied in other contexts.
You can try a free demo of a variety of GravityKit templates here, or check out their plans and pricing.
Congratulations on building your business directory! What parts of this tutorial did you find the most helpful? Or is there anything we could be more clear about? Let us know in the comments below. Your feedback helps us improve our instruction and know when we’re doing things right.
Get Automated. Get WP Fusion.
Integrate GravityView with your email marketing list today
Get WP Fusion#Glossary
Automation – An ActiveCampaign automation refers to a series of actions that are automatically triggered by certain events. In the context of this post, the event that triggers an action will be that a user submits an entry to your business directory and the action that follows will be that they receive an email. The goal of an automation is to streamline your workload while still enhancing customer relationships.
CRM – Acronym for Customer Relationship Management. A CRM is a system or software that supports businesses manage their interactions with customers to improve relationships and to expand their business.
Feed – In the context of this post and in WP Fusion, a feed involves multiple automation rules that connect your WordPress site to your CRM. Feeds help determine when and what data gets sent between your WordPress site and your CRM. They also determine how this data is used to execute effective marketing strategies with your users.
Tags – This is a label assigned to a user to categorize them in your CRM. Tags are assigned to a user based on what they do when they’re on your website. For example, when a user signs up for your email list, they would likely be assigned a specific tag. Assigning tags to users is part of the process of a feed, and therefore also supports your marketing strategies.


