Marketing automation can transform how you run your WordPress website, but it often feels out of reach for many small business owners, freelancers, and solo creators.
The biggest challenge is the high costs.
WordPress plugins like WooCommerce, LifterLMS, and Gravity Forms don’t sync natively with popular CRMs like HubSpot.
While there are budget-friendly tools that offer automation, they often come with feature limitations or complex implementation processes that eat up your time and patience.
What you really need is a lean, reliable system that works with the tools you already use without draining your budget or requiring custom development.
In this guide, we’ll show you how to:
- Use the HubSpot Starter Bundle (just $15/month per seat) for lightweight but powerful automation features
- Pair it with WP Fusion to sync key WordPress activities like purchases, form submissions, or course progress, directly to your CRM
- Build real-world automations such as onboarding emails, lead-nurturing sequences, or progress check-ins
You’ll walk away with a realistic, affordable automation plan that scales with your business, cuts out expensive bloat, and keeps everything running smoothly.
Let’s dive in.
#😞 Problems With “Budget” Automation Tools
When you’re just starting or trying to keep expenses under control, it’s tempting to grab the cheapest automation tool you can find.
But low cost doesn’t always mean low friction. In fact, many “affordable” tools end up costing you more in time, effort, or missed opportunities. Here’s what often happens with free or cheap marketing automation options:
❌ The free tier lacks critical features, such as no CRM sync, no email sequences, or limited email sends
❌ Data gets trapped inside WordPress, because some plugins don’t connect with external tools or CRMs without paid upgrades
❌ You end up paying for premium tiers just to unlock what you assumed was included (like tagging, triggers, or basic segmentation)
In the meantime, your leads might go cold, or your customers might never receive that onboarding email you thought was automated.
True affordability isn’t just about price, it’s about value. A low-cost tool that works inconsistently or requires hours of setup isn’t really affordable in the long run.
That’s why pairing WP Fusion with the HubSpot Starter Bundle is worth considering.
For under $50/month combined, you get a stable, flexible, and proven automation setup that syncs your WordPress data with your CRM, without surprise upgrade fees or complicated workflows.
#😇 Best Affordable Automation Tools: WP Fusion + HubSpot Starter Bundle
Together, they create a streamlined system that delivers real automation without breaking your bank.
✅ HubSpot Starter Bundle (starting at just $15/month per seat) offers list-based segmentation, email triggers and drip sequences, custom properties for lead tracking, and basic reporting and performance insights.
✅ WP Fusion acts as the bridge between WordPress and HubSpot. It lets you automatically tag users based on actions in your WordPress site (e.g., product purchase, form submission, course progress), push custom data into HubSpot properties, and trigger automations in HubSpot without writing a single line of code.
The result is a seamless, connected system where your website activity directly fuels your marketing efforts.
For example, if someone fills out a form on your site, tags are applied. A customer buys a product? They’re added to a list. A student completes a lesson? You send a progress check-in email.
This tag-and-trigger model gives you a flexible foundation for dozens of real-world automations, all without needing a developer or expensive enterprise tools.
Also, with this stack, pricing stays predictable:
HubSpot Starter Bundle is priced per seat, not per contact. You can store 1,000 or 100,000 contacts without seeing your bill skyrocket

WP Fusion Pro offers a flat one-time or annual fee. It connects your WordPress site with over 100 popular plugins and pushes data into your CRM automatically

This pricing structure is ideal for solopreneurs or micro teams who only need one HubSpot user, growing businesses that don’t want to be punished for building a bigger list, and WordPress users who prefer tools that integrate natively.
Supercharge your HubSpot integration.
Get started with the HubSpot Starter Bundle and unlock powerful automation, tagging, and personalization—right from your WordPress site.
Explore the Bundle Now#WP Fusion + HubSpot Starter Bundle vs. Other Automation Tools
Popular platforms like ActiveCampaign, ConvertKit, and MailerLite charge based on the number of contacts in your system. That might seem fine at first, until your list starts growing. Then, suddenly, your “affordable” tool jumps from $30/month to $150/month or more, just because you hit 5,000 contacts.
Even worse, many of these tools don’t integrate deeply with WordPress. You often need additional plugins, connectors, or Zapier workarounds just to track basic user activity like purchases or form submissions.
Here’s a quick snapshot of what you might pay over time:
| Contacts | ActiveCampaign (Lite) | ConvertKit | WP Fusion + HubSpot Starter |
| 1,000 | $39/month | $29/month | ~$45/month |
| 5,000 | $99/month | $79/month | ~$45/month |
| 10,000 | $174/month | $119/month | ~$45/month |
Based on HubSpot Starter Bundle at $15/month (1 seat) + WP Fusion Pro at ~$247/year (averaged to ~$20/month)
As your contact list grows, so does the gap in cost. With WP Fusion + HubSpot Starter Bundle, you get powerful automation with transparent, steady pricing, without the pressure to constantly prune your list to keep costs down.
Now that you understand the benefits of combining WP Fusion with HubSpot’s Starter Bundle, let’s explore how to implement a practical automation workflow.
#🛠️ How to Set Up WordPress Automation Workflows For WordPress With WP Fusion + HubSpot
Let’s walk through setting up a real-world automation that solves a common challenge for online businesses, like sending product-specific onboarding emails after purchase.
The Problem: Let’s say someone buys your online course, and you want to automatically send tips for getting started, highlight key features, and improve their initial experience.
The Solution: When someone makes a purchase, WP Fusion applies a specific tag to their user profile, which triggers their addition to a HubSpot list, which then starts a tailored email sequence.
Here’s how to implement this step by step.
First off, the required tools for this tutorial:
- HubSpot Starter Bundle ($15/month per seat)
- WP Fusion Lite (free version) or WP Fusion Pro (starts at $297 annual fee)
Note: While the free WP Fusion Lite plugin does connect WordPress to HubSpot, we recommend WP Fusion Pro for this tutorial as it provides access to the full range of WooCommerce integrations and automation features we’ll be covering. However, you can still follow along with the connection steps using WP Fusion Lite if you’re just exploring the possibilities.
#Step 1: Connect WordPress to HubSpot With WP Fusion
Install and activate WP Fusion on your WordPress site, open your WordPress dashboard, and go to WP Fusion → Settings, then from the CRM dropdown select HubSpot, and click the Authorize with HubSpot button.
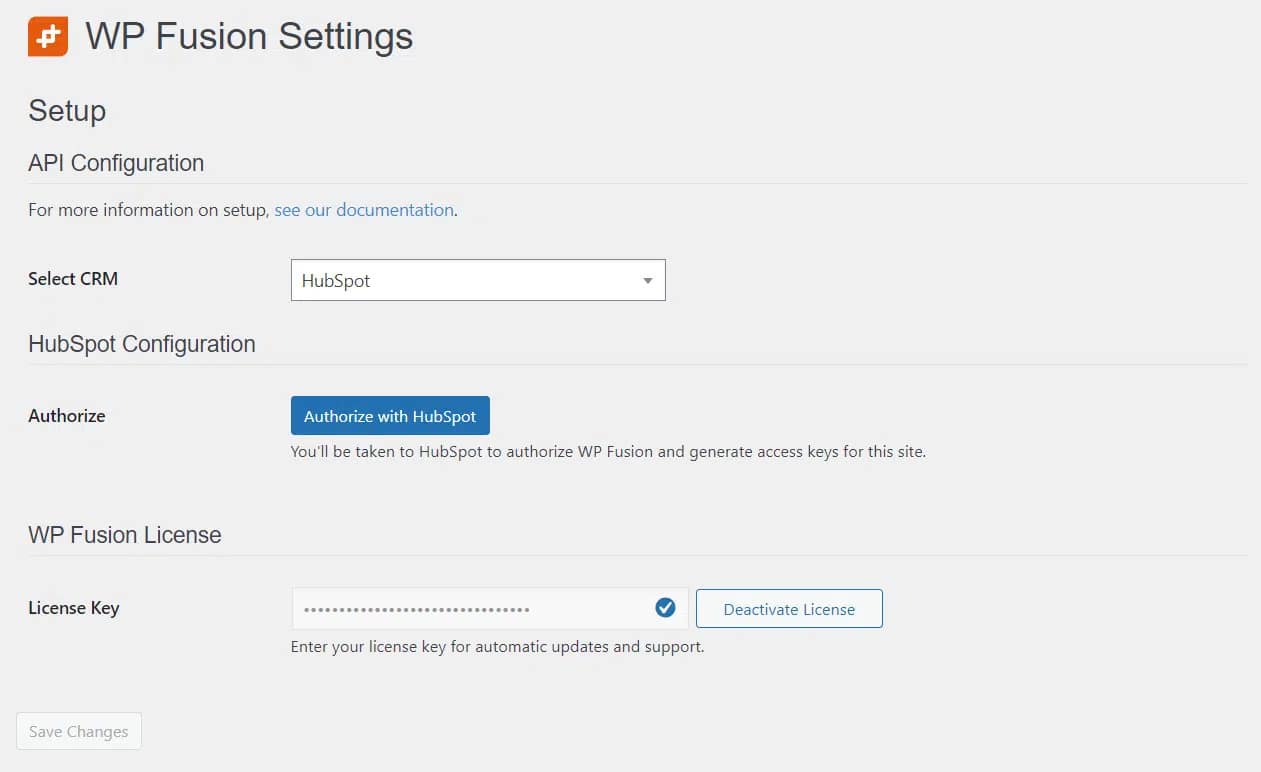
You’ll be redirected to HubSpot to authorize the connection. Select your HubSpot domain and click Choose Account. After authorization, you’ll be returned to your WordPress dashboard. Enter your WP Fusion license key in the License section.

Scroll down to configure your sync settings:
- Use webhooks to add new HubSpot contacts as WordPress users if you want bidirectional sync
- Set up field mappings between WordPress user fields and HubSpot contact properties
- Configure any additional tracking options
With this connection established, you can now build powerful automation workflows that leverage both platforms.
The beauty of this combination lies in its simplicity: WP Fusion captures activity on your WordPress site and sends this information to HubSpot, which then triggers appropriate marketing actions.
Let’s walk through setting up a real-world automation that solves a common challenge for online businesses: sending product-specific onboarding emails after purchase.
#Step 2: Configure Your WooCommerce Product in WP Fusion
First, you need to set up WP Fusion to apply the right tag when someone purchases your product.
- Edit your WooCommerce product
- Scroll down to the Product Data section and click on the WP Fusion option
- Select the tag you want to apply when this product is purchased (example: Purchased Online Course A)
- Save your product

When a customer completes their purchase, WP Fusion will automatically apply this tag to their contact record in HubSpot. This tag becomes the trigger for the next step in our automation workflow.
#Step 3: Create a Dynamic List in HubSpot Based on the Tag
Now we’ll create a list in HubSpot that automatically includes anyone who has the purchase tag:
- Log in to your HubSpot account
- Navigate to CRM → Lists
- Click Create list
- Select Active list (these update automatically as contacts meet or stop meeting criteria)
- Name it something descriptive (example: Course A Customers)
- In the filter section, select Contact properties → HubSpot tags → contains any of → select your WP Fusion tag “Purchased Online Course A“
- Save your list

This list will now automatically populate with new customers as they purchase your product and receive the tag from WP Fusion. As soon as WP Fusion applies the tag, HubSpot adds the contact to this list.
#Step 4: Create Your Onboarding Email Sequence in HubSpot
Next, we’ll build an email sequence for people who purchased your product:
- Go to Marketing → Email
- Use any of the templates or create from scratch
- Select Automated and then List membership
- Choose When contacts are added to a list
- Select your “Course A Customers” list

- Now design your onboarding sequence. Here’s a recommended structure:
- Email 1: Welcome and quick-start guide (send immediately)
- Email 2: Key features and tips (send 2 days later)
- Email 3: Common questions and support resources (send 4 days later)
- Email 4: Success stories and next steps (send 7 days later)
For each email, create compelling content that helps customers get the most value from their purchase. Set the appropriate delays between emails, review, and publish your sequence.
#Step 5: Test Your Automation Workflow
Before relying on this automation for real customers, it’s crucial to test the entire workflow:
- Make a test purchase of your product using a test email account
- Check that the tag was applied in WP Fusion (Users → your test account → Tags)
- Verify that the contact was added to your HubSpot list
- Confirm that the email sequence begins according to your schedule
If any part of the workflow isn’t working as expected, troubleshoot before proceeding:
- Check that WP Fusion is properly connected to your HubSpot account
- Verify that the tag is being correctly applied on purchase
- Ensure your HubSpot list criteria exactly match the tag name from WP Fusion
- Confirm your email workflow is published and properly triggered by list membership
#⚙️ Taking Your Automation Further
Once you’ve mastered this basic workflow, you can extend it in several ways:
Segment your onboarding: Create different tags for different product variations, then set up unique lists and email sequences for each. For example, if you sell different course tiers, each can have a customized onboarding experience.
Reference to properties: Use WP Fusion to send additional user properties to HubSpot, like purchase amount or specific product options. Reference these properties in your emails for more personalized messaging.
Add engagement tracking: Configure WP Fusion to send engagement data to HubSpot when customers interact with your content. This lets you see which customers are actively using your product versus those who might need extra encouragement.
Create re-engagement campaigns: Set up additional lists for customers who haven’t logged in after a certain period, then trigger re-engagement campaigns to bring them back.
#🧹 Maintaining Your Automation System
For best results with your new automation workflow:
- Keep your tags organized and documented
- Use clear naming conventions for lists and properties
- Regularly review email performance metrics in HubSpot
- Update your onboarding content based on customer feedback and questions
- Periodically test the entire workflow to ensure everything still works properly
This automation workflow demonstrates the power of connecting WP Fusion with HubSpot’s Starter Bundle.
You’ve created a sophisticated customer onboarding system that works automatically, improving customer experience and potentially reducing support requests, all without expensive enterprise software or custom development.
Remember, the key advantage of this setup is its affordability and scalability. As your business grows, your automation grows with it, handling more customers without additional per-contact fees.
#🤔 Is This Automation Stack For You?
This isn’t a one-size-fits-all solution, and that’s a good thing. The WP Fusion + HubSpot Starter combo is best for WordPress users who want powerful automation without the complexity or cost of enterprise platforms.
It’s a great fit for:
- WordPress site owners using WooCommerce, LearnDash, Gravity Forms, MemberPress, or LifterLMS
- Solopreneurs, freelancers, or micro-agencies looking for just enough automation to stay efficient
- Business owners frustrated by the limitations of “free” tools or the sticker shock of HubSpot Pro
It may not be ideal for:
- Teams that need advanced branching logic, complex “if/then” workflows, or multiple seats
- Users who prefer visual builders or ecommerce-native platforms like Klaviyo for Shopify
If you value clean integrations, predictable pricing, and practical automations tailored for WordPress, this stack is worth a closer look.
#🎁 Wrapping Up
Curious to try this setup for yourself? Getting started is easier than you might think.
WP Fusion Pro offers a 7-day free demo so you can test tagging and integration features with your WordPress site.
HubSpot Starter Bundle starts at just $15/month (billed annually) and gives you access to powerful tools like email automation, list segmentation, and contact property tracking.
Together, you can build most of the workflows covered in this article, like onboarding emails, lead nurturing, or course progress tracking, without hiring a developer or paying for bloated software.
Start by connecting your site with WP Fusion and creating a few basic tags. Then use HubSpot to trigger an email based on a user action, like completing a form or making a purchase.
This setup gives you the automation muscle you need to scale, without the overhead you don’t.
If you have any questions about the setup, let us know in the comments below.