If you’re using WP Fusion with Salesforce, you’re used to syncing WordPress users and customers bidirectionally (and in real time!) with Contact records in Salesforce’s CRM 🚀.
In most cases, this works great, since the Contact object is a good way to represent someone you have a relationship with— a customer, a student, a member, etc.
However, Salesforce supports a lot more than just Contact objects. Salesforce can also manage Leads, Accounts, Opportunities, Events, and custom objects. It’s infinitely customizable.
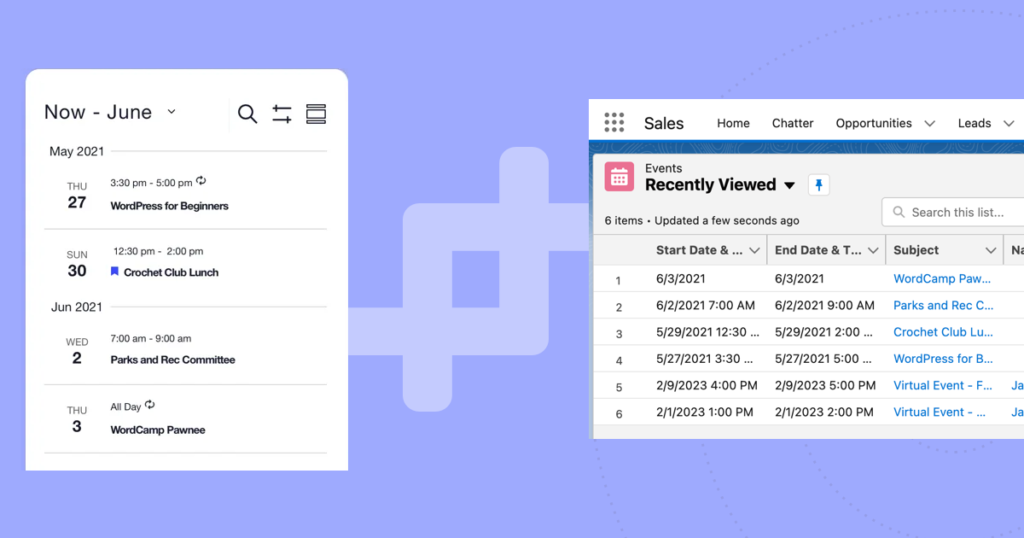
In this post we’ll take a look at using WP Fusion to sync The Events Calendar and Event Tickets events with Salesforce, and associating contacts with Events in Salesforce when they make a booking.
We’ll cover:
- How does WP Fusion handle custom objects?
- What if I need to sync with multiple objects at the same time?
- Setup in WordPress
- Setup in Salesforce
- Putting it all together
#How does WP Fusion handle custom objects?
At the moment WP Fusion can only sync bidirectionally with a single object at a time.
This can be overridden to a different object using a filter, or (in some cases) WP Fusion can sync entries one way (such as Leads), while maintaining a bidirectional link with Contacts— but generally, WP Fusion was designed around syncing with a single object type at a time.
There are a couple of reasons for this:
- Complexity: Imagine a single WordPress user has a Lead, Contact, and Account record and they update their billing address. Where should the data be synced?
- Conversely— if the Lead’s address is updated in Salesforce and this data is loaded onto the WordPress user, should WP Fusion sync that data back to the associated Contact and Account records?
- Performance: WP Fusion is designed with performance in mind, and we try not to add features that could impact your site’s performance. If a single process (for example an event registration) had to create a Contact, Event, and Ticket object and link them all together over the API, this could potentially add 10+ seconds of API calls to your registration process, which we’d prefer to avoid 😬
#What if I need to sync with multiple objects at the same time?
We’re glad you asked!
In this tutorial, we’re going to look at using Flows in Salesforce to create and update Event custom objects when an attendee registers for an event using The Events Calendar and Event Tickets.
First some key concepts:
- WP Fusion: If you’re new here 👋, WP Fusion is a WordPress plugin that integrates WordPress plugins with popular CRMs and marketing automation platforms. It’s often used on ecommerce, membership, and LMS websites to personalize the user experience, increase conversions, and help deliver more targeted marketing campaigns.
- The Events Calendar: The Events Calendar (and Event Tickets) are plugins for WordPress that let you create and display events, as well as sell tickets, check-in event attendees, manage RSVPs, and much more. The concepts covered in this tutorial will also work with these other event plugins supported by WP Fusion:
- Salesforce: Salesforce is a cloud-based customer relationship management (CRM) platform that provides businesses with a suite of applications for managing sales, customer service, and marketing processes.
- Flows: Flows are Salesforce feature that allows businesses to automate processes using a step-by step visual builder. Flows can include a variety of elements such as decision points, screens for user input, and actions that update records or send emails.
#Setup in WordPress
First, install and activate The Events Calendar and Event Tickets, and install WP Fusion and connect it to your Salesforce account.
For this tutorial we’ll be using the free Event Tickets plugin to sell tickets, but you can also use Event Tickets Plus to sell tickets using WooCommerce, collect custom attendee information, track attendance using QR codes, and more.
#Create an event and ticket
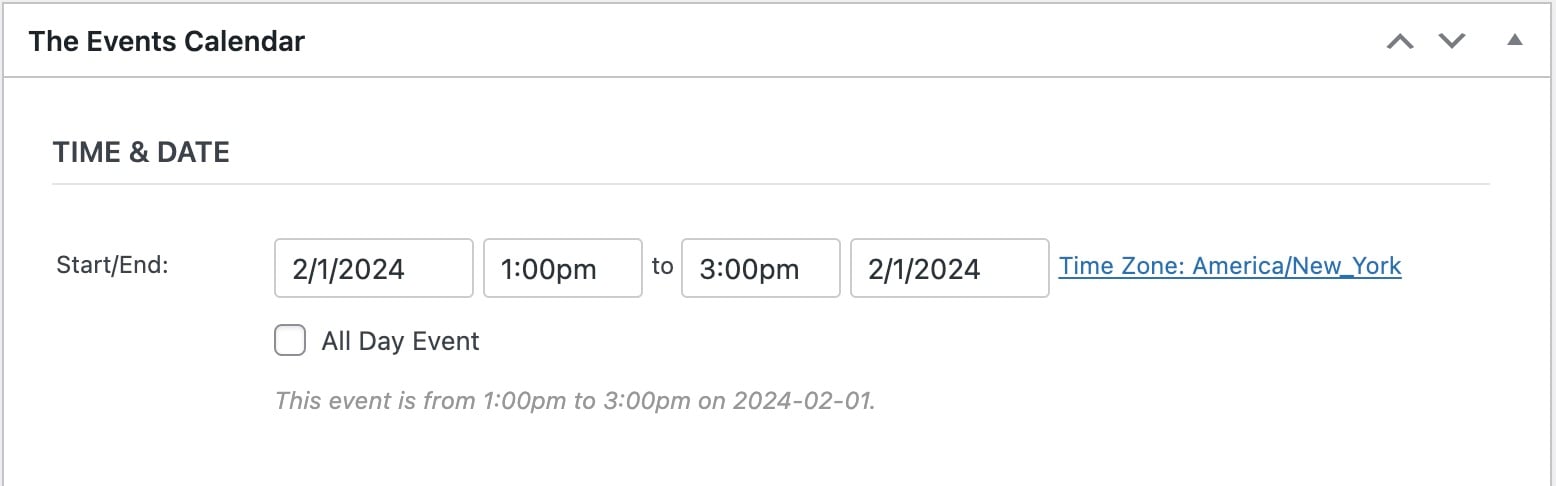
Head to Events » Add New in your WordPress admin and create an event. Select a date, time, and venue.
Next, add a ticket to your event. Set the ticket price and sale dates, if applicable.

In the WP Fusion settings for the ticket, you can optionally select one or more Topics or Tags to assign to event attendees.
#Configure WP Fusion
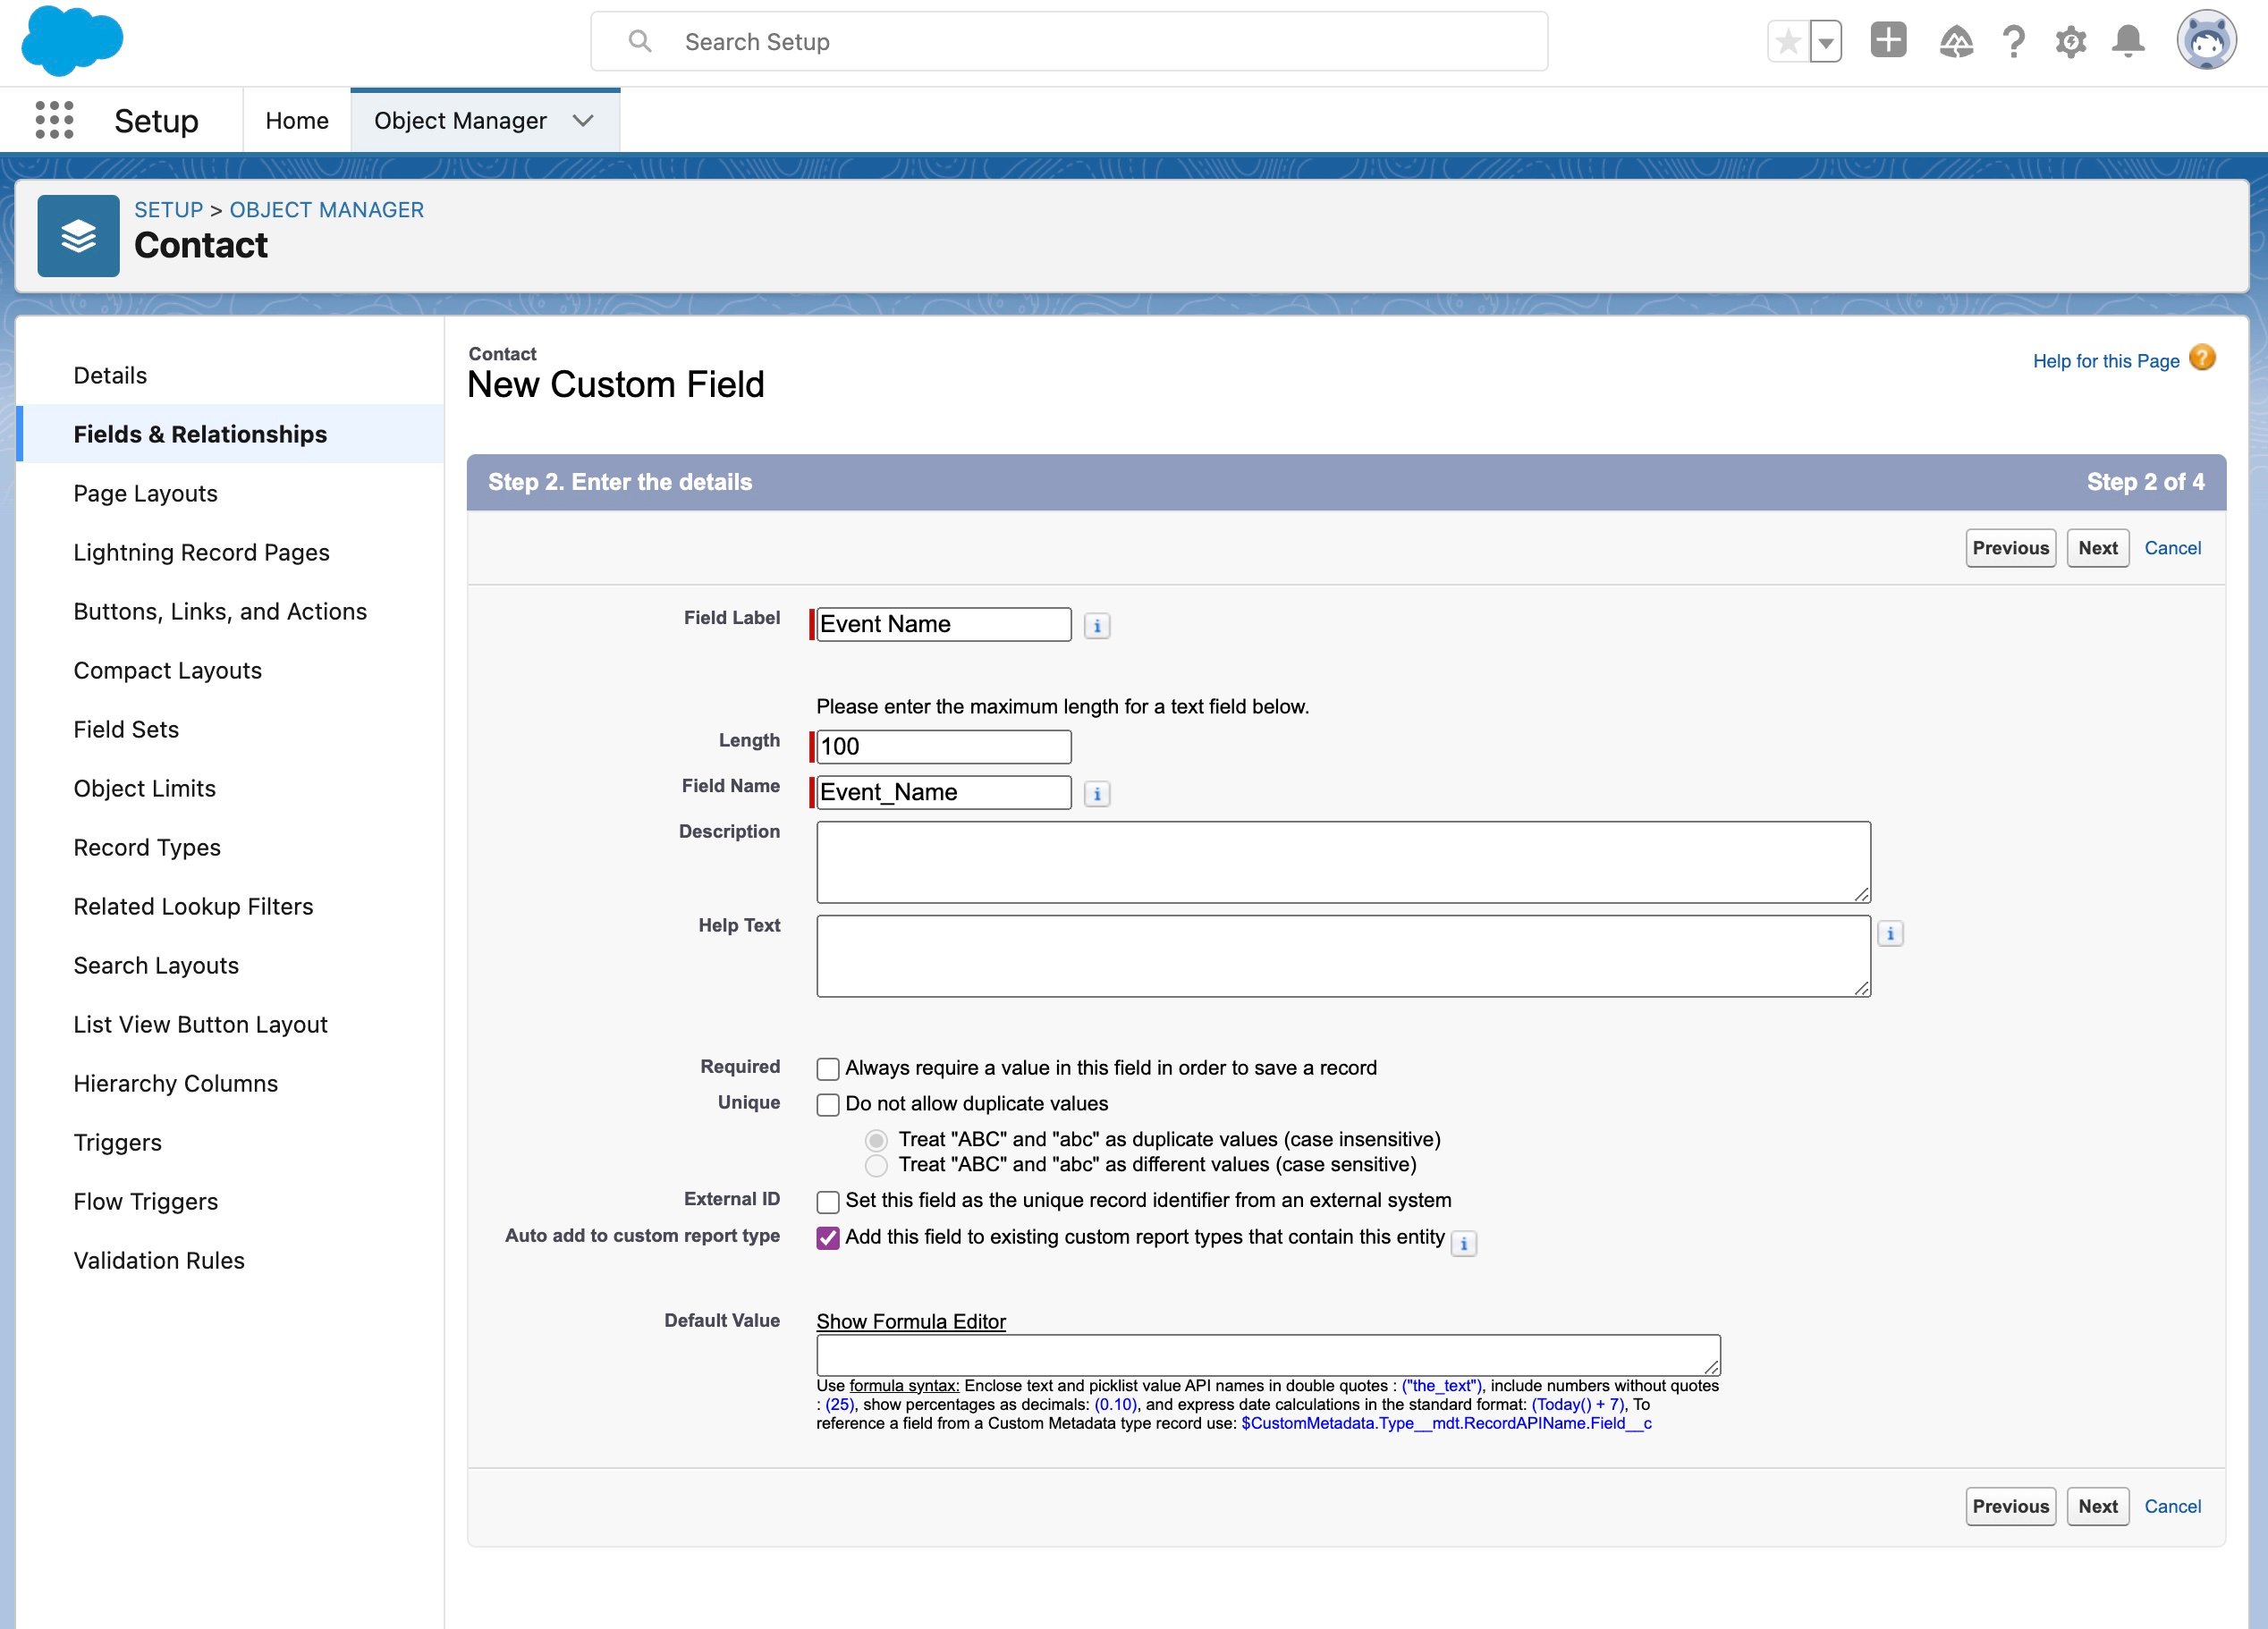
First, in Salesforce, create two new custom fields on the Contact object:
- Event Name: A text field. This will hold the attendee’s event name.
- Event Start Date: A date/time field. This will hold the event start date and time.
Then, in the WP Fusion Contact Fields settings, scroll down to the Events Calendar section and map the Event Name and Event Date and Time fields with your new fields in Salesforce.
If the new fields don’t show up right away, click the prompt to Resync Available Fields, and they will appear in the “Select a field” dropdowns.
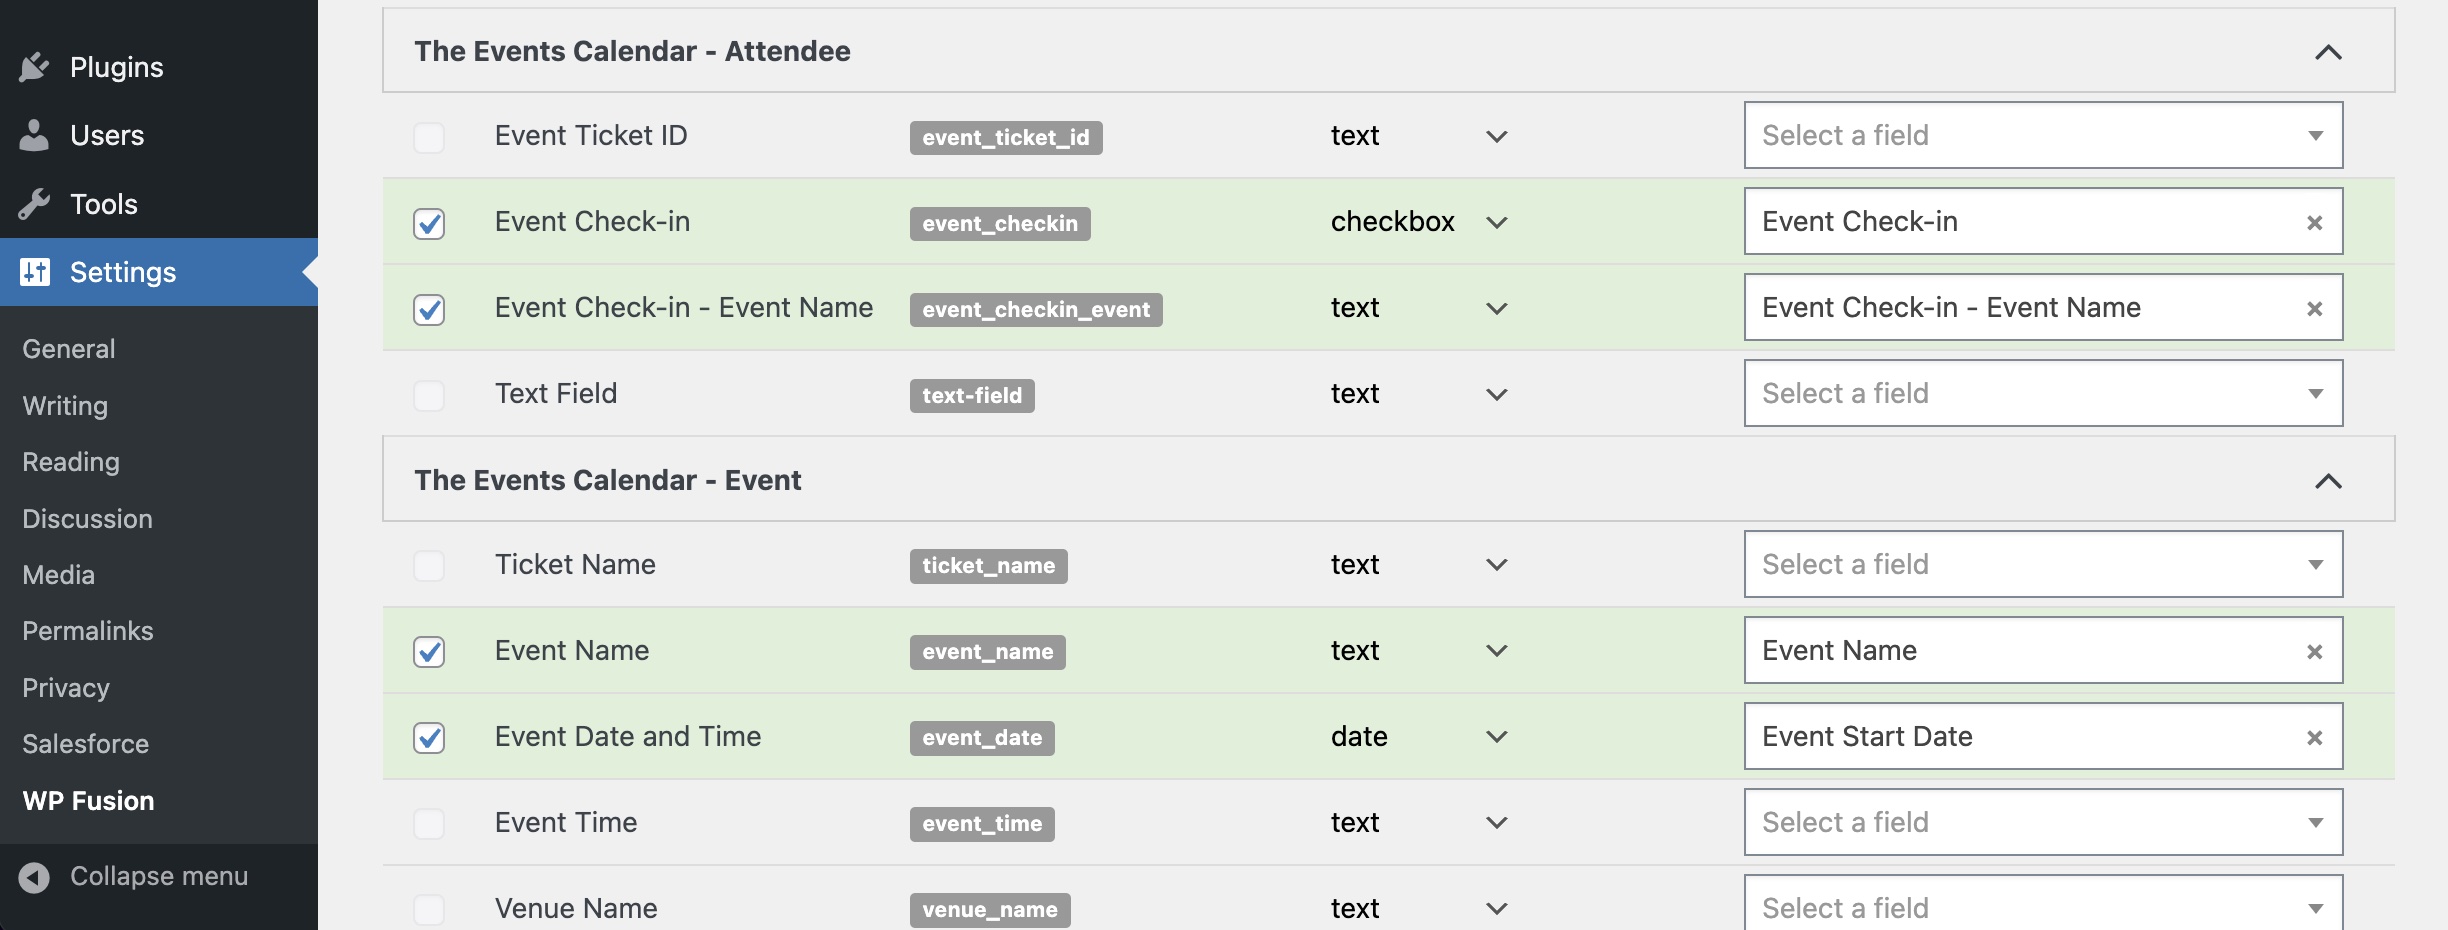
Save the settings, and that’s it! 👏. New event registrations will automatically be synced to Salesforce, and their event name and start date will be stored in the selected custom fields.
Now let’s set up a Flow in Salesforce to manage the data.
#Setup in Salesforce
Because Events are a special object type, we need to first enable linking multiple contacts with a single event.
Log into Salesforce and head to Setup » Activity Settings and enable Allow Users to Relate Multiple Contacts to Tasks and Events.

This may take some time to process if you have a lot of activity data. While that’s running, we can begin building our Flow.
#Creating an event management flow
We’re going to use a Flow in Salesforce to manage the relationship between the Contact, the Event, and the attendance (“Event Relation”).
The flow will work like this:
- The flow will be triggered when a Contact is created or updated with a new Event Name.
- It will check to see if an Event object exists with that name.
- If not, it will create a new Event, and set the Start Date property from the Contact that triggered the flow.
- It will create a new Event Relation object to add the Contact as an attendee to the event.
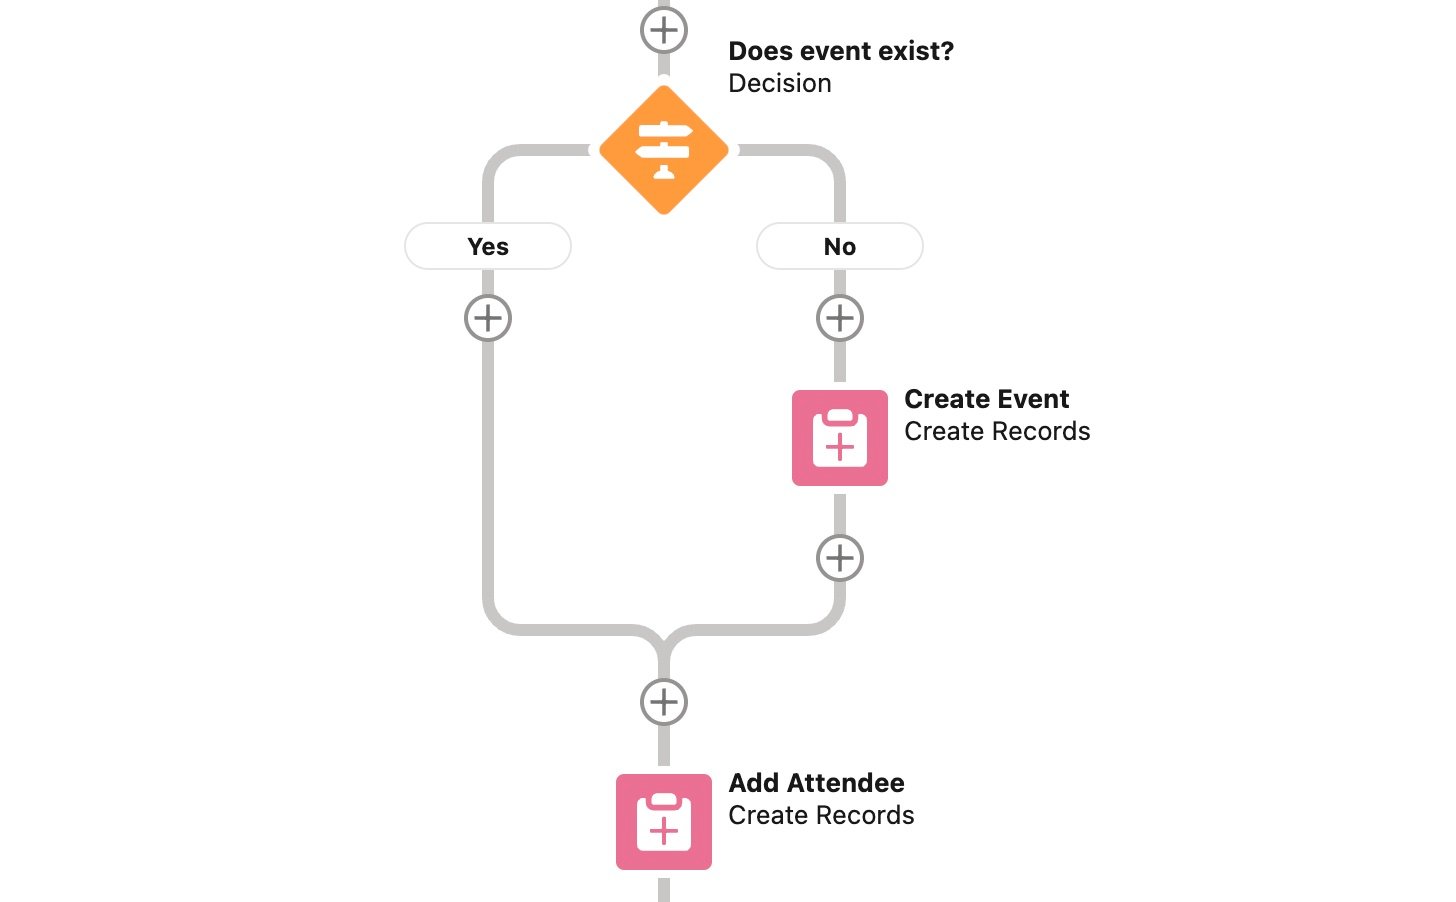
When it’s finished, the flow will look like the following:
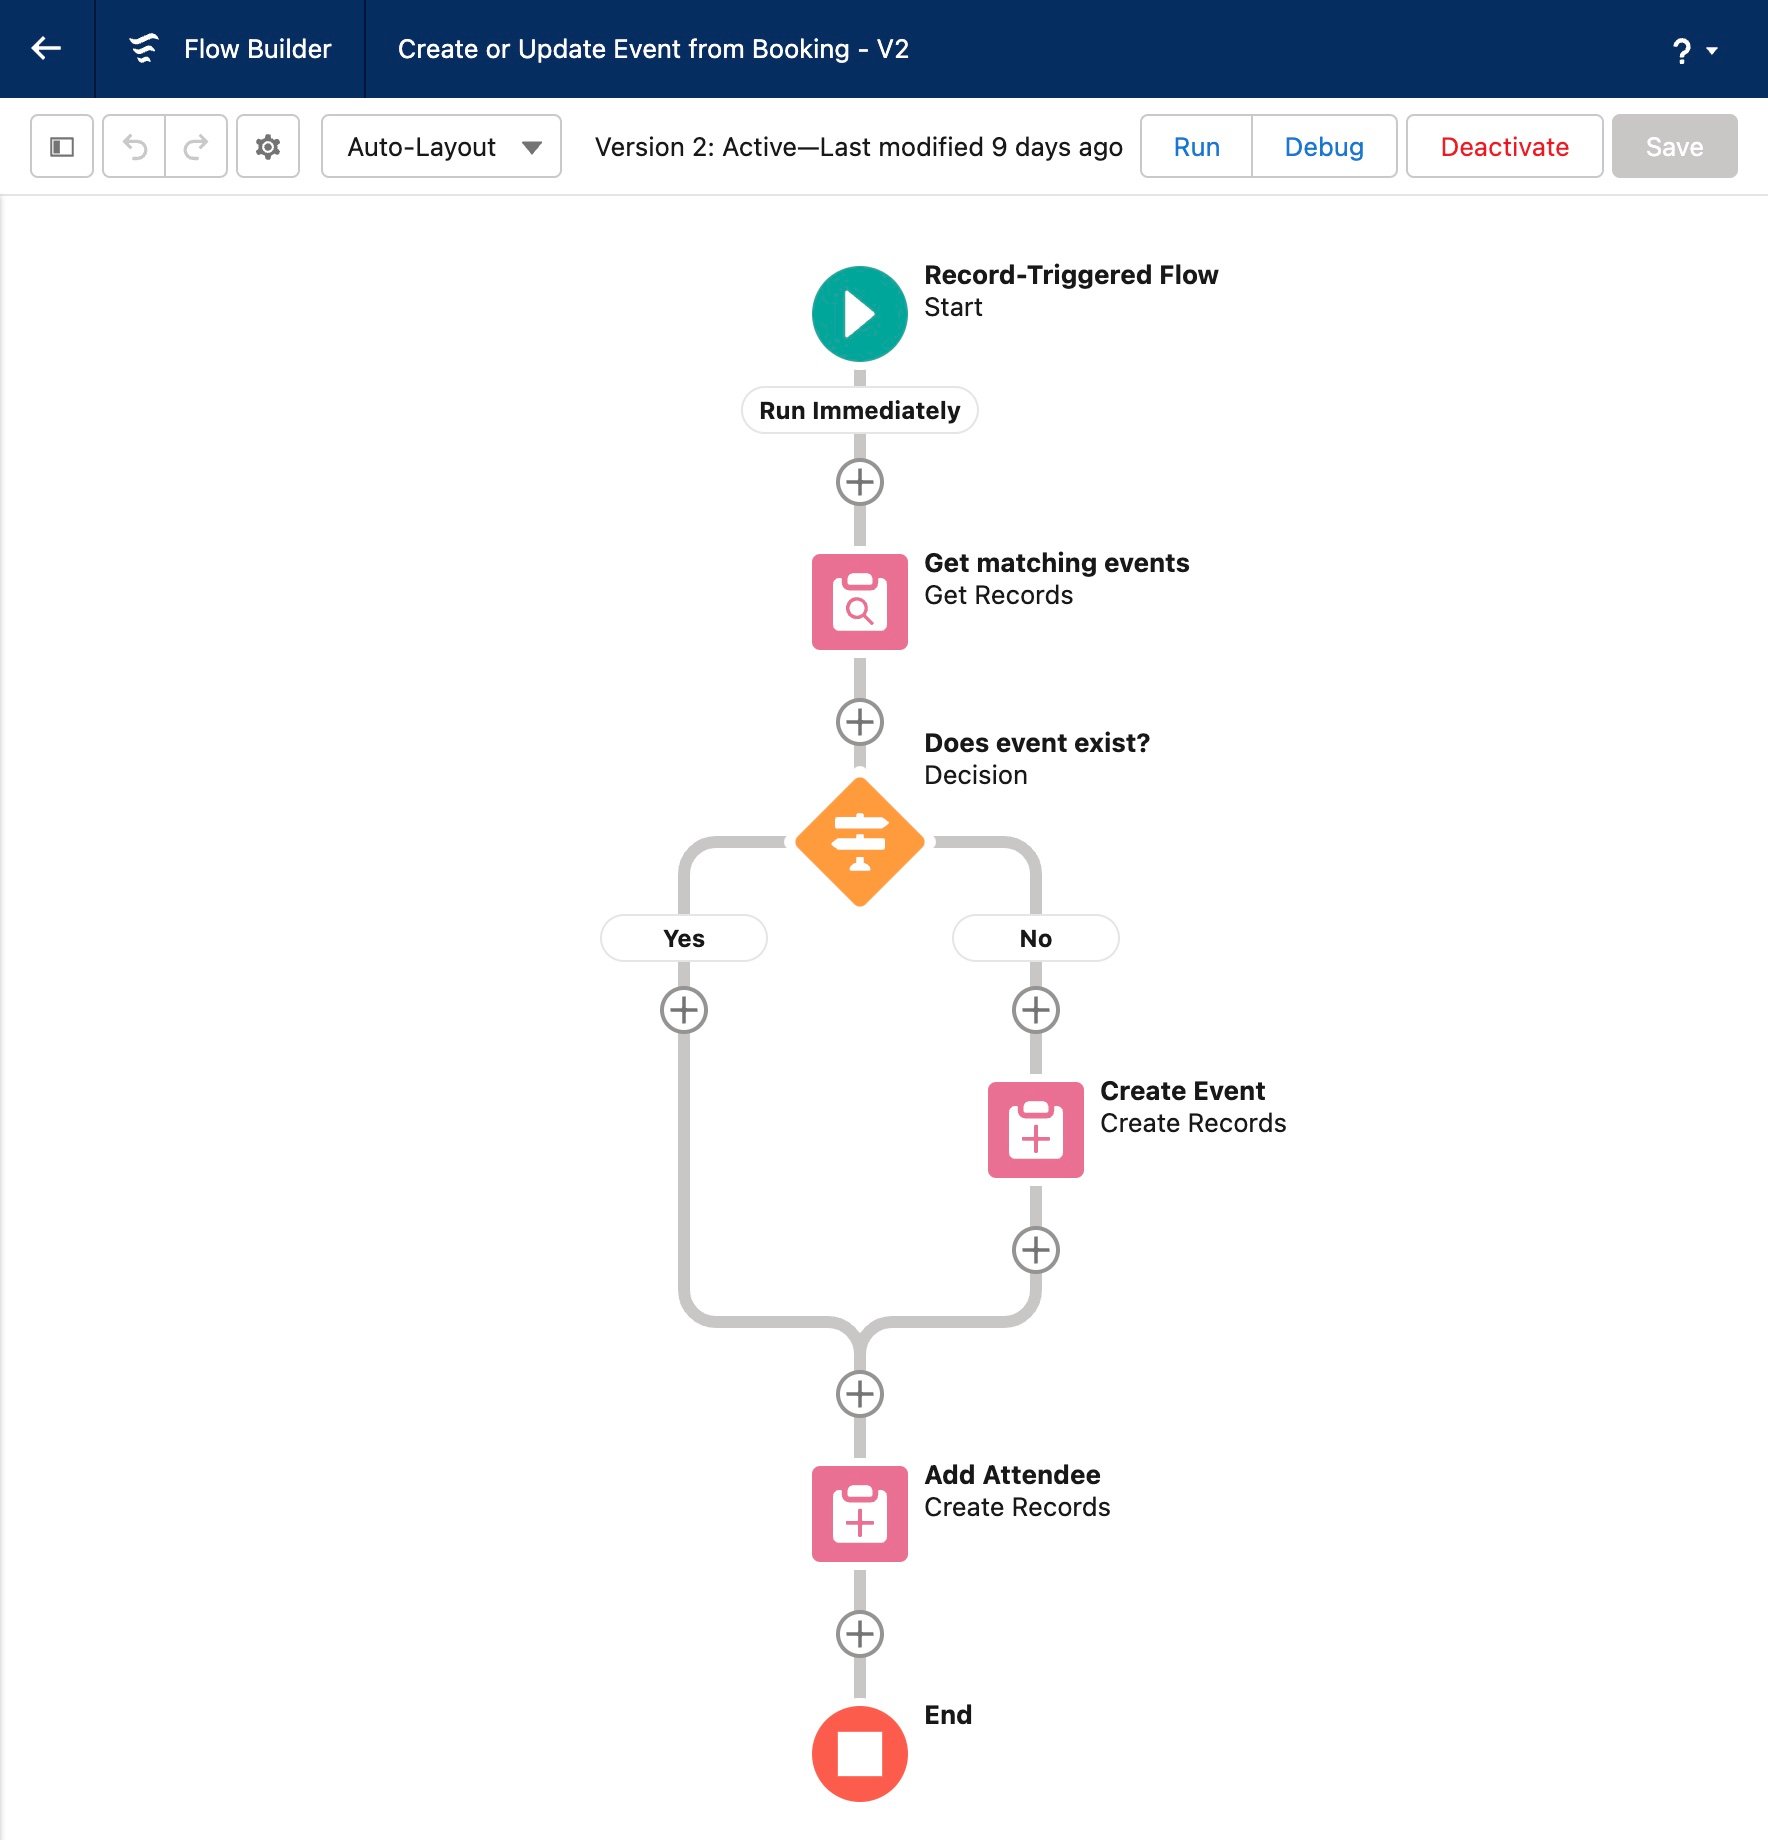
To get started, head to Process Automation » Flows in your Salesforce admin, and add a new flow.
We’ll go through the flow steps one at a time.
#1 – Record-Triggered flow
This flow is triggered by a record being created or updated, in this case a Contact record.
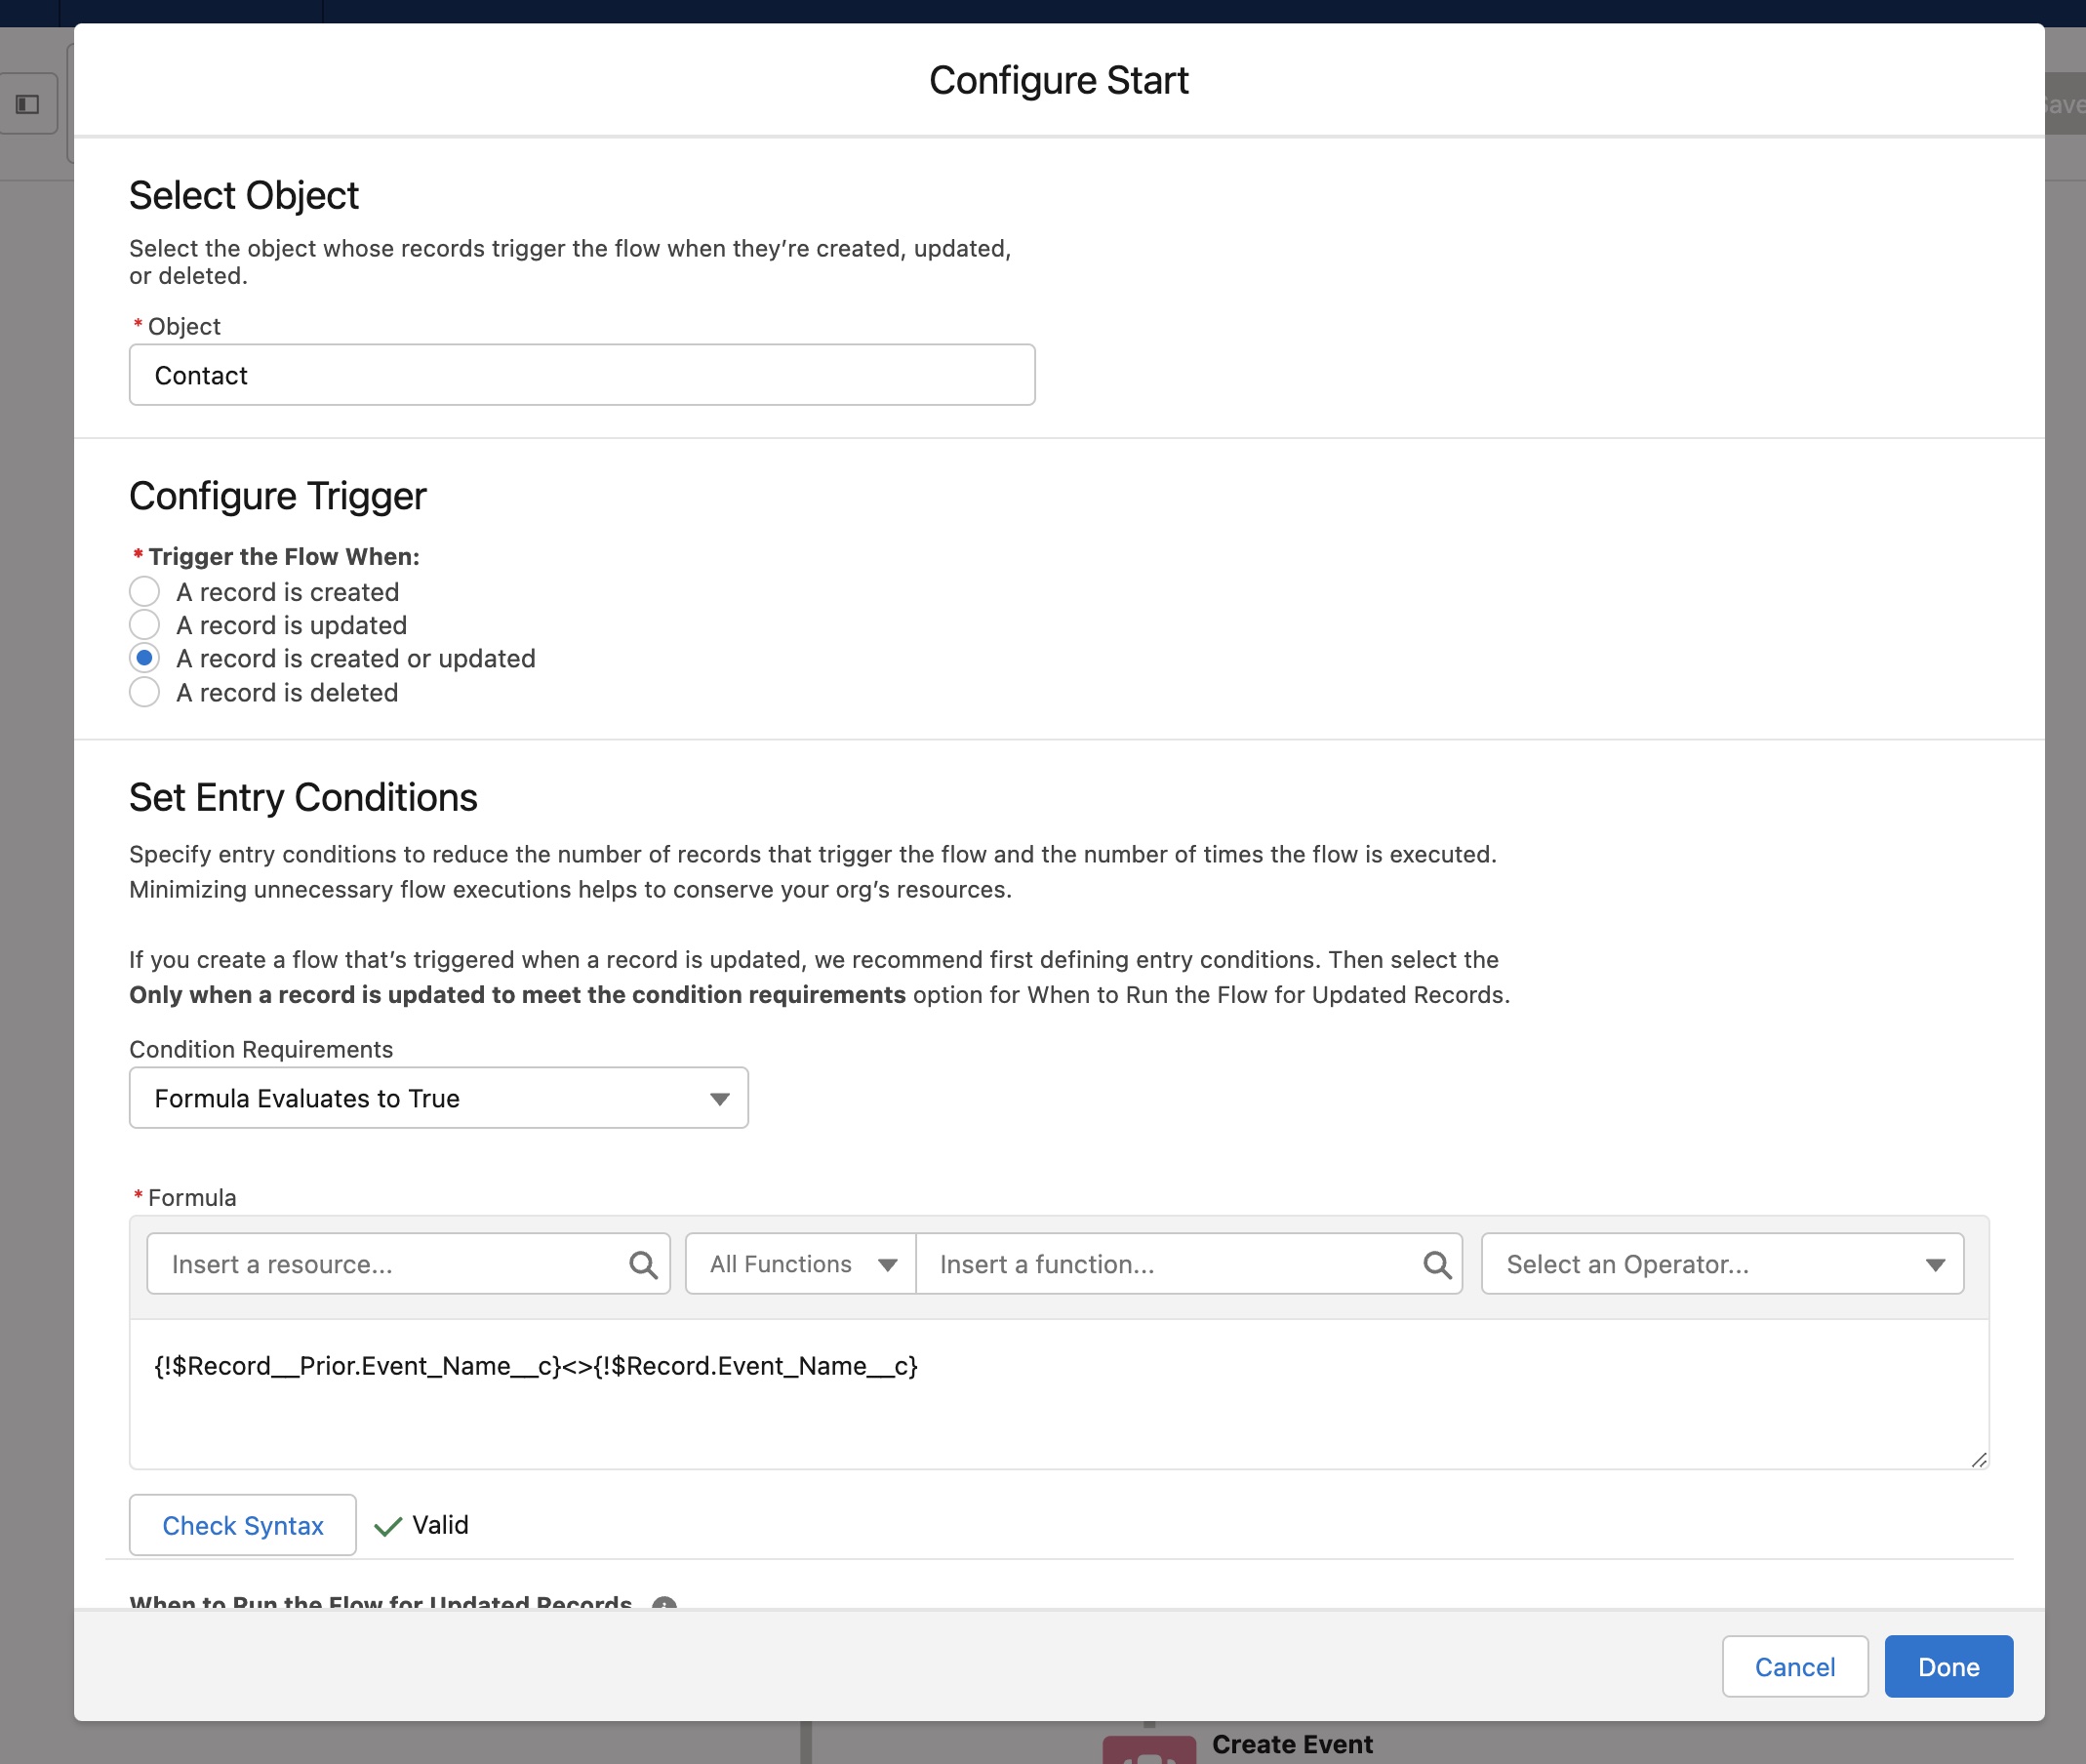
Ideally, we only need the flow to run when a contact has been added to a new event. To achieve this, we can set the Entry Condition to a formula:
{!$Record__Prior.Event_Name__c}<>{!$Record.Event_Name__c}
This says that if the record is created or updated, and the Event Name has changed, the flow can start.
#2 – Get matching events
Next we need to see if this is a new event that needs to be created, or it’s an existing event.
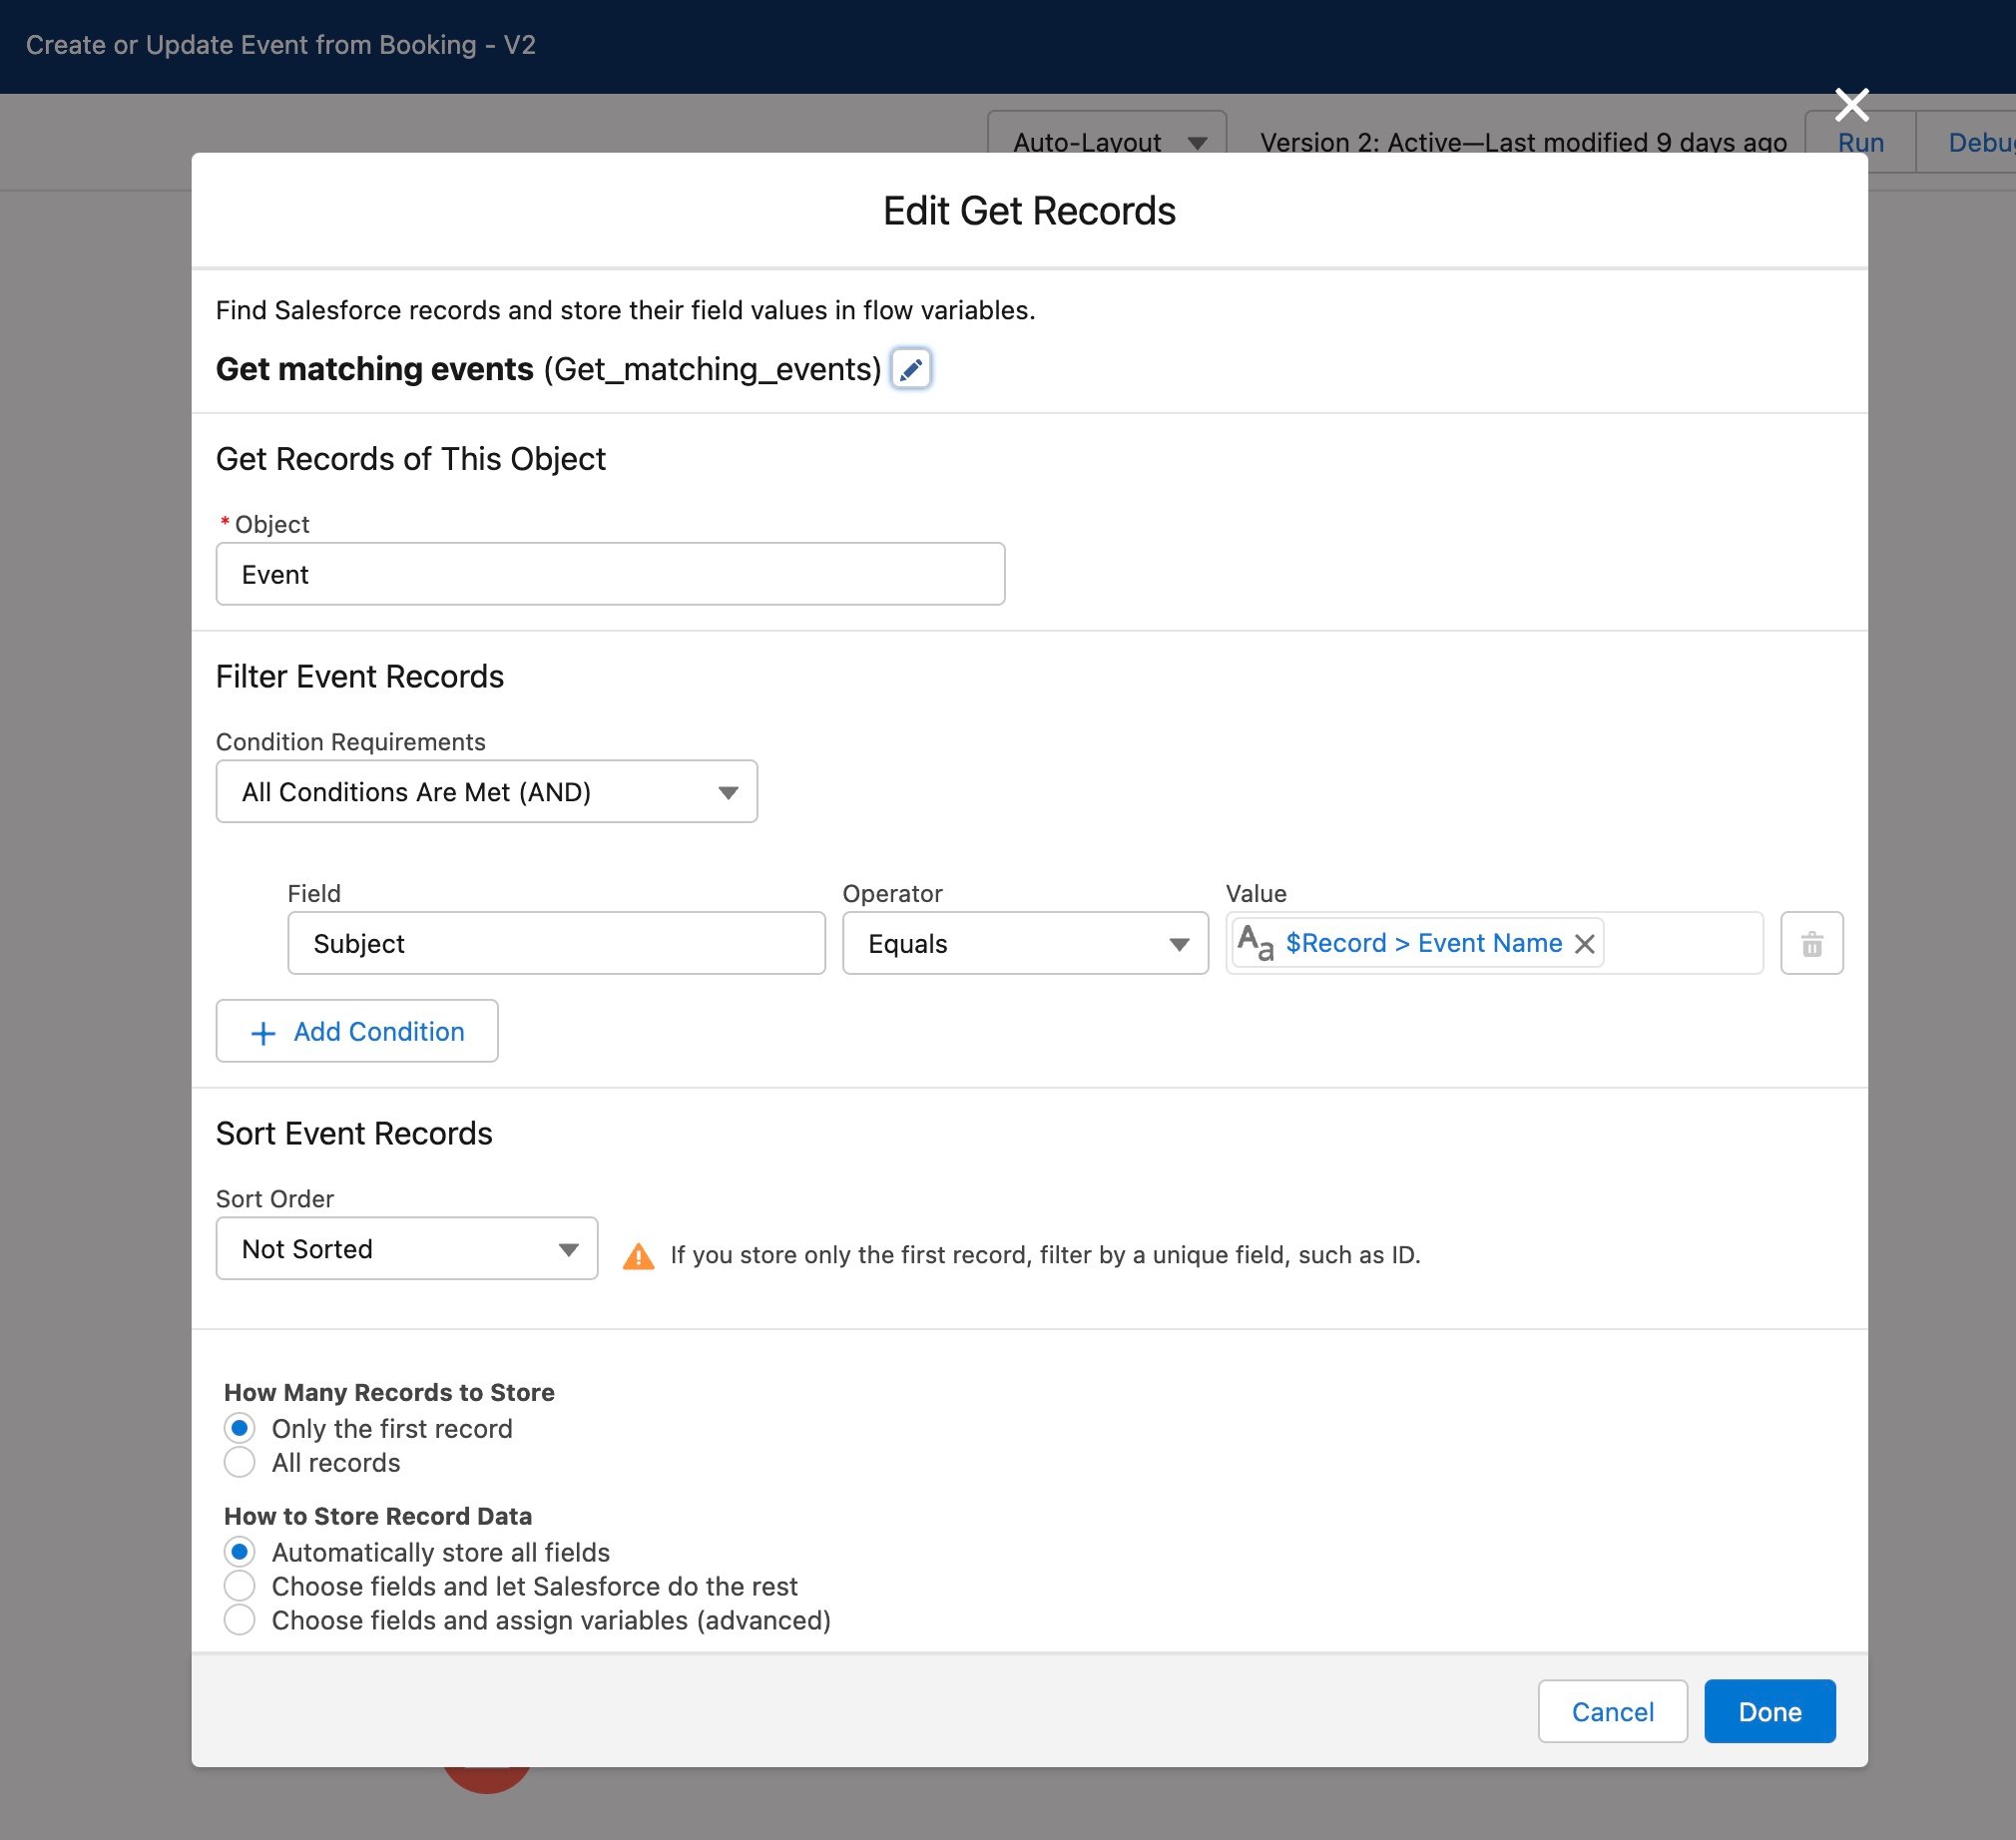
Add a Get Records step to the flow, and configure it like in the screenshot above:
- Object: Event
- Condition: All conditions are met
- Field: Subject equals
$Record > Event Name - How Many Records to Store: Only the first record
- How to Store Record Data: Automatically store all fields
When this action runs, it will check to see if there’s an existing event with the same name as our Event Name (we could also optionally compare the date as well).
The result will be used in the next decision step.
#3 – Does event exist?
Next, add a Decision element to the flow, and configure it like the following:
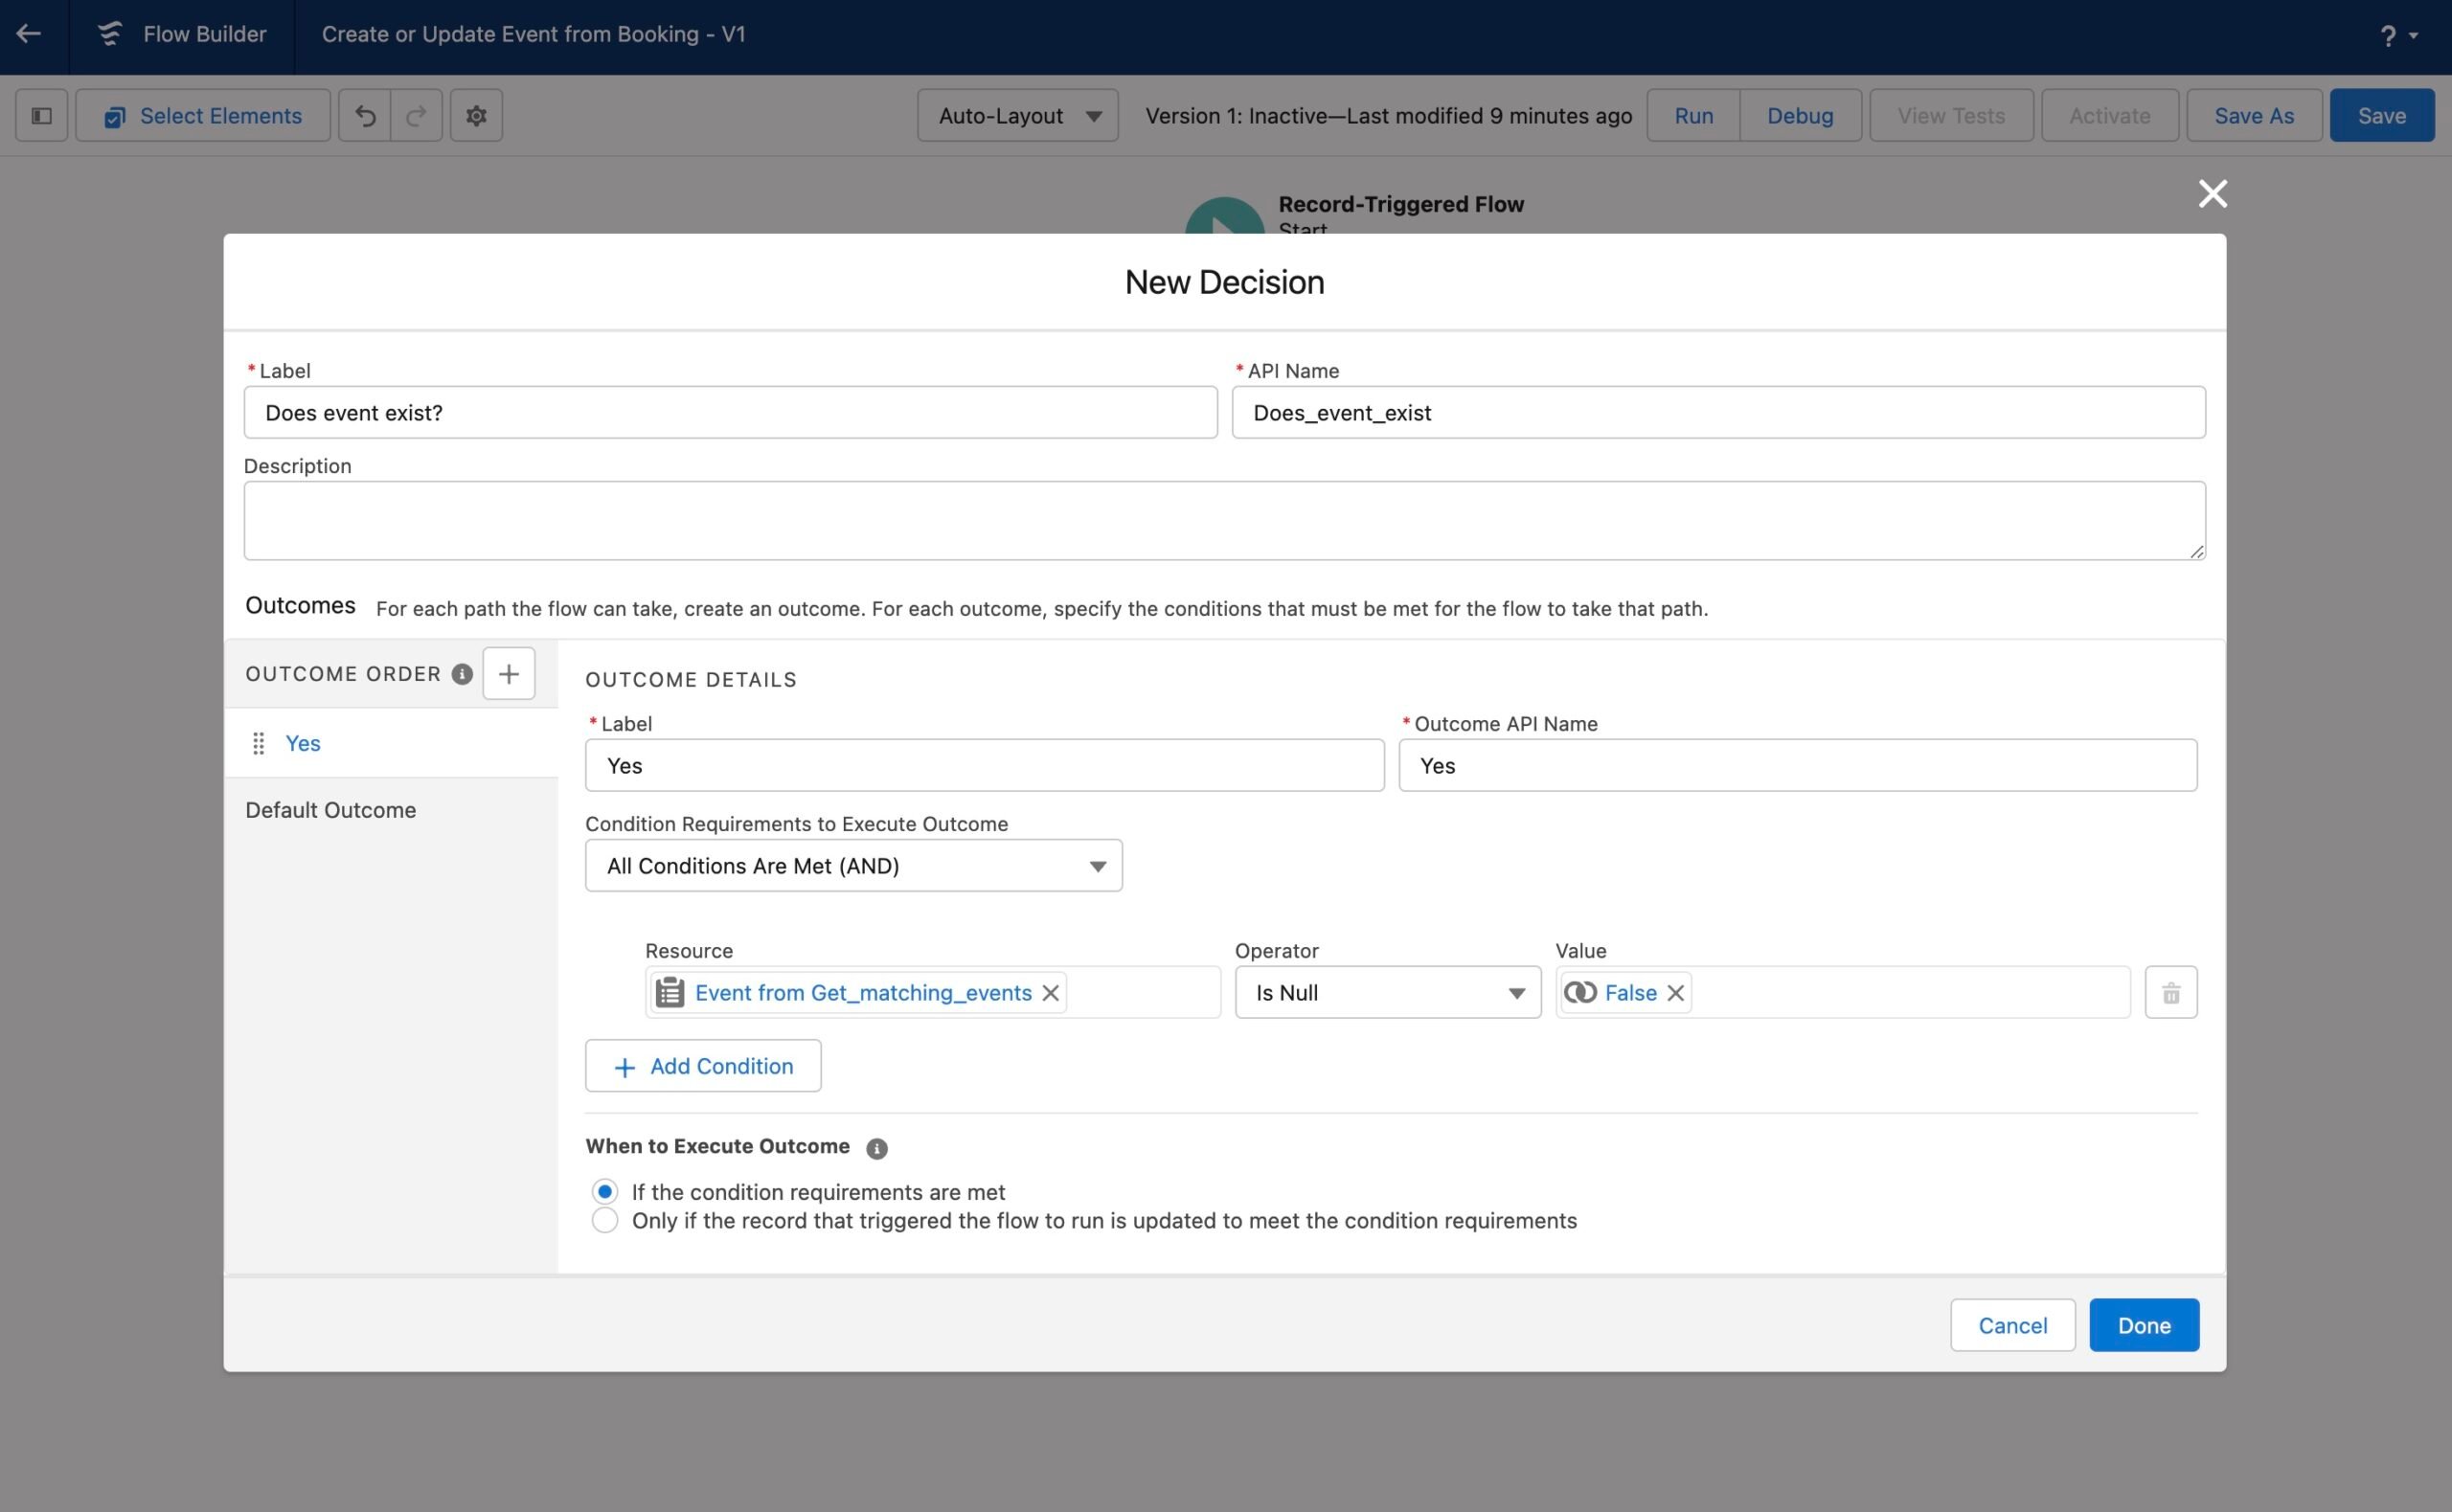
- Label: Does event exist?
- Outcome Label: Yes
- Condition Requirements: All Conditions Are Met
- Resource:
Event from Get_matching_eventsis nullFalse - When to Execute Outcome: If the condition requirements are met
The important part here is the Resource— this is checking the value of the previous Get Records element.
If a record was found, the Yes condition will be triggered. If not, the Default Outcome (i.e. No) condition will be triggered.
#4 – Create Event
After saving the Decision element, your Flow will have two outcome paths, Yes and No.
On the No path, add a new Create Records element, and configure it like the following:

- How Many Records to Create: One
- How to Set the Record Fields: Use separate resources, and literal values
- Object: Event
- Set Field Values for the Event:
Subject←$Record > Event NameStartDateTime←$Record > Event Start DateDurationInMinutes← the fixed duration of your event, or another custom field
- Manually assign variables: yes
- Store Event ID in Variable:
Event from Get_matching_events > Activity ID
- Store Event ID in Variable:
The first part is saying we should create a new Event object, and in the field values we’ve copied over the custom contact fields to create the new event.
In this example we are just using the Event Name and Start Date, but you can copy over any number of other custom fields as well (such as venue, meeting join URL, etc).
Finally, we want to store the new event ID back in the results of the Get Records query, so we can use it in the next step.
(It’s also possible to store the new event data in a flow variable or resource, which is helpful if you’re relating multiple custom objects with each other, but in this case it makes the flow easier to comprehend by saving it back to the results of the previous query).
#5 – Add Attendee
Finally, we add the contact to the event. Add a new Create Record element, and configure it like the following:
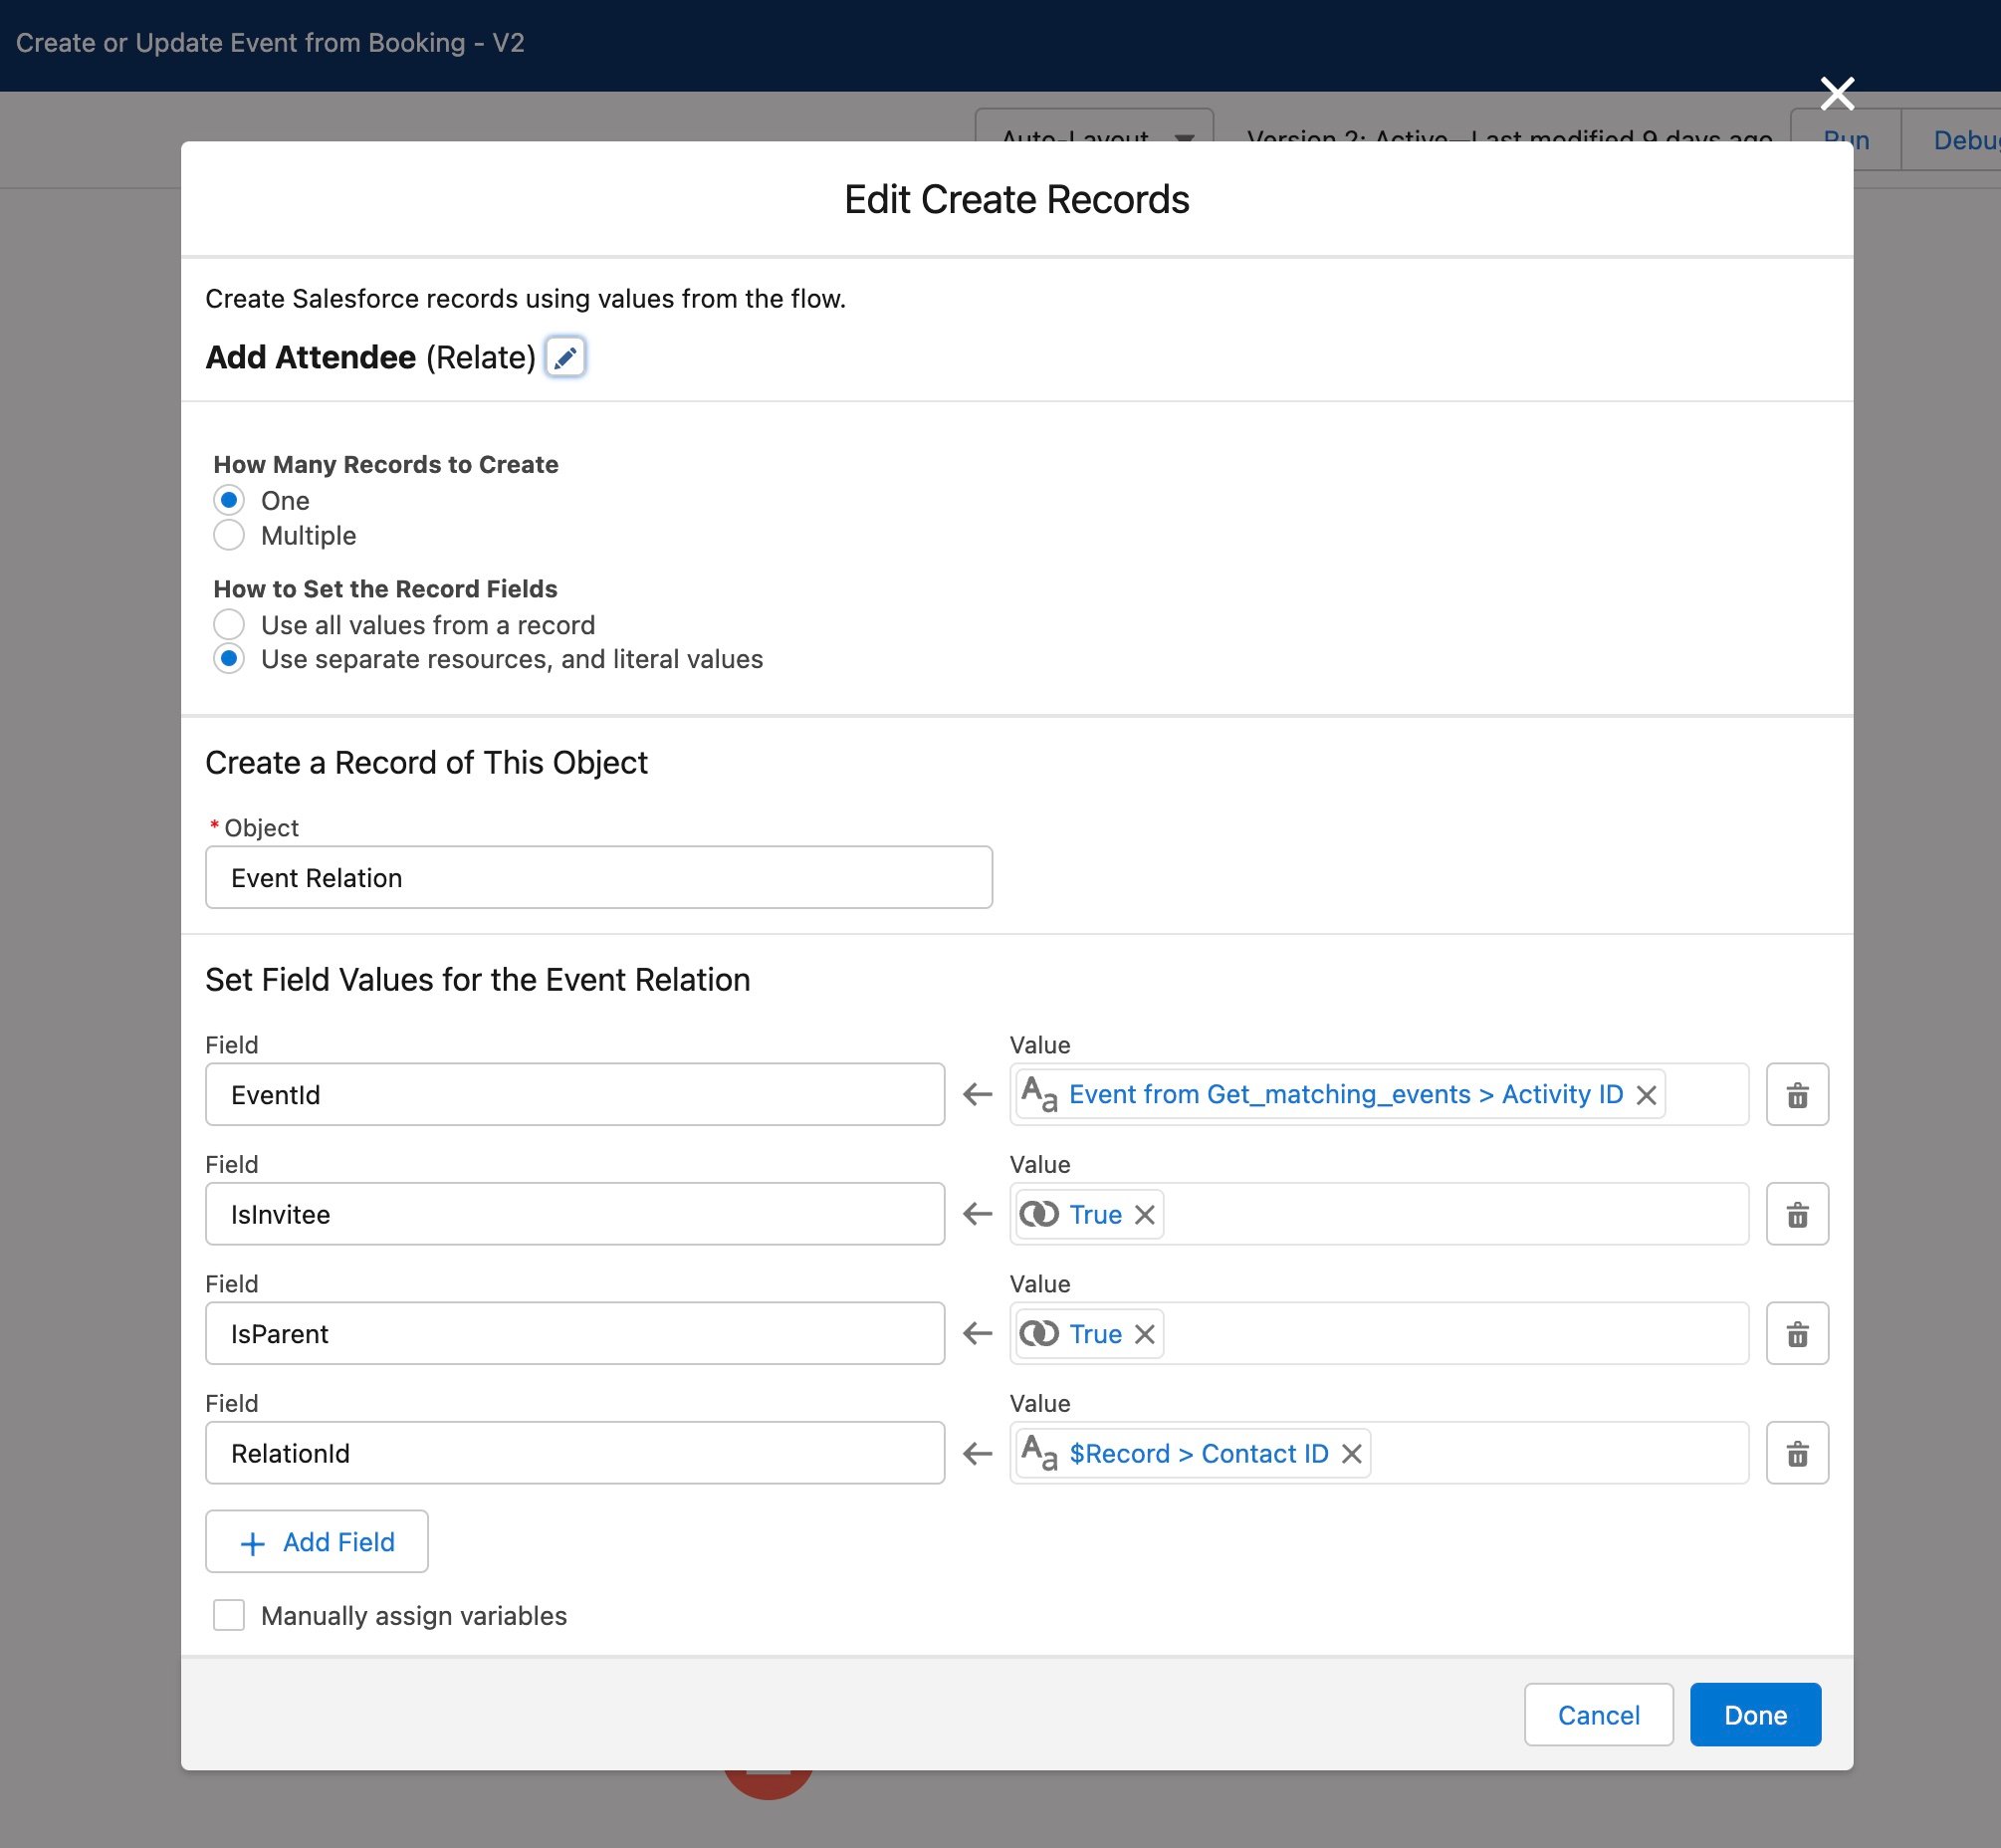
- How Many Records to Create: One
- How to Set the Record Fields: Use separate resources, and literal values
- Object: Event Relation (this is a standard object which relates attendees to events)
- Set Field Values for the Event Relation:
EventId←Event from Get_matching_events > Activity ID(this connects the Relation to the Event)IsInvitee←TrueIsParent←TrueRelationId←$Record > Contact ID(this connects the Relation to the Contact)
And that’s it! Your flow is complete. When a Contact’s event field is updated, an event will be created (if necessary), and the contact will be added as an attendee to the event.
#Testing and debugging the flow
Before we do a test checkout in WordPress, let’s run a test contact through the Salesforce Flow debug tool to make sure we haven’t missed anything.
Click the Debug button, and choose Run the flow as if a Contact is updated. Select a test contact, and add an event name and date to the custom field inputs that appear (don’t worry— this won’t modify any data, it’s just for testing purposes).
Click Run to run the debugger.
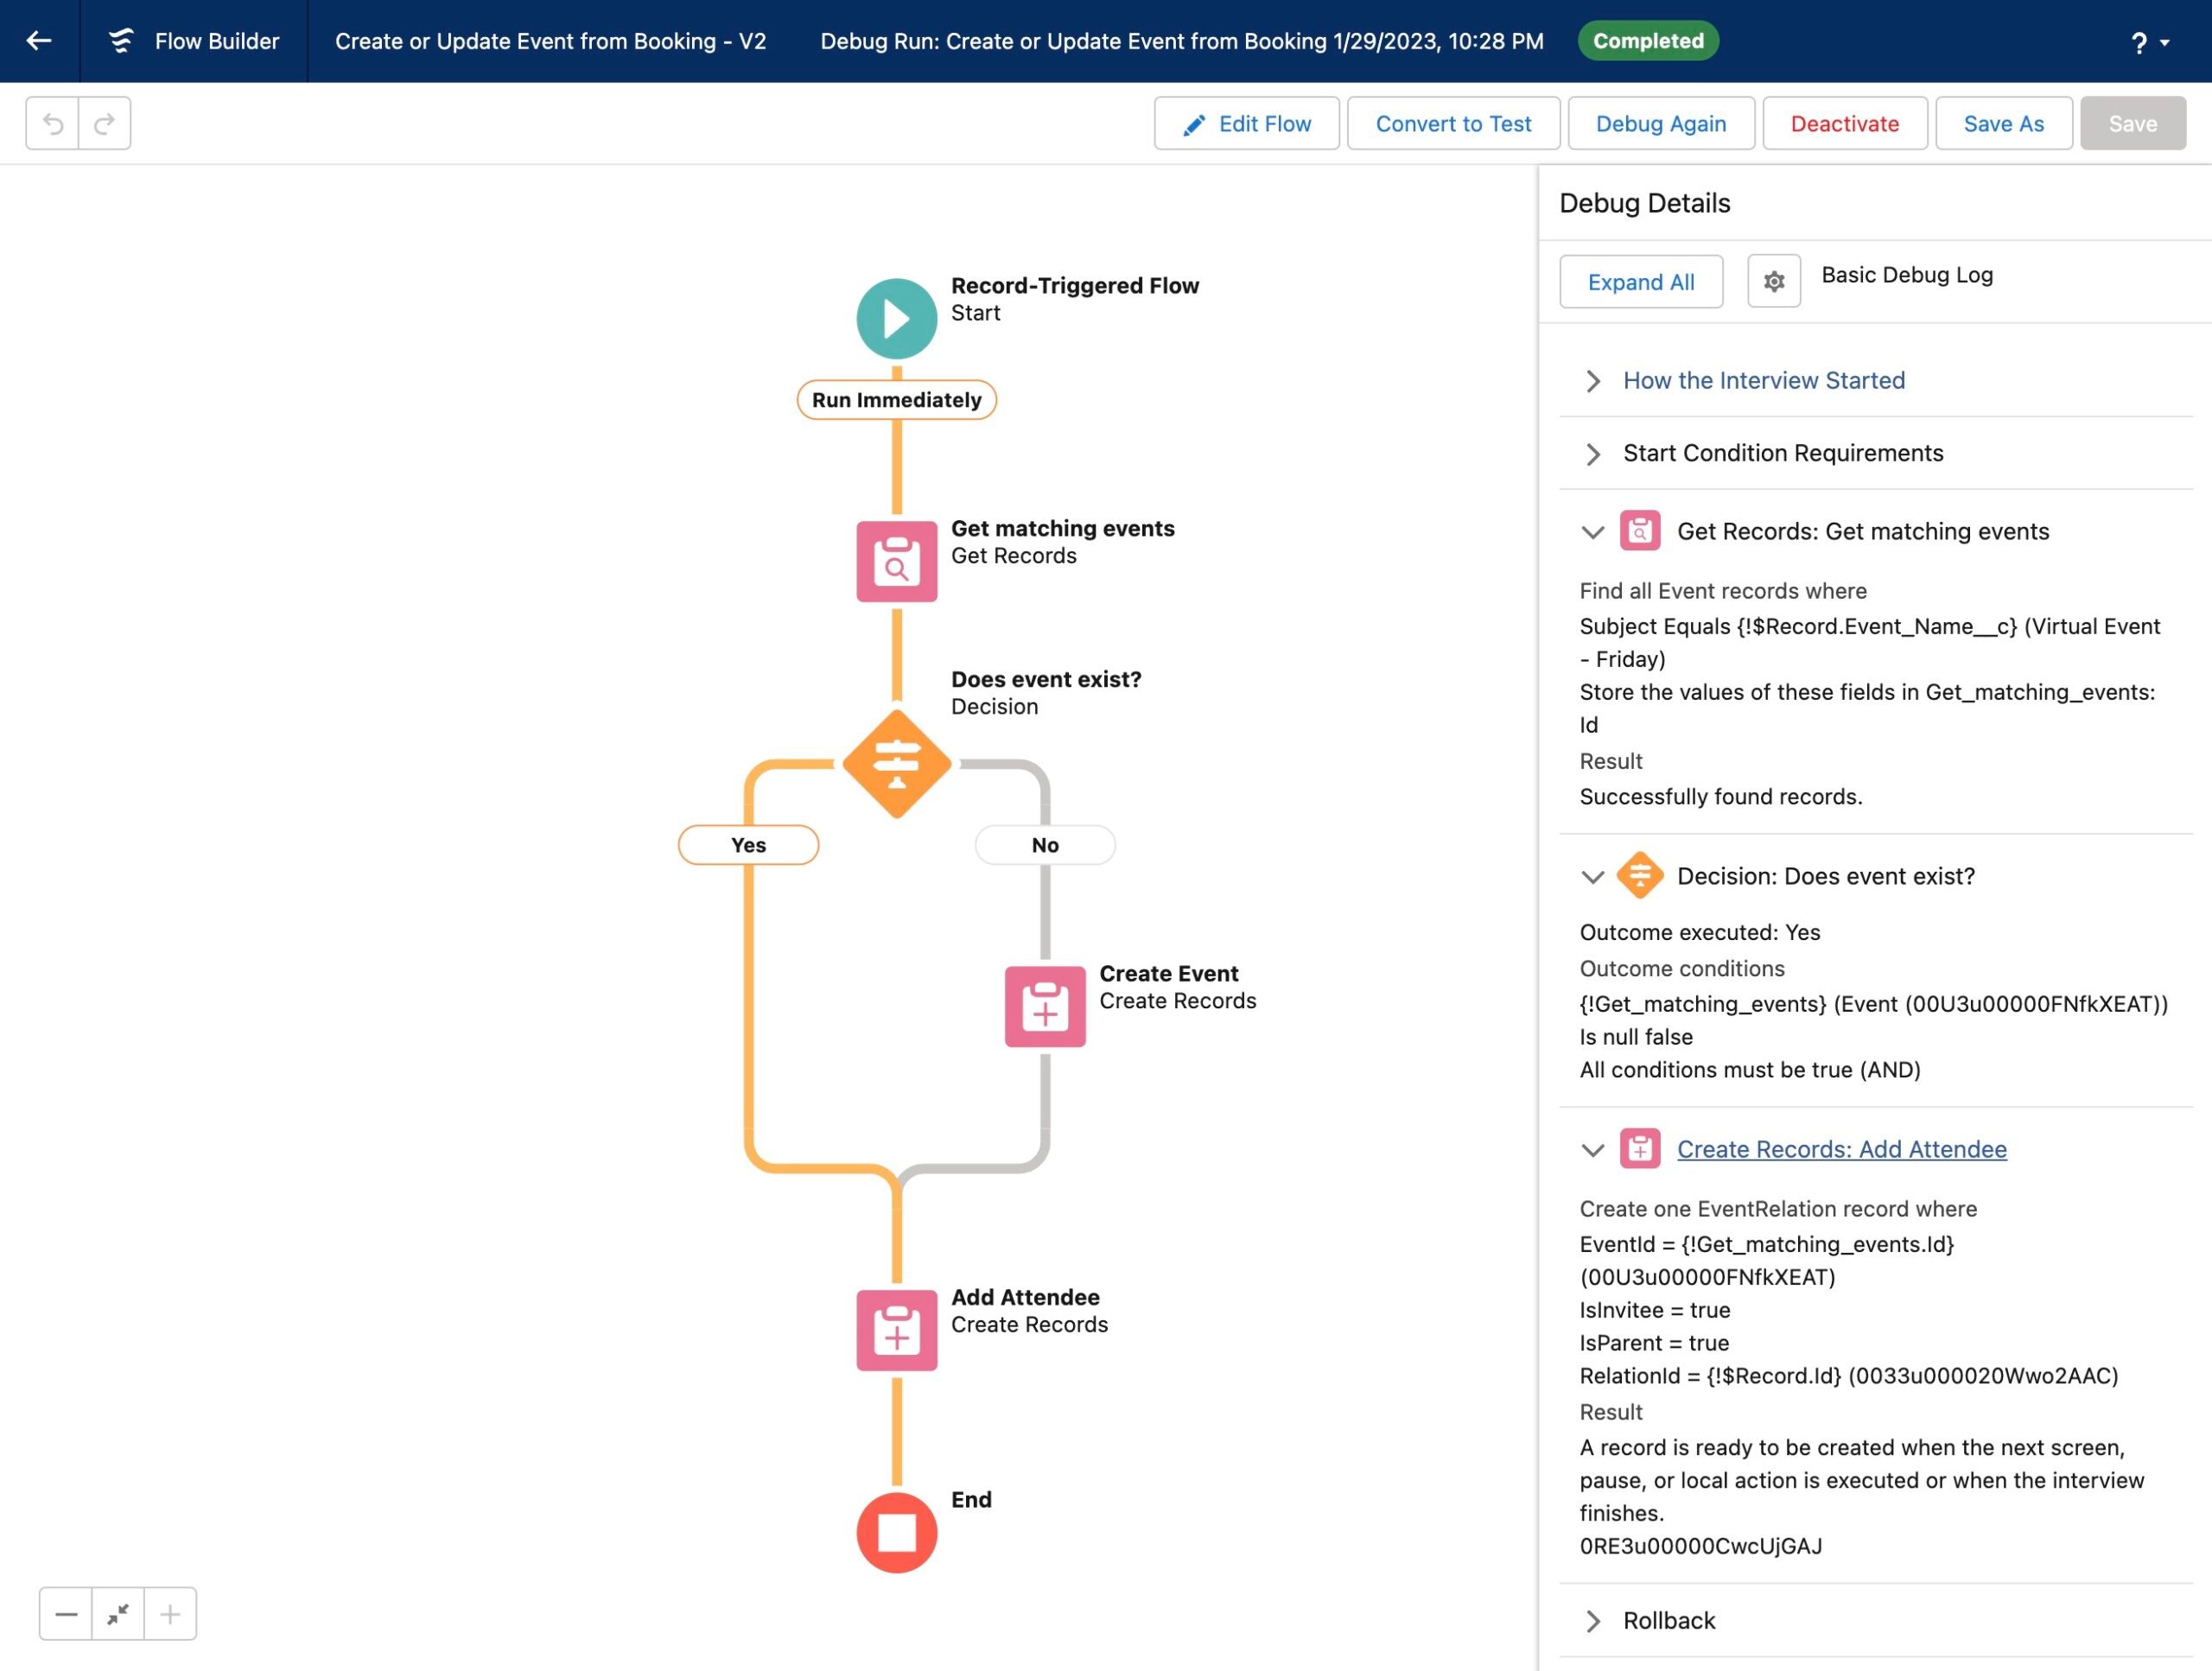
If everything worked, the status will show that the flow completed successfully. If not (for example you have a typo in an object type or variable name), you’ll see a notice about any errors.
In the debug panel, you can also expand the steps to see the outcome of each step in the flow.
In the screenshot above, we’ve confirmed that a contact who was updated so their Event Name field was set to Virtual Event – Friday was successfully added as an attendee to an existing event with that name.
Publish the flow, and we’re ready to put it to the test.
#Putting it all together
Finally, let’s make a test purchase of our ticket in WordPress, and see how it all comes together.
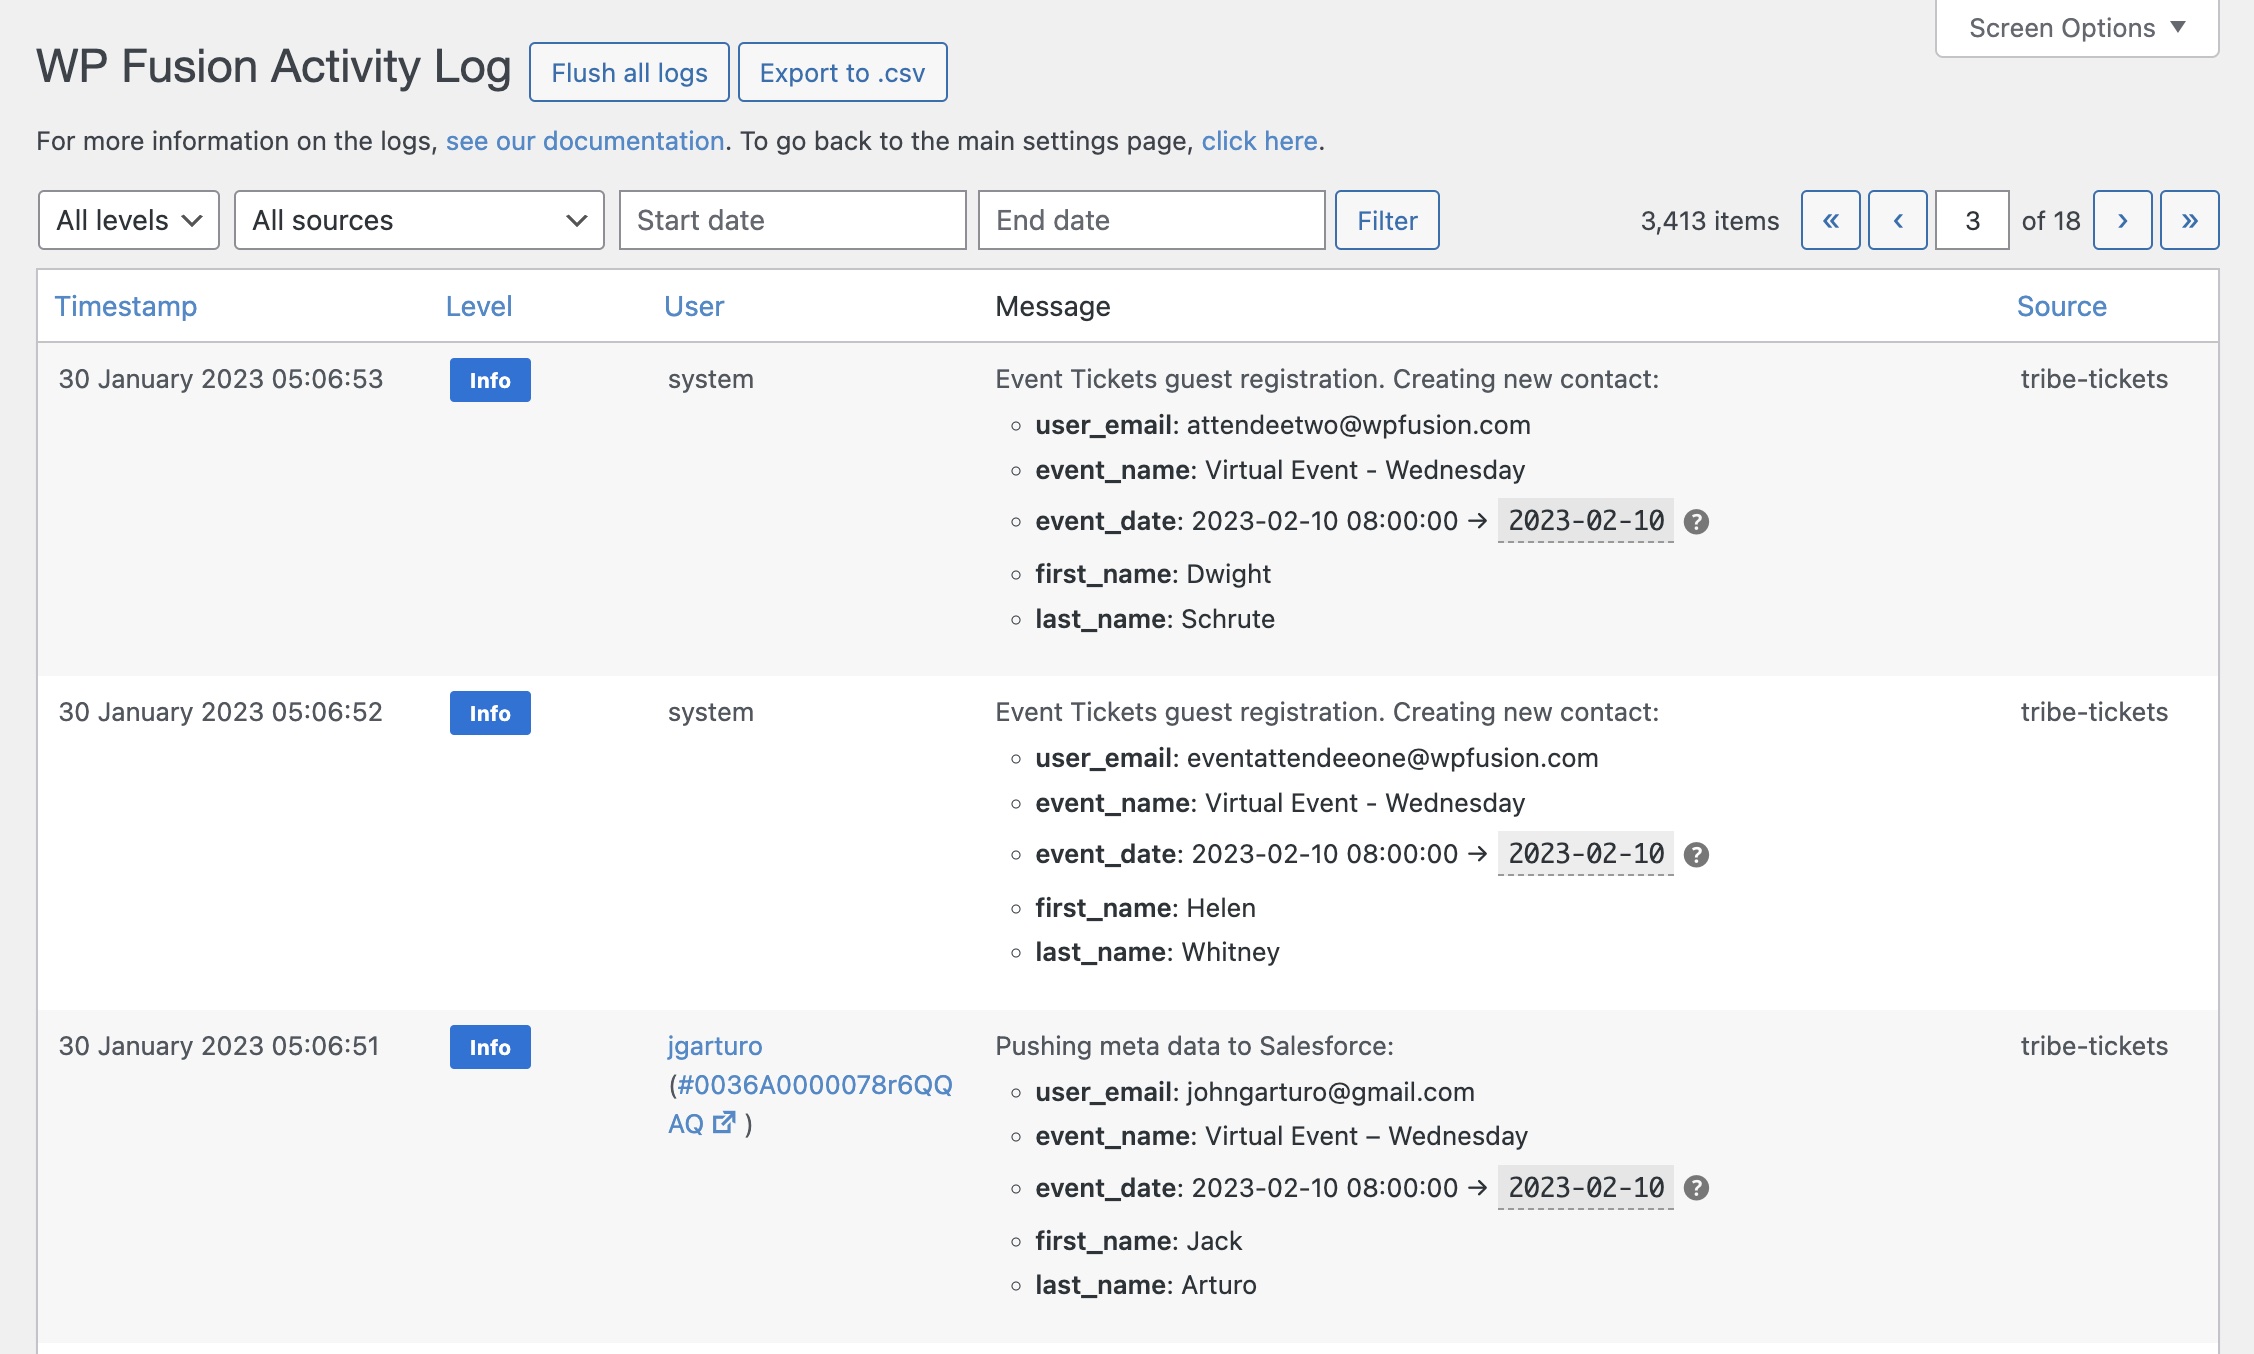
We can look in the WP Fusion logs and see the attendee data being synced to Salesforce.
Above we can see a ticket purchase by registered user, as well as two guest bookings being synced due to the Add Attendees as Separate Contacts option in the WP Fusion ticket settings.

In Salesforce, a new event is automatically created and added to the calendar.

And when we click on the event, we can see the event details, as well as the list of attendees.
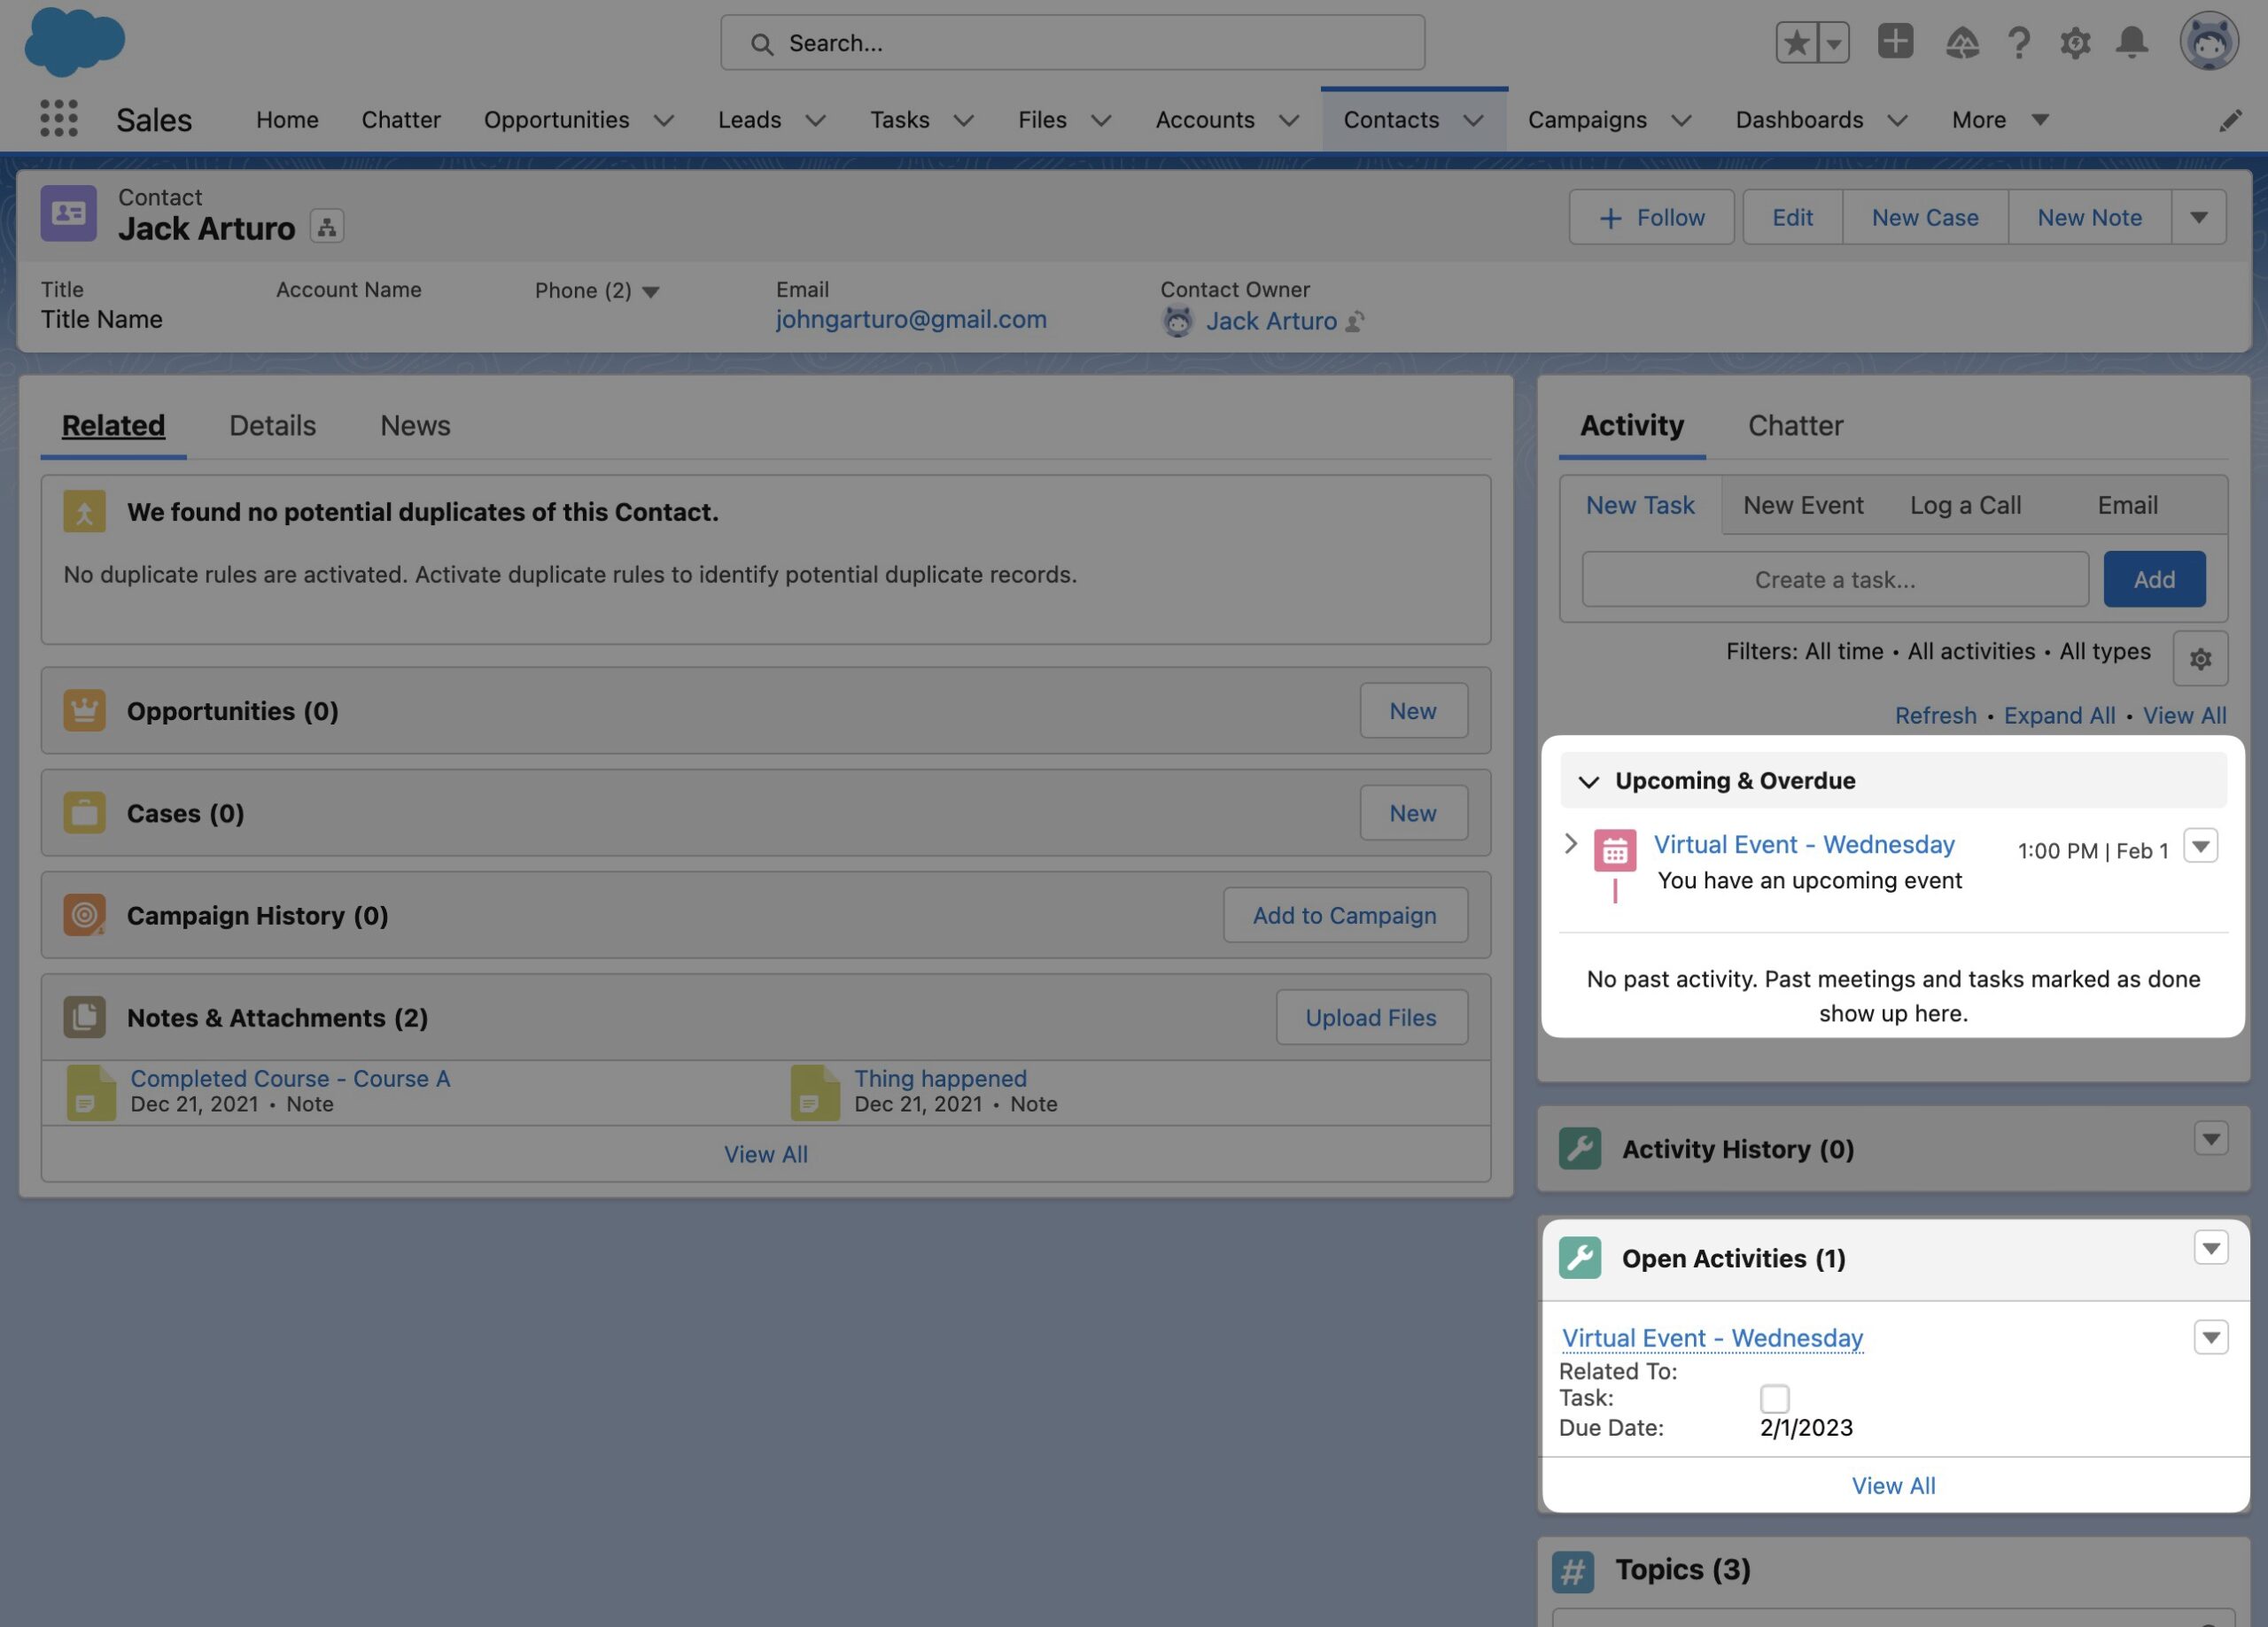
As well, visiting the contact record for each attendee shows their upcoming events in the sidebar.
That’s it! You’ve integrated The Events Calendar and Salesforce’s events calendar using WP Fusion 🥳
Get Automated. Get WP Fusion.
Automate your attendee engagement today using WP Fusion.
Get WP Fusion#Additional examples
This is a relatively simple example since it uses objects that are already in Salesforce (Events and EventRelations) with the necessary standard fields.
But these concepts could be extended to managing custom object relations as well. For example:
- Relate a Student (contact) to multiple Course objects from LearnDash or LifterLMS
- When a customer checks out with a new Billing Company, create a new Account and link them (for another tutorial, see here)
- Relate a Member (contact) to their Membership Level object in Salesforce
For more information on using Flows in Salesforce, check out this tutorial from Automation Champion on linking attendees with Events.
For more info on using WP Fusion with custom objects, including code examples, check out our developer documentation.