
WP Fusion includes many features for protecting content on your site and personalizing the visitor experience based on tags or lists in your CRM or marketing automation platform.
In this tutorial we’ll tie a few of those concepts together to create a Substack-like platform in WordPress: a blog with a mix of free and premium content, protected behind a free opt-in form or paywall.
First, let’s see what it looks like when it’s all put together:
In this recording you can see:
- Premium articles are displayed in the post list with a locked icon
- When the visitor attempts to read a premium article, they’re blocked by a paywall
- Clicking Subscribe takes them to a form where they enter their name and email
- After submitting the form, the visitor is redirected back to the content they’d just tried to access
- The content is now unlocked, and a popup is triggered welcoming the visitor to the site
- All premium articles are now unlocked and available
The plugins and tools we’re using in this tutorial:
- WP Fusion (of course 😉)
- Groundhogg CRM for collecting the leads and managing tags (but this works equally well with any of our 50+ supported CRMs)
- Elementor Pro for the post grid and popups (but this works with any page builder, or the block editor)
- Astra theme (free)
Unlock Premium Content Effortlessly
Learn how to offer freemium and paywalled content using WP Fusion. Start converting visitors into subscribers today!
Get WP Fusion#Protecting content
The first step is to set up our protected content. On each blog post in the admin, we can set access rules for WP Fusion.
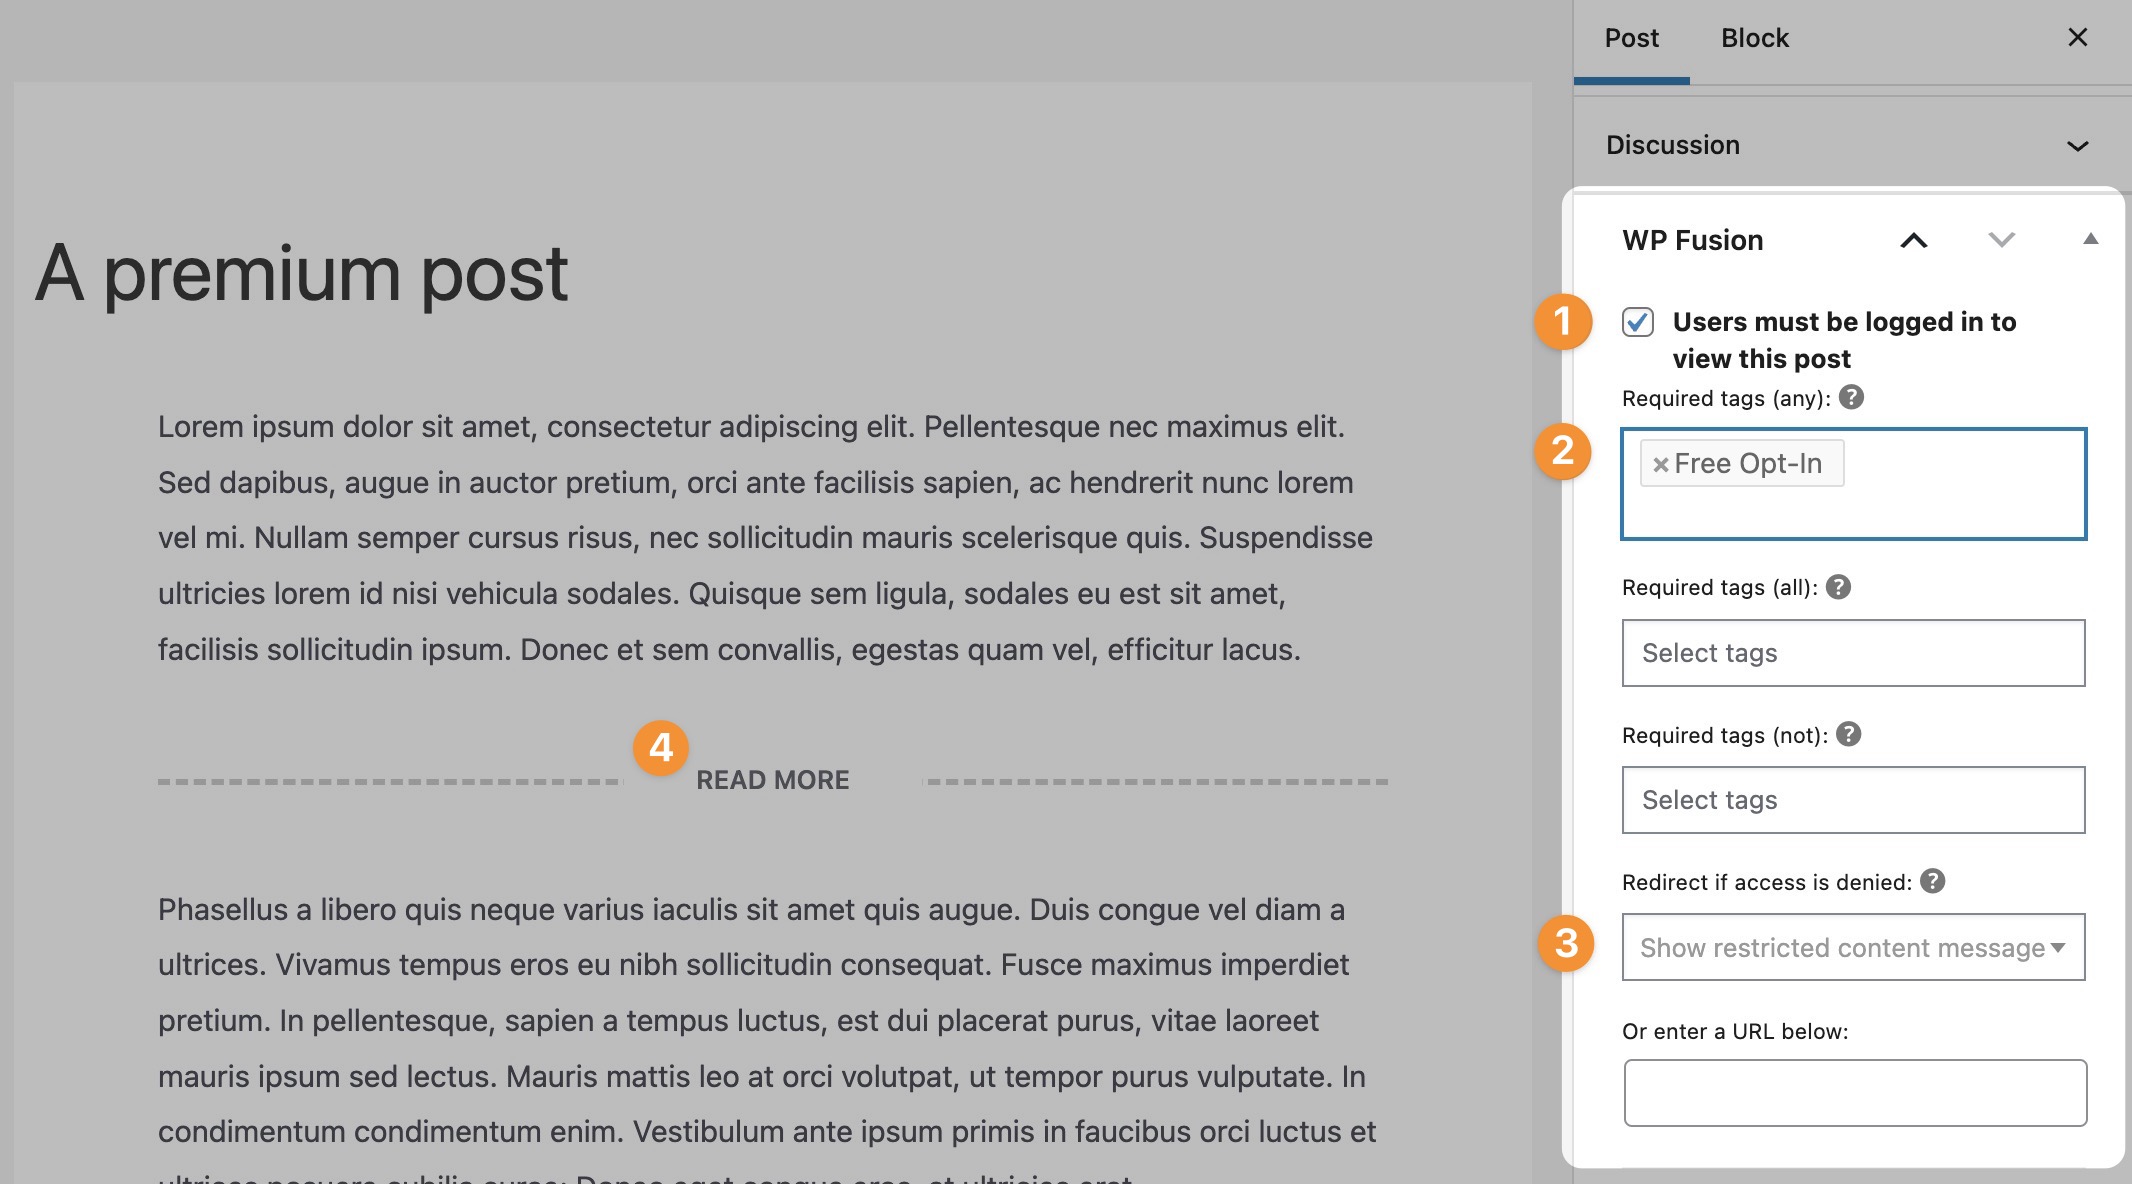
On this post:
- We’ve enabled Users must be logged in to view this post, which activates WP Fusion’s access rules on the content.
- We’ve selected that the user must have the Free Opt-In tag on their contact record in Groundhogg to access the content.
- When access is denied, we will show a message in place of the restricted content (another option is to redirect the visitor to another page).
- We’ve added a Read More block to the content to separate the excerpt from the full article.
For the restricted content message in the general WP Fusion settings, we’ve added a box with links to Subscribe or sign in.

Now if we visit the site in an incognito browser window, the article content below the More tag is replaced by the restricted content message.
Next, let’s explore adding a lock icon to restricted content in the post archives.
Get Automated. Get WP Fusion.
Automate access to content in WordPress using tags or segments in your connected CRM.
Get WP Fusion#Showing a lock icon or text button on restricted content
To help visitors see which content is available without a subscription, we can create a posts loop with a lock icon that is displayed conditionally based on the visitor’s access level. Elementor has a library of icons, and we can even add custom icons from Fontello, Icomoon, or Fontastic.
![]()
Alternatively, we can display buttons dynamically based on the user’s tags in your CRM.
Using Elementor or Bricks, we can create a custom posts loop layout and use WP Fusion to prevent or offer access.
In Elementor, select any element in a Loop Builder template and set the WP Fusion Visibility dropdown to either Users who can access the post or Users who cannot access the post.

Please note that to use this feature, you must set the Cache Settings to Inactive under Advanced → Layout → Display Conditions for any widgets you’d like to be conditionally displayed.
In Bricks, select any element and set the WP Fusion Visibility dropdown to either Users can access the post or Users who cannot access the post.

IMPORTANT: We used Elementor or Bricks to demonstrate, but the same strategy works with any page builder or plugin that lets you build a custom posts loop layout.
Turn Content Into Conversions
Discover how WP Fusion seamlessly integrates with your CRM to manage freemium users and premium members. Monetize smarter!
Get WP Fusion#Collecting opt-ins
The Subscribe button on the form takes visitors to the Subscribe page. On this page is a form configured via WP Fusion with a connection to Groundhogg.

In this case we’re using an Elementor form, but this works equally well with Gravity Forms, WPForms, or any other WordPress form plugin.
The form is configured to apply the tag Free Opt-In (the same tag we used to protect our content in the first step).
Finally, we’ve enabled Form Auto Login in the WP Fusion settings. This means when the form is submitted:
- WP Fusion will create a new contact record in Groundhogg CRM with the submitted details, and apply the Free Opt-In tag.
- The contact’s details and tags will be saved in a cookie in the user’s browser, and any content protected by WP Fusion can be unlocked, even though the user doesn’t have an account on the site.
- WP Fusion detects that the user previously tried to access a piece of protected content, and that they now have access. The visitor is automatically redirected back to the last premium article they tried to access (via the Return After Login feature).
Get Automated. Get WP Fusion.
Sync opt-ins from WordPress form plugins to any one of 50+ CRMs and marketing automation tools.
Get WP Fusion#Triggering a popup or welcome message
WP Fusion’s access control features can be used for more than just blog posts.
Now that the visitor is identified, you can personalize the site experience based on their tags on their CRM contact record.
Next, let’s trigger an Elementor popup with a welcome message.
![Orange popup message with text: Youre in! Thanks, [user_meta field=first_name]. Welcome back to the Welcome popup—enjoy your free article with seamless WP Fusion CRM integration! Copyright notice at the bottom.](https://wpfusion.com/wp-content/uploads/2022/05/elementor-popup-content.jpg)
In the popup content, we’ll use the [user_meta] shortcode (more info here) to display the visitor’s name, and a dynamic content element to show the current post name.
For the targeting settings, we’ll set the popup to appear at most one time, for identified visitors that have the Free Opt-In tag.
(As an alternative to Elementor, check out WP Fusion’s Popup Maker integration for another way to target popups based on CRM tags).
Check out the sequence again in this screencast:
#Taking it further
While this is a simple example, it’s easy to extend and customize.
Because WP Fusion works with most WordPress plugins, you can choose the tools that work best for your project, or integrate tag-based access controls into an existing blog or membership site.
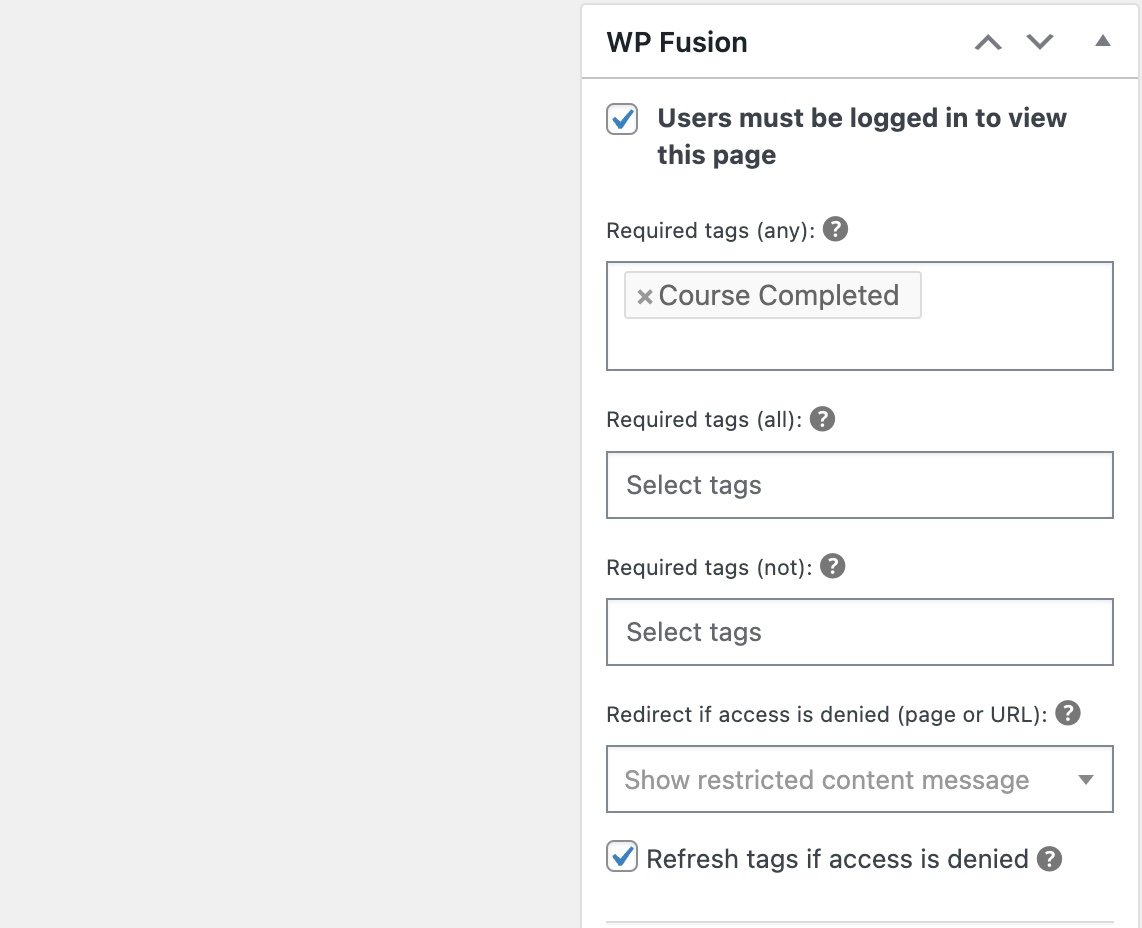
#Restrict LearnDash courses
When offering premium courses, we can use LearnDash to manage access to the course content and WP Fusion to trigger course enrollment based on tags in the CRM.
WP Fusion makes it easy to apply tags based on progress and use tags as automated triggers for course and group enrollments. We can also lock lessons and filter course steps to hide content that users can’t access and redirect users to another page (like a sales page) if they don’t have the required tags.
The first step is to create a paywall for premium LearnDash courses, then show a lock icon or add dynamic buttons to display accessible or restricted content.
To create a paywall, go to the WP Fusion meta box and enable the User must be logged in to view this course option and add the required tags.
Then, build a course grid where users are prevented from accessing premium courses.
The Take This Course button can be set to Users who can access the post, and the Upgrade to Unlock button can be set to Users who cannot access the post. This ensures that the buttons are shown based on the user’s tags in the CRM and the access rules configured on the underlying post.

#Paid subscriptions
For example, we could protect some content with a Paying Member tag. Then, using WP Fusion’s WooCommerce integration, create a product and configure it to apply this tag when it’s purchased. This will grant access to that content for anyone who buys the product.
Or, you could create a membership plan for your premium content using Paid Memberships Pro, and via WP Fusion’s integration, configure it to apply the Paying Member tag. This way members will have access to your premium content as long as they have an active subscription.
#Require email verification
In this simple example we are immediately granting access to the premium content after the form is submitted. Another option is to disable the “Form Auto Login” feature and instead send a verification email via your CRM with an auto-login link.
When the link is clicked, the visitor’s tags will be loaded from your CRM, and any restricted content will be available. Just like with the form submission, they will be redirected back to the last piece of content they tried to access.
#Allow 5 free posts
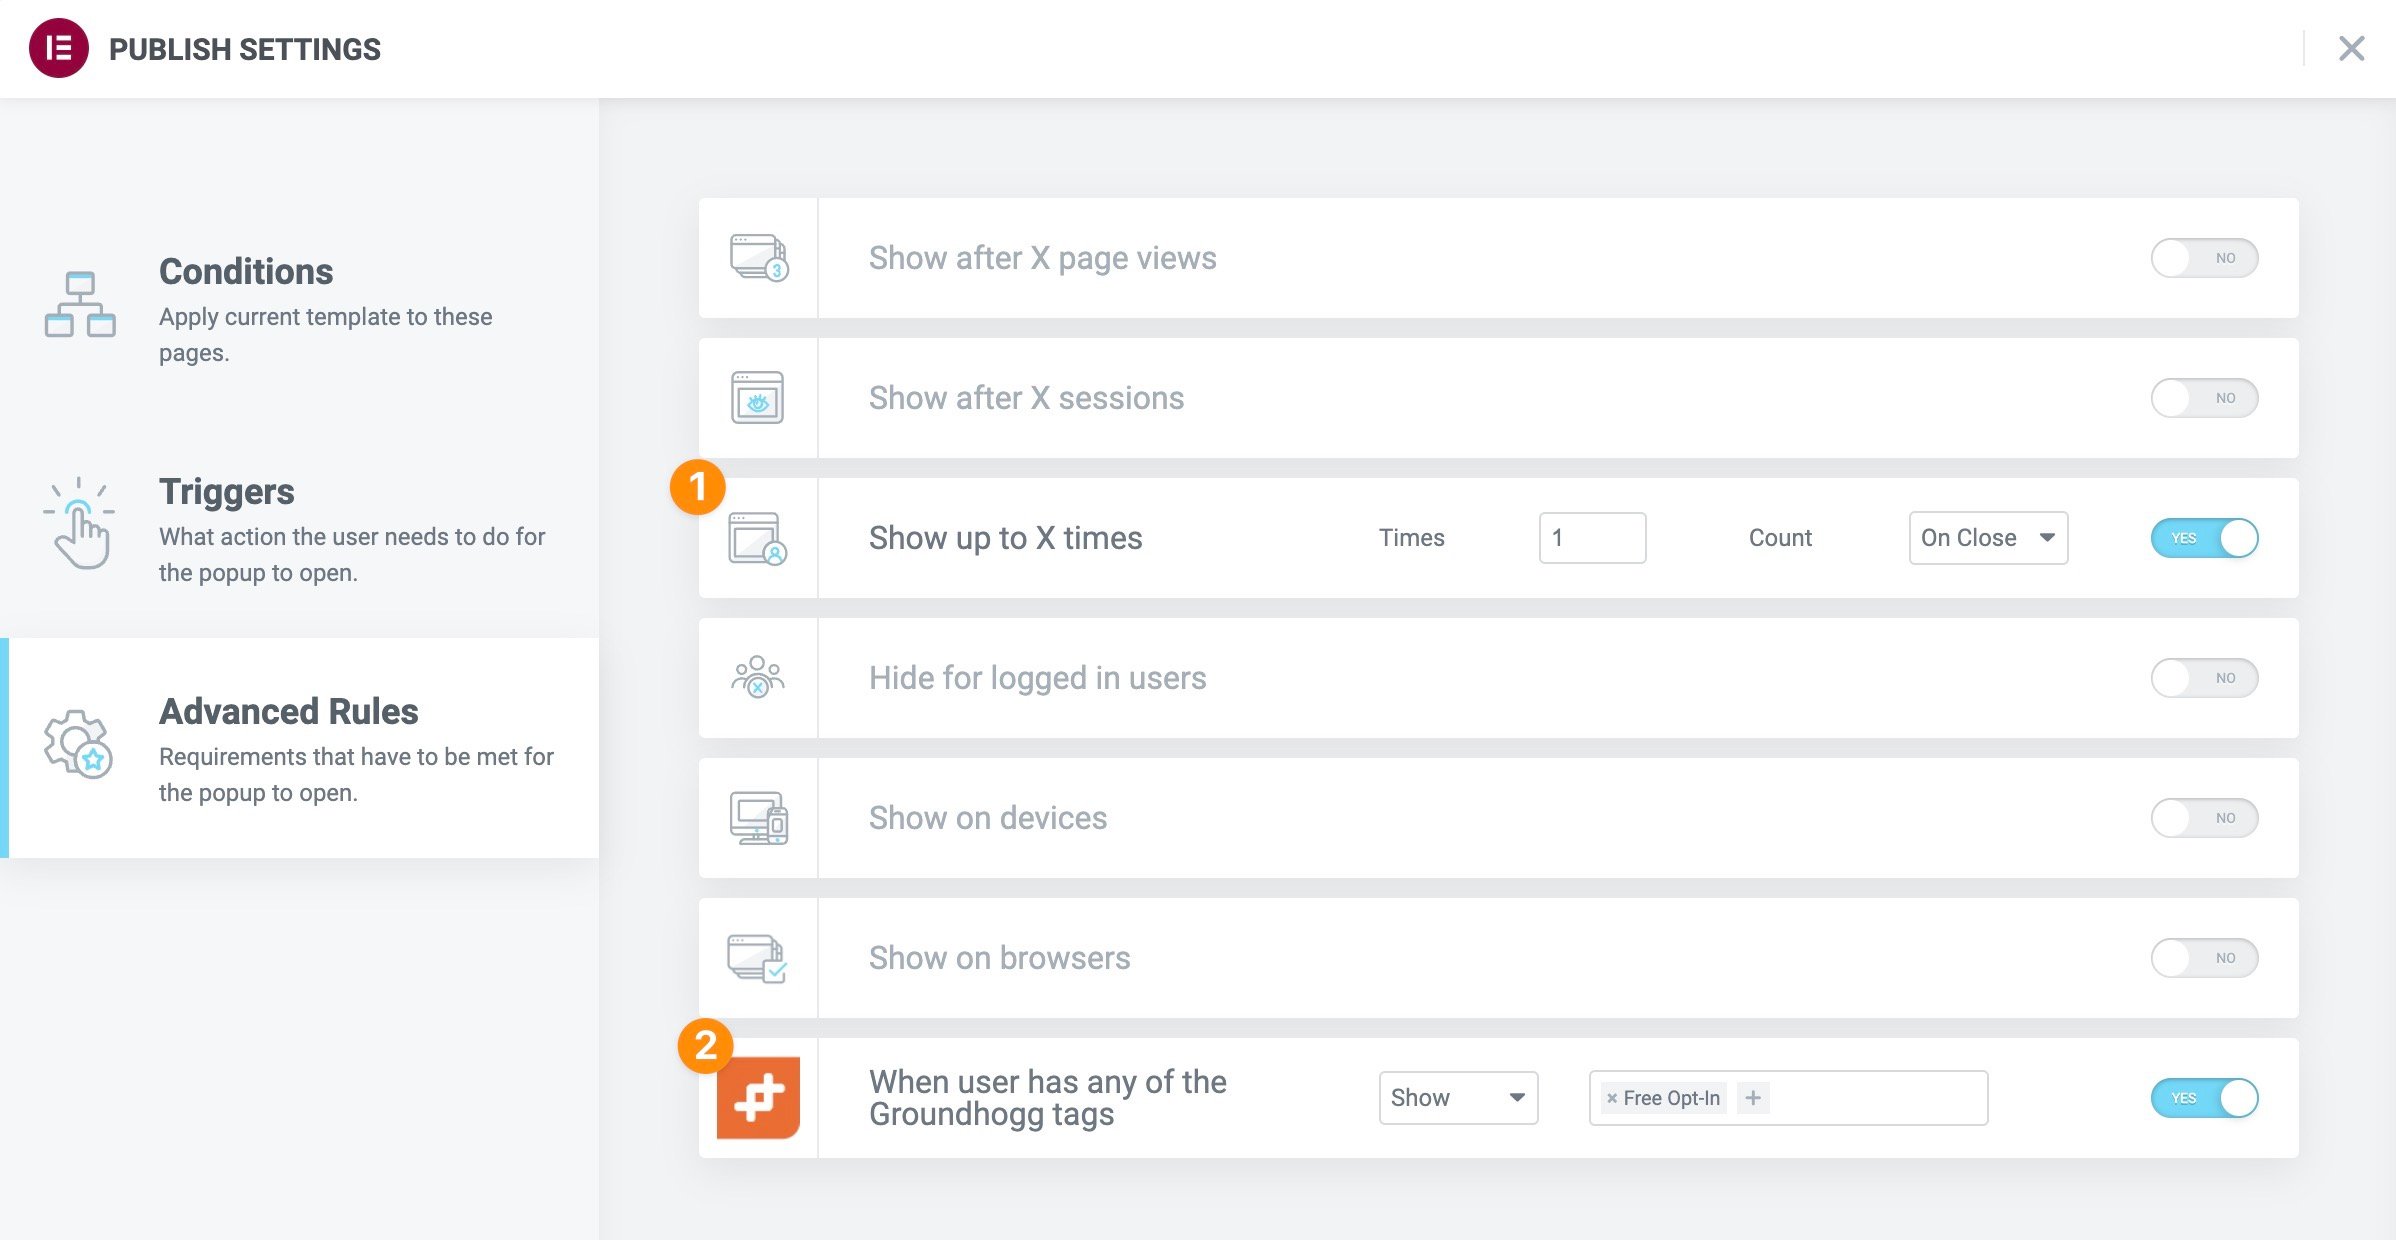
As an alternative paywall method, we can use a popup to allow visitors to read five free posts before they need to opt in.
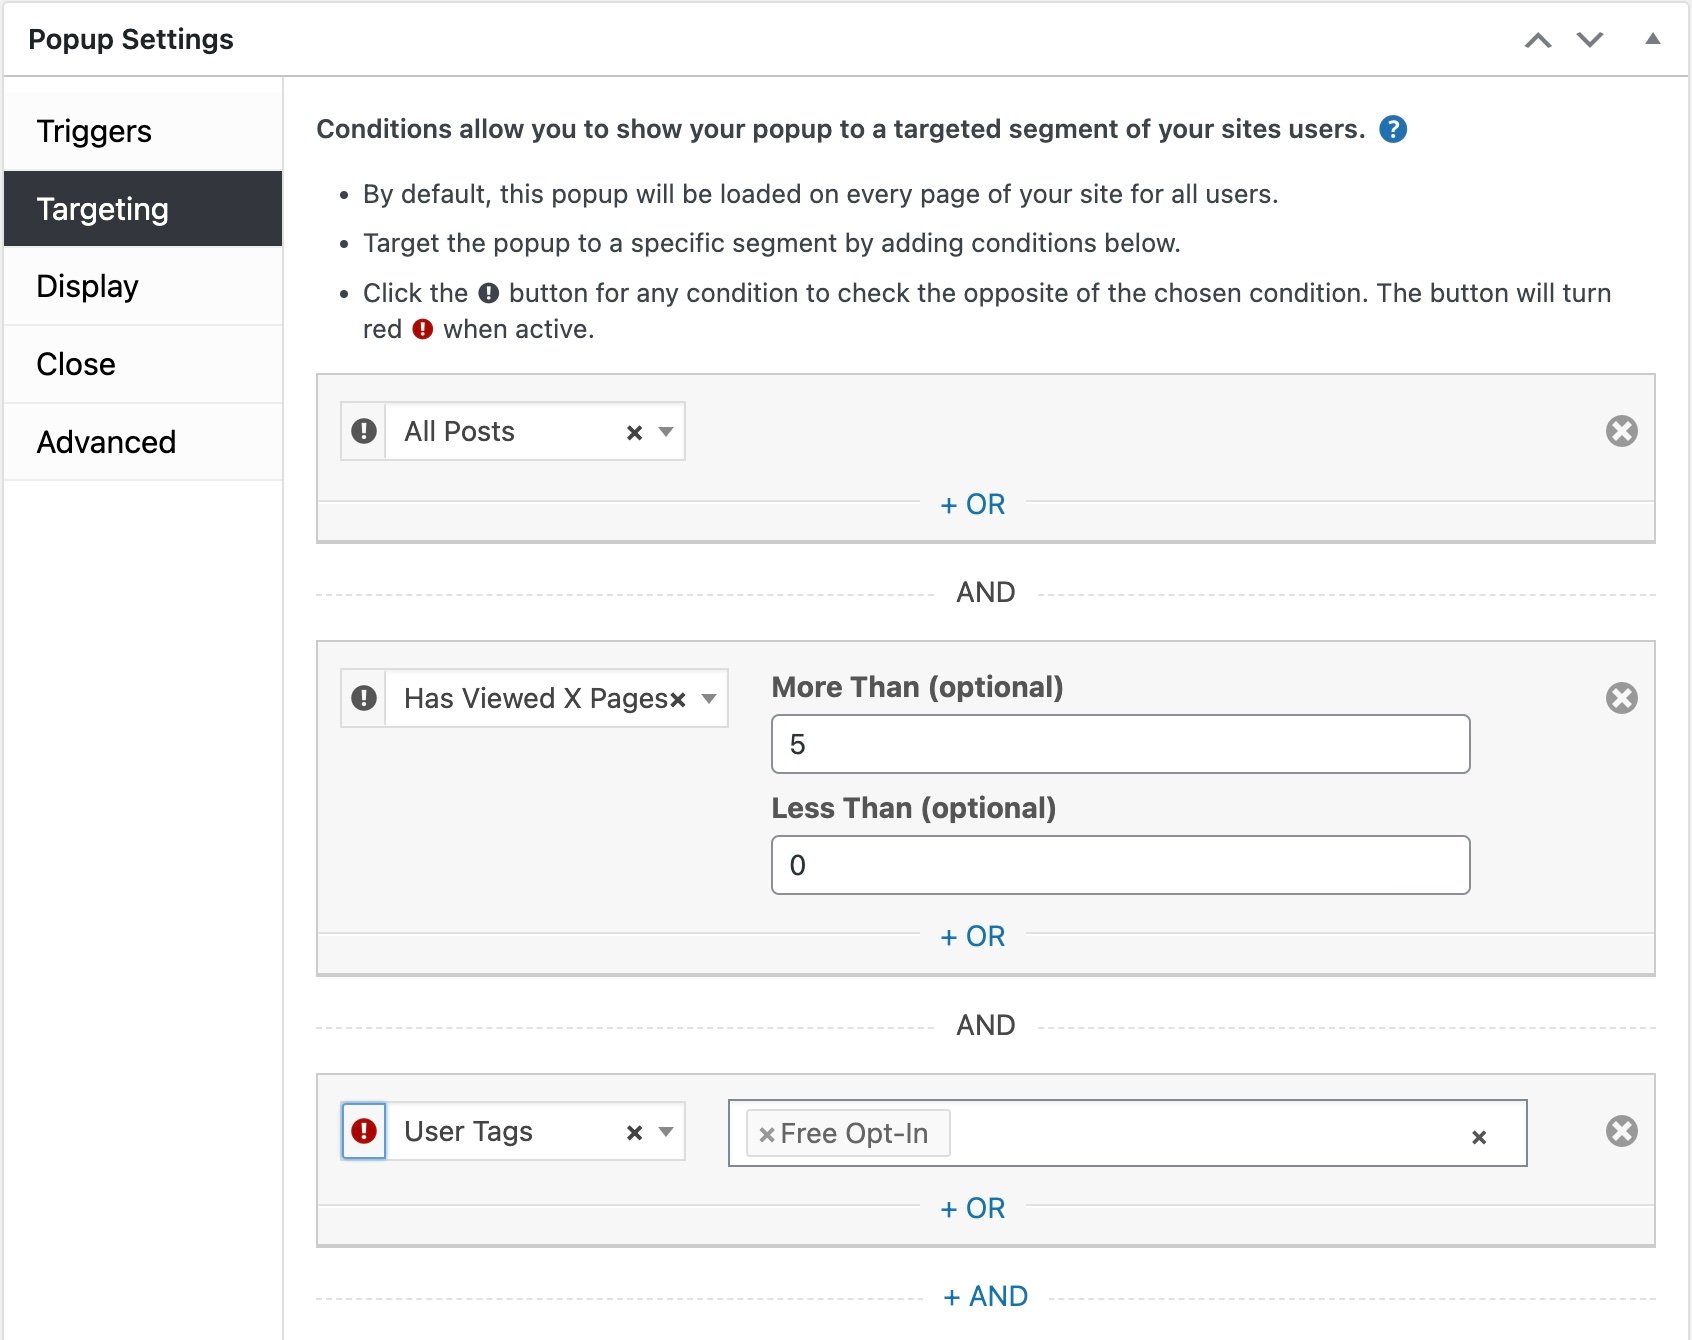
For this example we can use Popup Maker’s Advanced Targeting Extension to show a popup after someone has read five blog posts. WP Fusion’s Popup Maker integration lets us additionally trigger popups based on the visitor’s tags in your CRM.
In this case we will trigger the popup only if the visitor does not have the Free Opt-In tag.
When the form in the popup is submitted, the tag will be applied, and the popup won’t be shown again. This strategy works with Elementor popups as well.
#Automatically email new content to your subscribers
This isn’t directly related to WP Fusion, but we couldn’t talk about building a Substack clone in WordPress without mentioning MailPoet.
While WP Fusion helps you sync your opt-ins with your CRM or email marketing tool, MailPoet allows you to send out automated email newsletters right from your WordPress dashboard whenever a new post is published.
With WP Fusion handling the subscriber synchronization, anyone who signs up on your WordPress site can be automatically added to your MailPoet mailing list.
Then, whenever you publish a blog post, MailPoet will send an email notification to those subscribers—just like Substack, but fully integrated into your own WordPress environment. 🤩
#Wrapping up
In this tutorial we’ve looked at creating a Substack-like website in WordPress, using WP Fusion to offer a mix of free and premium content that requires an opt-in to read.
You may be used to protecting content with a traditional “membership plugin”, which comes with things like free and paid membership plans, a checkout form, account area, members directory, etc.
A big thing that we love to show off about WP Fusion is, since it uses tags (or lists, groups, or segments) in your connected CRM for access control, WP Fusion can protect almost any content on your site, and almost anything can grant access to that content.
This means WP Fusion can be used as a super lightweight “membership” layer on your premium blog content (in this tutorial we used just three plugins).
Or, it can be used alongside popular membership plugins like MemberPress, Paid Memberships Pro, and Restrict Content Pro, to create a deep bi-directional integration between your membership data in WordPress and marketing data or workflows in your connected CRM.
We think WP Fusion gives you the maximum flexibility in building a WordPress site that’s deeply integrated with your CRM or marketing automation tool, and we hope you’ll think so too.
Thanks for reading! 😎✌️
Get Automated. Get WP Fusion.
Create flexible content access rules using tags or lists in your marketing automation platform.
Get WP Fusion


8 thoughts on “How to Offer Freemium or Paywall Content/Courses in WordPress (Complete Guide)”
Thank you very much for this post which is well explained.
Very helpful. I’m trying to find a balanced point between free blog content and paywalled content. I think it would be very helpful if the paywalled content can still be indexed by Google.
Can paywalled blog content appear in Google search results when using WP Fusion? I read that it needs to follow the Structured and Technical Guidelines. Does WP Fusion allow that?
Could it be bypassed by going into the Google cache and reading content for free?
Thanks
Hey Daniel,
Yeah, WP Fusion includes an option whereby an except of your restricted content can be shown to Google and other search engine spiders. To enable that, just check the box for Show Excerpts: https://wpfusion.com/documentation/getting-started/general-settings/#seo
Even then it’s just an excerpt (length of your choosing) that’s shown, not all of the content… so folks wouldn’t be able to access the content via the Google cache, or by pretending to be a search engine in their browser.
WP Fusion only removes the content area of your posts and pages so any structured data, SEO tags, etc., would be un-modified.
Cheers 🙂
Jack
Thank you!
Hey, sour Demo link is broken!
Hey Manu, yeah, sorry about that… our demo server crashed a few weeks ago and we lost the site 🙁
I’ve updated the post.
Instead of using the lock icon, how do I Blur both the image and title, description, tag, category of a post on the list of posts?
Thank.
With Elementor you can use a filter https://elementor.com/help/blend-mode-and-css-filters/ , or else you can also do it with CSS using the filter property, like
filter: blur(4px);
🙂