#Overview
You can use HTTP Posts and Webhooks in Drip to send data back to your WordPress site when a contact’s profile has been modified, or tags have been added or removed. You can also automatically generate new WordPress user accounts for Drip subscribers.
#Webhook types
Drip can trigger webhooks in three ways: via Rules, Workflows, and globally based on account-wide triggers.
#HTTP Posts in rules
Using an HTTP Post in a Rule in Drip allows you to send data back to WordPress when the rule is triggered.
You can set this up by navigating to the Workflows tab in Drip. Head to the Rules tab and create a new rule.
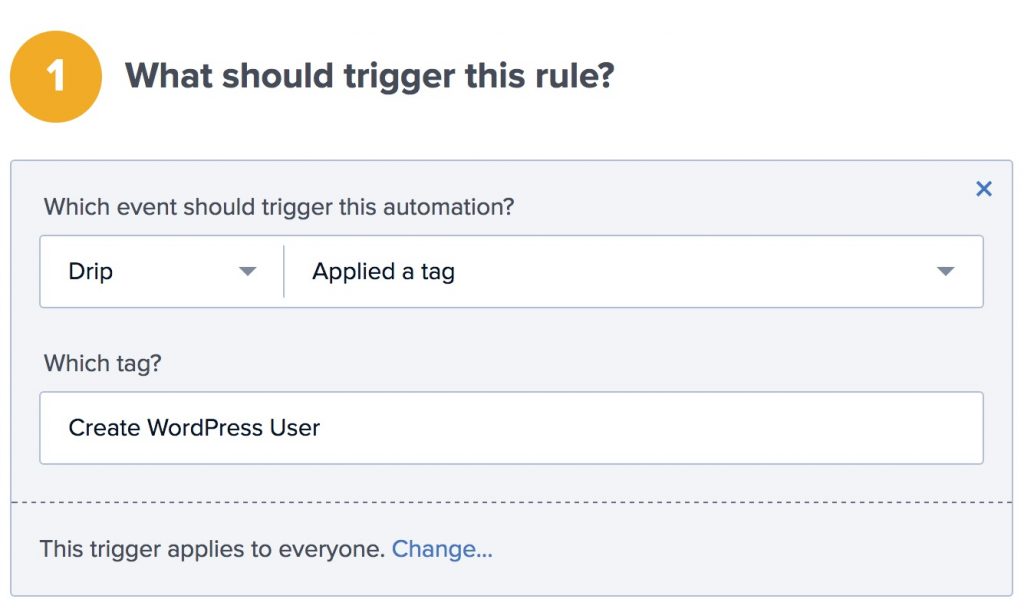
First set the criteria which will trigger the rule. In this case, we’re telling Drip to send the HTTP Post whenever the tag “Create WordPress User” is applied to a subscriber.
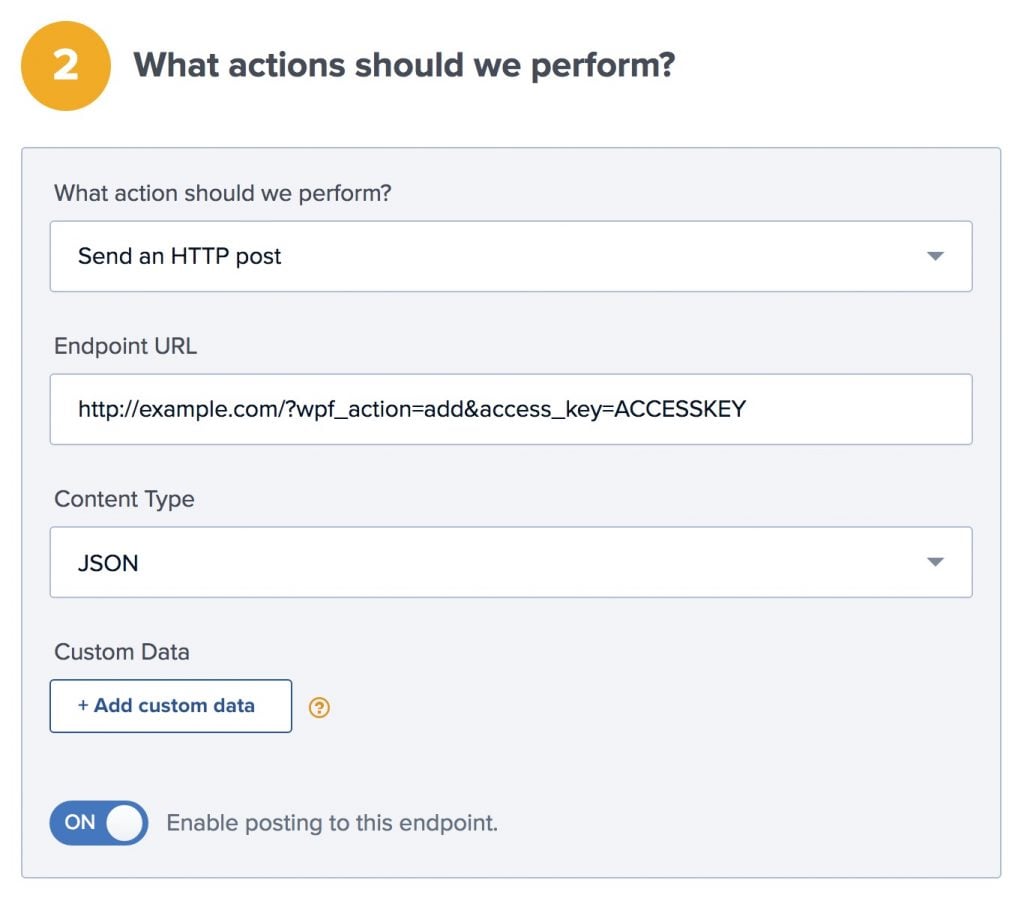
In the second panel, select “Send an HTTP post” from the dropdown. For the Endpoint URL, enter the URL to your site.
In this example, we’re triggering the creation of a new WordPress user when the tag is applied. This is achieved by using wpf_action=add in the URL. You also need to supply your access key, which can be found from the WP Fusion settings page on your site.
Depending on the action you’re trying to perform, there are several additional parameters you can include in the URL. These can be found at the bottom of this article.
#HTTP posts in workflows
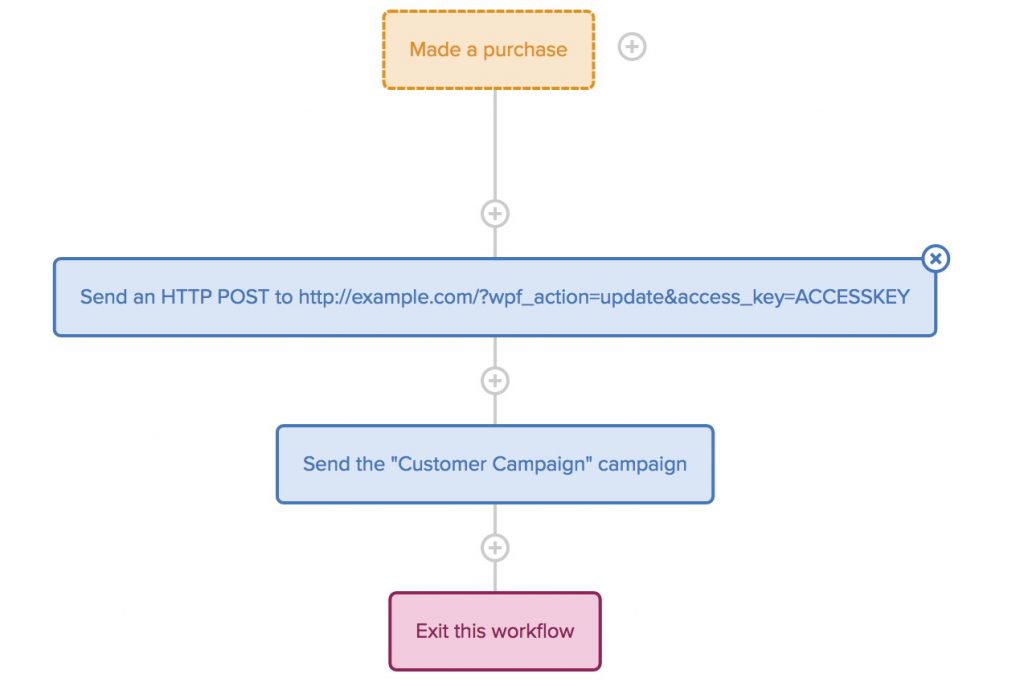
You can also trigger an HTTP Post as part of a workflow. Add a new node to the automation and follow the same steps outlined above.
#Account-wide webhooks
Another way to configure webhooks in Drip is globally to your account. Head to Settings » Webhooks and click New Webhook to create a webhook.

Enter the URL to your site, following the examples below. Then select the events that should trigger the webhook.
In the screenshot above we’ve used wpf_action=update_tags and set the triggers to Applied a tag and Removed a tag. This means that any time a tag is added to or removed from a subscriber in Drip, the tag cache will be automatically updates for the corresponding user in WordPress.
#Webhook URL structure
You can structure the webhook URL differently depending on the desired action. To authenticate the webhook you must add your access key, which can be found at the bottom of the General tab in the WP Fusion settings.
#To update a user’s tags
To update an existing WordPress user’s tags from the contact record, the URL for the webhook should look like the following:
https://mydomain.com/?wpf_action=update_tags&access_key=YOURACCESSKEY
#To update a user’s tags and meta data
To update a user’s tags and pull any new meta data from Drip for that contact, the URL for the webhook should look like the following:
https://mydomain.com/?wpf_action=update&access_key=YOURACCESSKEY
#To create a new user
To create a new user, use the following URL:
https://mydomain.com/?wpf_action=add&access_key=YOURACCESSKEY
You can also specify additional parameters in user creation. For example, to send the user a welcome email containing a link to log in on your site, use the following:
https://mydomain.com/?wpf_action=add&access_key=YOURACCESSKEY&send_notification=true
You can also specify a specific user role to be assigned to the new user. For example, to set the new user to the “customer” role, use the following:
https://mydomain.com/?wpf_action=add&access_key=YOURACCESSKEY&role=customer
Note that you have to have registered a “customer” role on your site for this to work. By default users will be assigned the role of “subscriber”.
The add method will update a user if an existing user already exists. It will not create a duplicate user.
user_login and user_pass on your website, the new users will be given the usernames and passwords stored in their Drip subscriber record.#User passwords
New user accounts will be created with an automatically generated password. If you’d like to use this password in your email marketing, you can send the password back to Drip after it has been generated.
In the Webhooks section of the General settings tab, check the box for Return Password, and select a field in Drip where the password should be stored.
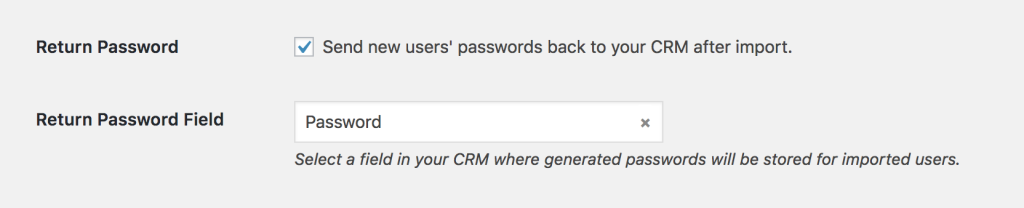
After a new user is created, their automatically generated password will now be saved back to their contact record, and you can use a merge field to include it in an email. The username will be the contact’s email address.