#General Info
Navigate to Plugins » Add New in your WordPress dashboard and upload the .zip file you received when you purchased WP Fusion.
After you’ve uploaded WP Fusion and activated the plugin, go to Settings » WP Fusion to activate your WP Fusion license key, select your desired CRM, and follow the instructions to configure the initial connection.

Once you click Connect, WP Fusion will validate your API credentials and then load some data from your CRM like your available tags and custom fields.
Once that’s finished you can save the settings, and the rest of the WP Fusion options will appear. Proceed to General Settings and Basic Setup for more info.
#Resynchronize Available Tags and Fields
If you later add new tags or fields in your CRM, you can always go back to the Setup tab and click the blue Refresh Available Tags & Fields button to load the latest tags and fields into the dropdowns in WordPress.
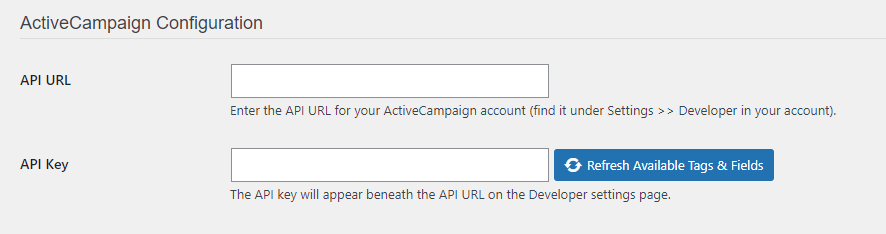
This will also update the values for any other dropdowns in WP Fusion’s settings, depending on your connected CRM. For example available products, pipelines, deal stages, owners, and contact layouts.
All data that’s not tied to a specific contact record can be refreshed by clicking Refresh Available Tags and Fields.
#Initial User Sync
After you’ve connected WP Fusion to your CRM and saved the settings page, WP Fusion will go through the users on your site and attempt to match them with contact records in your CRM.
A status bar will appear at the top of the page showing this progress. If a match is found the contact’s ID and tags will be loaded and cached in WordPress for future use.
No data will be sent to your CRM during this process and no user data will be modified.
#CRM Specific Setup Guides
- ActiveCampaign Installation Guide
- AgileCRM Installation Guide
- Bento Installation Guide
- BirdSend Installation Guide
- Brevo Installation Guide
- Capsule Installation Guide
- Constant Contact Installation Guide
- ConvesioConvert Installation Guide
- ConvertKit (aka Kit) Installation Guide
- Customer.io Installation Guide
- Drift Installation Guide
- Drip Installation Guide
- Dynamics 365 Installation Guide
- Encharge Installation Guide
- EngageBay Installation Guide
- EmailOctopus Installation Guide
- FluentCRM Installation Guide
- FluentCRM (REST API) Installation Guide
- FunnelKit Installation Guide
- GetResponse Installation Guide
- Gist Installation Guide
- Groundhogg Installation Guide
- Groundhogg (REST API) Installation Guide
- HubSpot Installation Guide
- HighLevel Installation Guide
- Infusionsoft / Keap Installation Guide
- Intercom Installation Guide
- Kartra Installation Guide
- Klaviyo Installation Guide
- KlickTipp Installation Guide
- MailerLite Installation Guide
- Mailchimp Installation Guide
- MailPoet Installation Guide
- Mautic Installation Guide
- MooSend Installation Guide
- NationBuilder Installation Guide
- Omnisend Installation Guide
- Ontraport Installation Guide
- Ortto Installation Guide
- Pipedrive Installation Guide
- PulseTechnologyCRM Installation Guide
- Salesflare Installation Guide
- Salesforce Installation Guide
- Sender.net Installation Guide
- Sendlane Installation Guide
- Sendlane Installation Guide
- User.com Installation Guide
- Zoho Installation Guide
