#Overview
WP Fusion integrates with WooCommerce to add customers to your CRM when they make a purchase on your site, and tag them based on products purchased.
You can also use WP Fusion to restrict access to products and product variations, as well as track coupon usage, and auto-apply coupons based on CRM tags.
With supported platforms, WP Fusion’s Enhanced Ecommerce addon can also sync revenue data, deals, and/or invoices from WooCommerce to your CRM’s ecommerce system.
And WP Fusion’s Abandoned Cart addon can track abandoned WooCommerce carts, allowing you to follow up with customers using automated sequences in your CRM.
#Syncing customer data and custom fields
By default, when a customer checks out on your store, a new contact will be created in your CRM with their first name, last name, and email.
You can enable additional fields for sync from the Contact Fields tab in the WP Fusion settings.

By default all of the billing and shipping fields will be available for sync. If you’re using a custom checkout field editor plugin such as WooCommerce Checkout Field Editor, those fields will also be displayed.
There are three special fields at the end of the list:
- Email Optin: If you are using WP Fusion’s email optin feature to collect marketing consent at checkout, this will sync the value of the checkbox to a custom field as
trueorfalse, for updating checkbox and boolean fields in your CRM. You can optionally change the field type todateto sync the date and time that the customer gave marketing consent. - Total Order Count: This will be updated each time a customer places an order, it will reflect the total count of orders for that customer on your store.
- Total Lifetime Value: This will be updated each time a customer places an order, with their total lifetime value (i.e. the total of all their non-refunded orders) on your store.
#Order fields
WP Fusion has the ability to sync some details about the customer’s most recent order to custom fields in your CRM. Those can be enabled under the WooCommerce Order heading in the contact fields list.
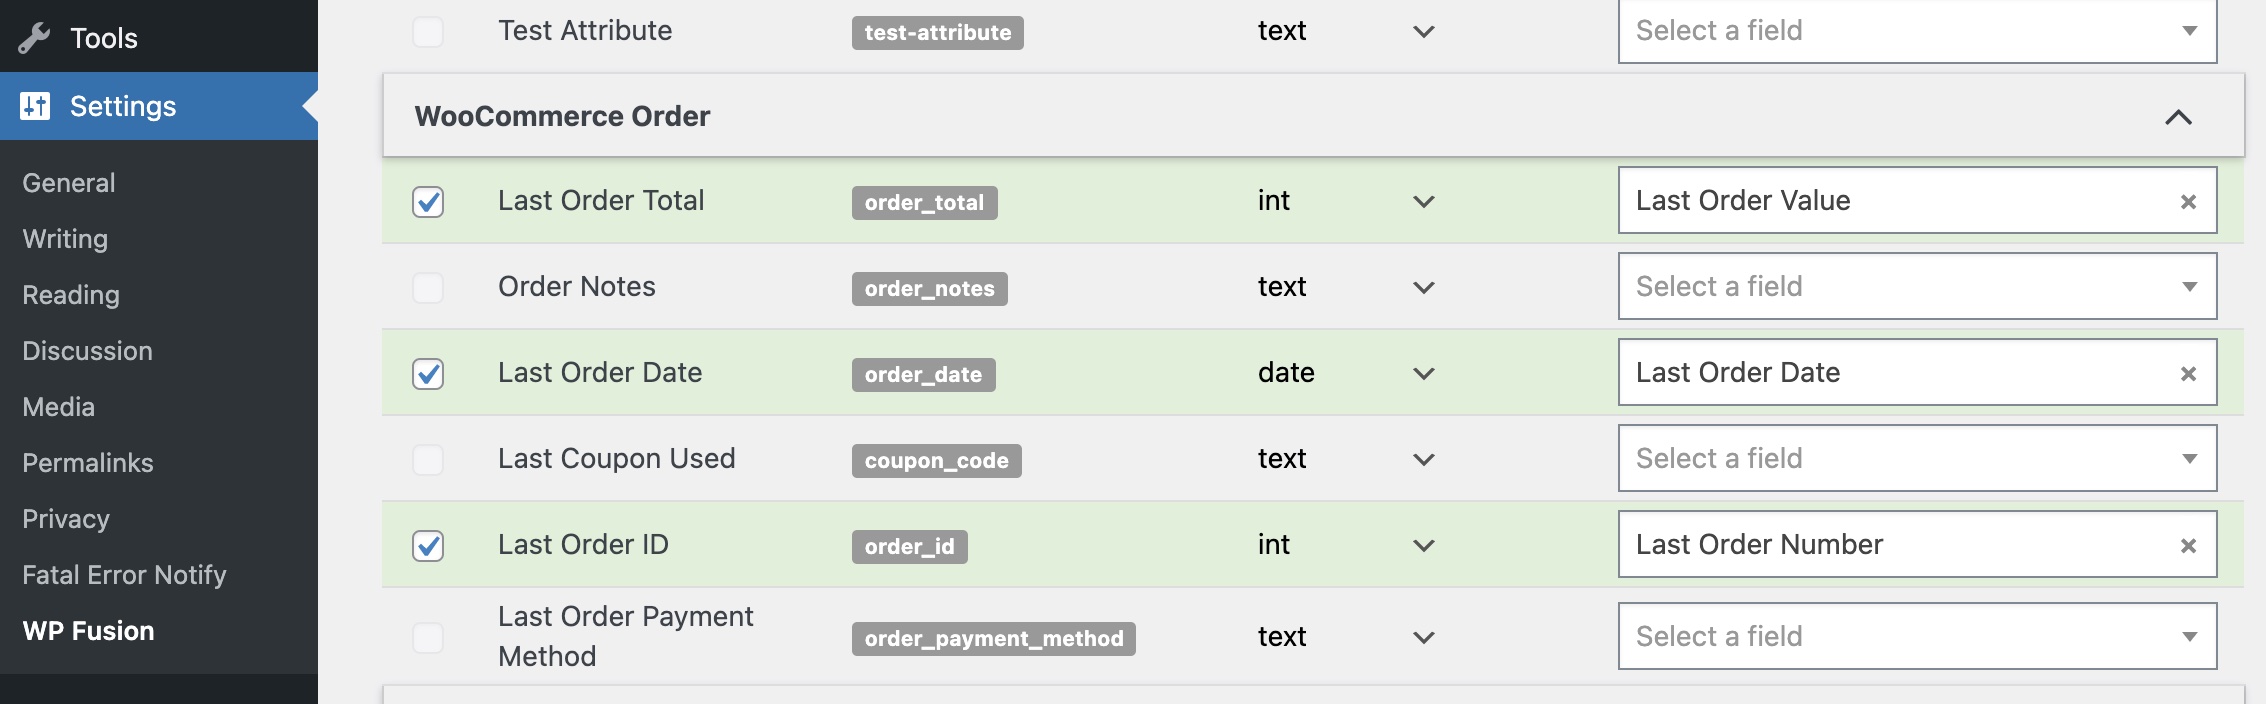
The available fields are:
- Last Order Total: The total order value
- Order Notes: Any notes added by the customer to the order at checkout
- Last Order Date: The date of the customer’s most recent order
- Last Coupon Used: The coupon code used at checkout
- Last Order ID: The ID of the order
- Last Order Status: The order status, for example
processingorrefunded. Note: thependingstatus will not be synced to avoid duplicate order syncs at checkout - Last Order Payment Method: The title of the payment method used, for example “Stripe”, “PayPal”
- Last Order Shipping Method: The title of the shipping method used, for example “Flat Rate”, “UPS Express”, etc
#Attribute fields
If you’re selling variable products, WP Fusion also supports syncing selected attributes to custom fields in your CRM.
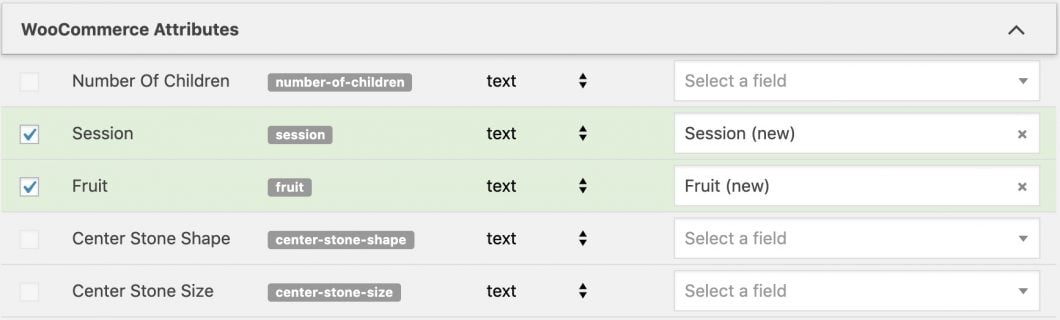
Under the WooCommerce Attributes header you’ll see all of the available attributes from your products. When a customer checks out the selected attribute will be stored in the corresponding custom field.
#General settings
WP Fusion has some general settings for WooCommerce. These can be found on the Integrations tab in the WP Fusion settings.

Those options are:
- Apply Tags to Customers: The tags specified here will be applied to all WooCommerce customers, when an order is placed.
- Hide Restricted Products: If you’ve configured access rules on an individual product, turning on this option lets you completely hide products from your store if the user doesn’t have the required tags.
- Restricted Product Error Message: The message here will be displayed when someone tries to add a restricted product to their cart.
- Asynchronous Checkout: When this is enabled WP Fusion runs WooCommerce order actions in the background, after the checkout has completed. This makes the checkout process faster, but it can sometimes have problems with caching or security plugins.
- Hide Coupon Field: If you’re using automatic discounts, enabling this option lets you hide the coupon input field on the checkout.
- Apply Tags – Left Review: The tags specified here will be applied when a user leaves a review on a product.
#Automatic tagging
With some CRMs WP Fusion supports automatically generating and applying tags based on certain variables when someone makes a purchase in WooCommerce.
If your CRM supports this feature, these settings will appear on the Integrations tab in the WP Fusion settings:
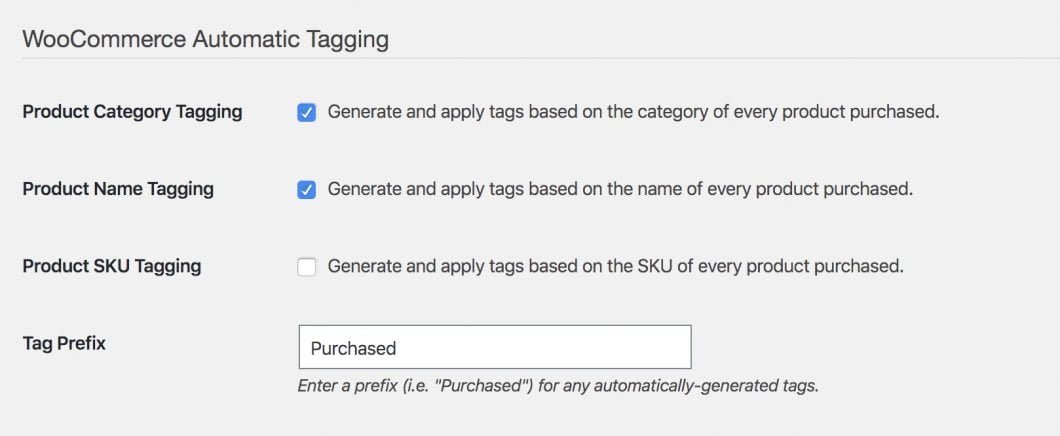
The Tag Prefix will be appended to any of the automatically generated tags. This field also accepts the shortcode [status] to dynamically insert the status of the order.
For example if someone purchases a product Widget and the order status is Processing, you could set the Tag Prefix field to
Purchased – [status] –
This would apply the tag Purchased – Processing – Widget.
Automatic tags will be applied when an order is originally placed, but unlike tags configured on individual products, they will not be removed if the order is later refunded or cancelled, or if a subscription is cancelled. They are only applied, not removed.
#Order status tagging
WP Fusion also includes an option where you can apply tags to a customer in your CRM when their order status changes in WooCommerce. For example if you manually mark an order as “Shipped”, an automated email could be sent through your CRM to customers.
The tags in this section will be applied to the customer when their order status is changed. These tags are not automatically removed. For example the tags for On Hold will not be removed if the order is later changed to Completed.
If you’d like to remove the tags you can do so via an automation in your CRM.

Warning: It is recommended not to sync Pending payment customers with your CRM. When this is enabled, WP Fusion needs to create a contact record and apply a tag as soon as the pending order is created in WooCommerce, and then update it and apply additional tags less than a second later when the payment is processed.
This slows down your checkout with many duplicate API calls and in most cases isn’t necessary.
A more performant method of tracking incomplete payments is to use Abandoned Cart Tracking.
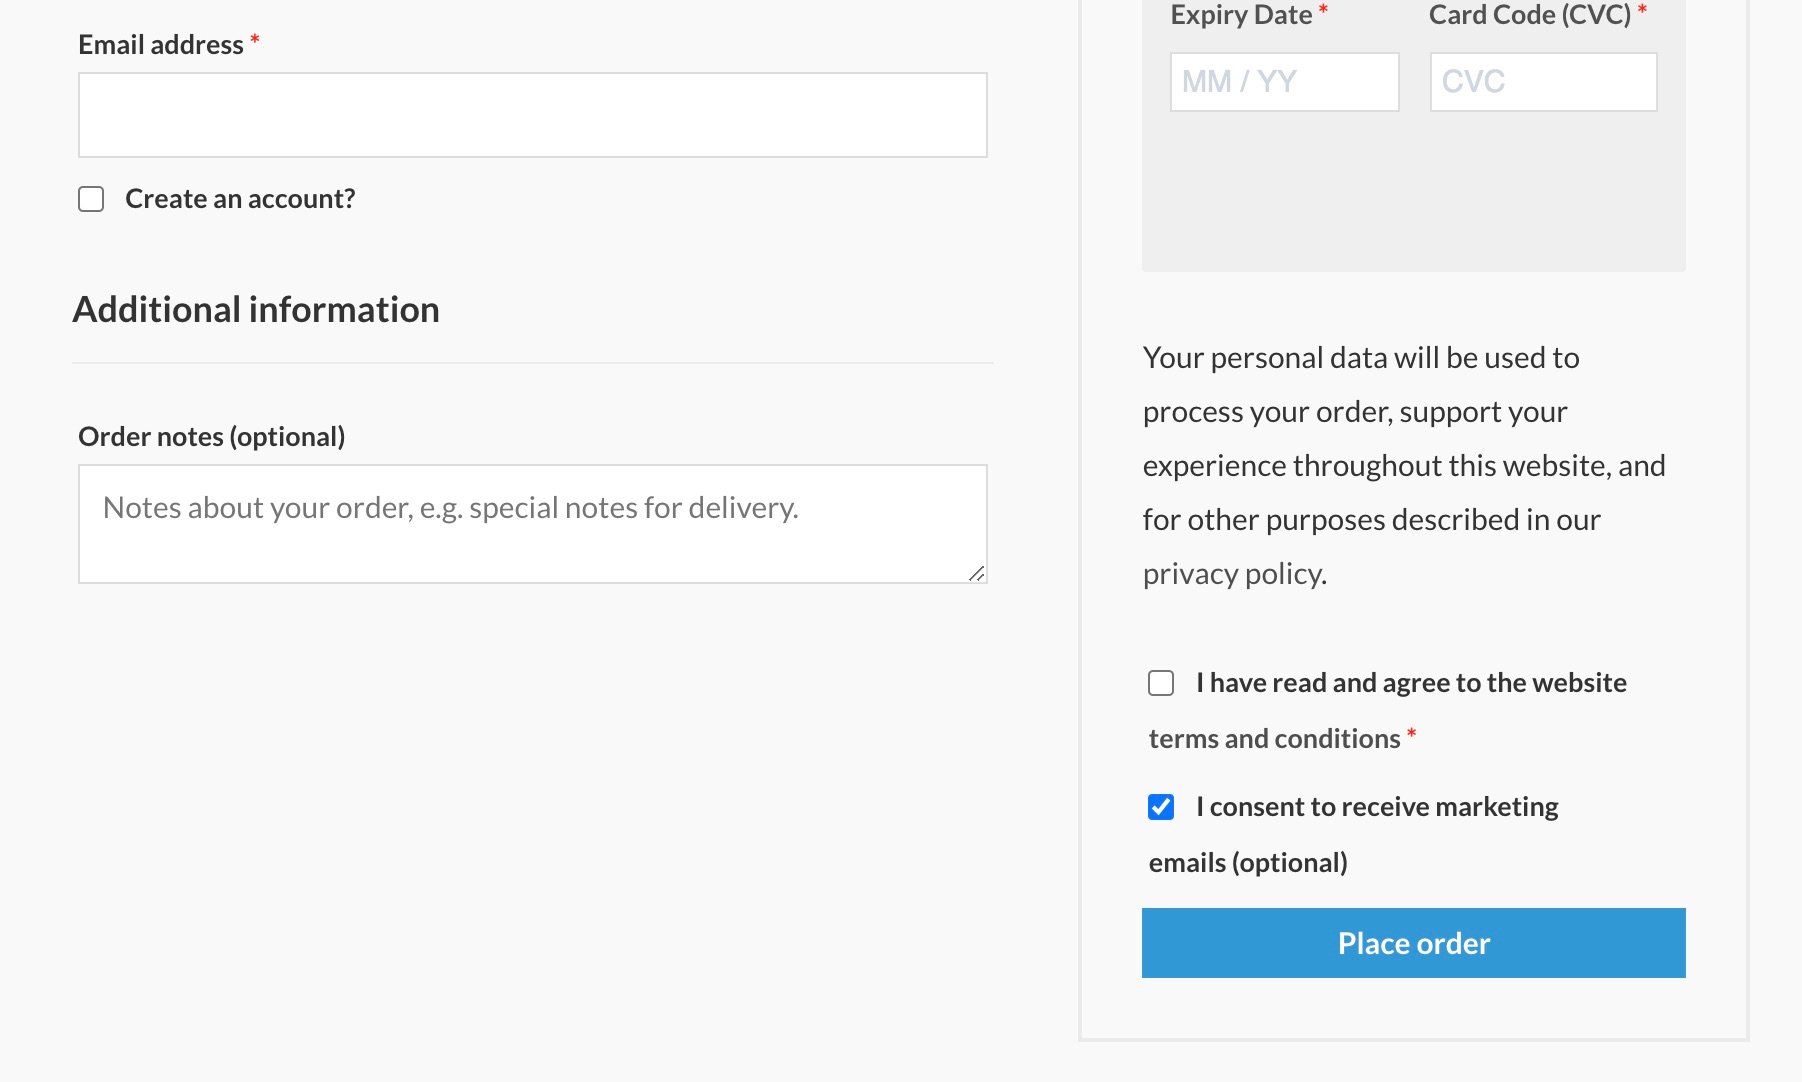
#Email Optins
WP Fusion includes an option to add an email optin checkbox to the WooCommerce checkout.
[woocommerce_checkout] shortcode.This can be enabled by checking the box for Email Optin in the main WP Fusion settings, under the Integrations tab.
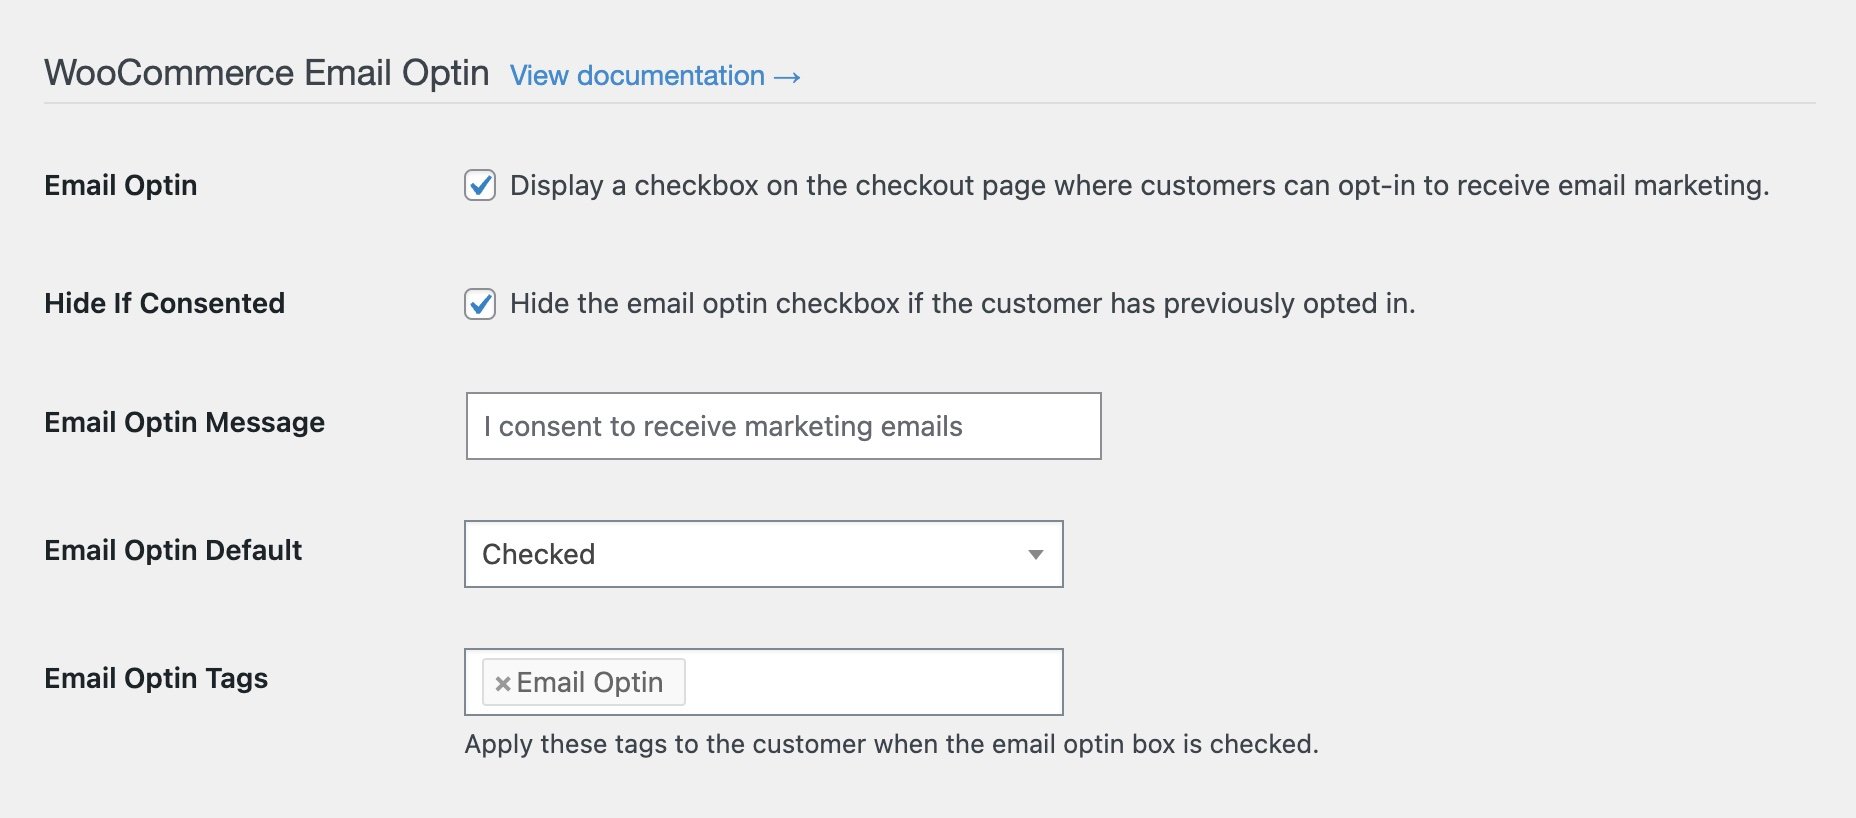
The settings are:
- Email Optin: This enables the email optin checkbox on the checkout form.
- Hide If Consented: When this is checked, the email optin checkbox will be hidden from any customers who have already consented to marketing.
- Email Optin Message: This is the message displayed with the email optin checkbox.
- Email Optin Default: Whether the optin checkbox defaults to Checked or Un-checked.
- Email Optin Tags: You can select one or more tags to be applied in your CRM when the email optin box is checked.
As an alternative to applying tags, you can also sync the value of the optin checkbox to a custom field in your CRM, by enabling the email_optin field for sync at Settings » WP Fusion » Contact Fields » WooCommerce Customer.
When enabled the optin checkbox will be displayed next to the Place Order button on the checkout.
In the Contact Fields settings, you can set the field type for the email optin field to either checkbox or date. The default is checkbox.
When set to checkbox, if the optin checkbox is checked, it will sync a true value to your CRM (works best with checkboxes or email consent fields, but can be used in text fields as well).
If the field format is set to date, it will sync the current date and time to your CRM. This works best with date or datetime fields.
Note: If the opt-in checkbox is unchecked, it will be saved to the order record, but nothing will be synced, and customers will not be unsubscribed from marketing.
This is by design and relates to the EU GDPR’s position that inaction should not be seen as a conscious decision.
For more control over the checkout fields, we recommend WooCommerce Checkout Field Editor.
#Only sync confirmed customers
Because WP Fusion uses tags applied at checkout to unlock content, enroll users into courses, and otherwise deliver access to purchased products— all customers will be synced with your CRM, regardless of whether or not they’ve consented to marketing.
It’s then up to you to use the tag and/or custom field value in your campaigns and automations to exclude contacts from marketing if they haven’t opted in.
On some simple stores, you may want to completely disable the sync of customers with your CRM if they haven’t opted in to marketing. This can be achieved with the following filter, added to your functions.php file:
function do_not_sync_unconfirmed_customers( $customer_data ) {

	if ( empty( $customer_data['email_optin'] ) ) {
		return false;
	}

	return $customer_data;

}

add_filter( 'wpf_woocommerce_customer_data', 'do_not_sync_unconfirmed_customers' );
In this case no data will be sent to your CRM unless the customer opts in to marketing on the checkout form. You will not be able to apply tags to them, and they will not be able to access any content protected by WP Fusion.
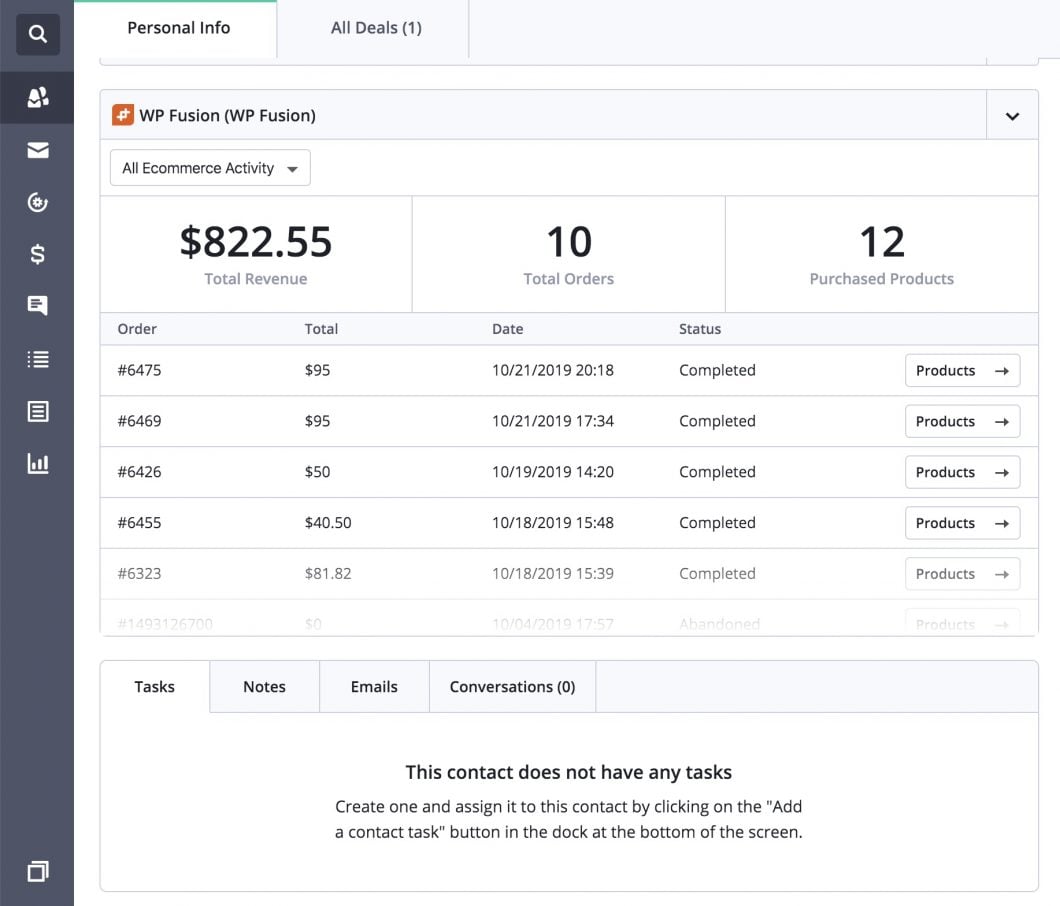
#Order management
When editing any WooCommerce order in the admin, you will see a meta box indicating that order’s status with WP Fusion.
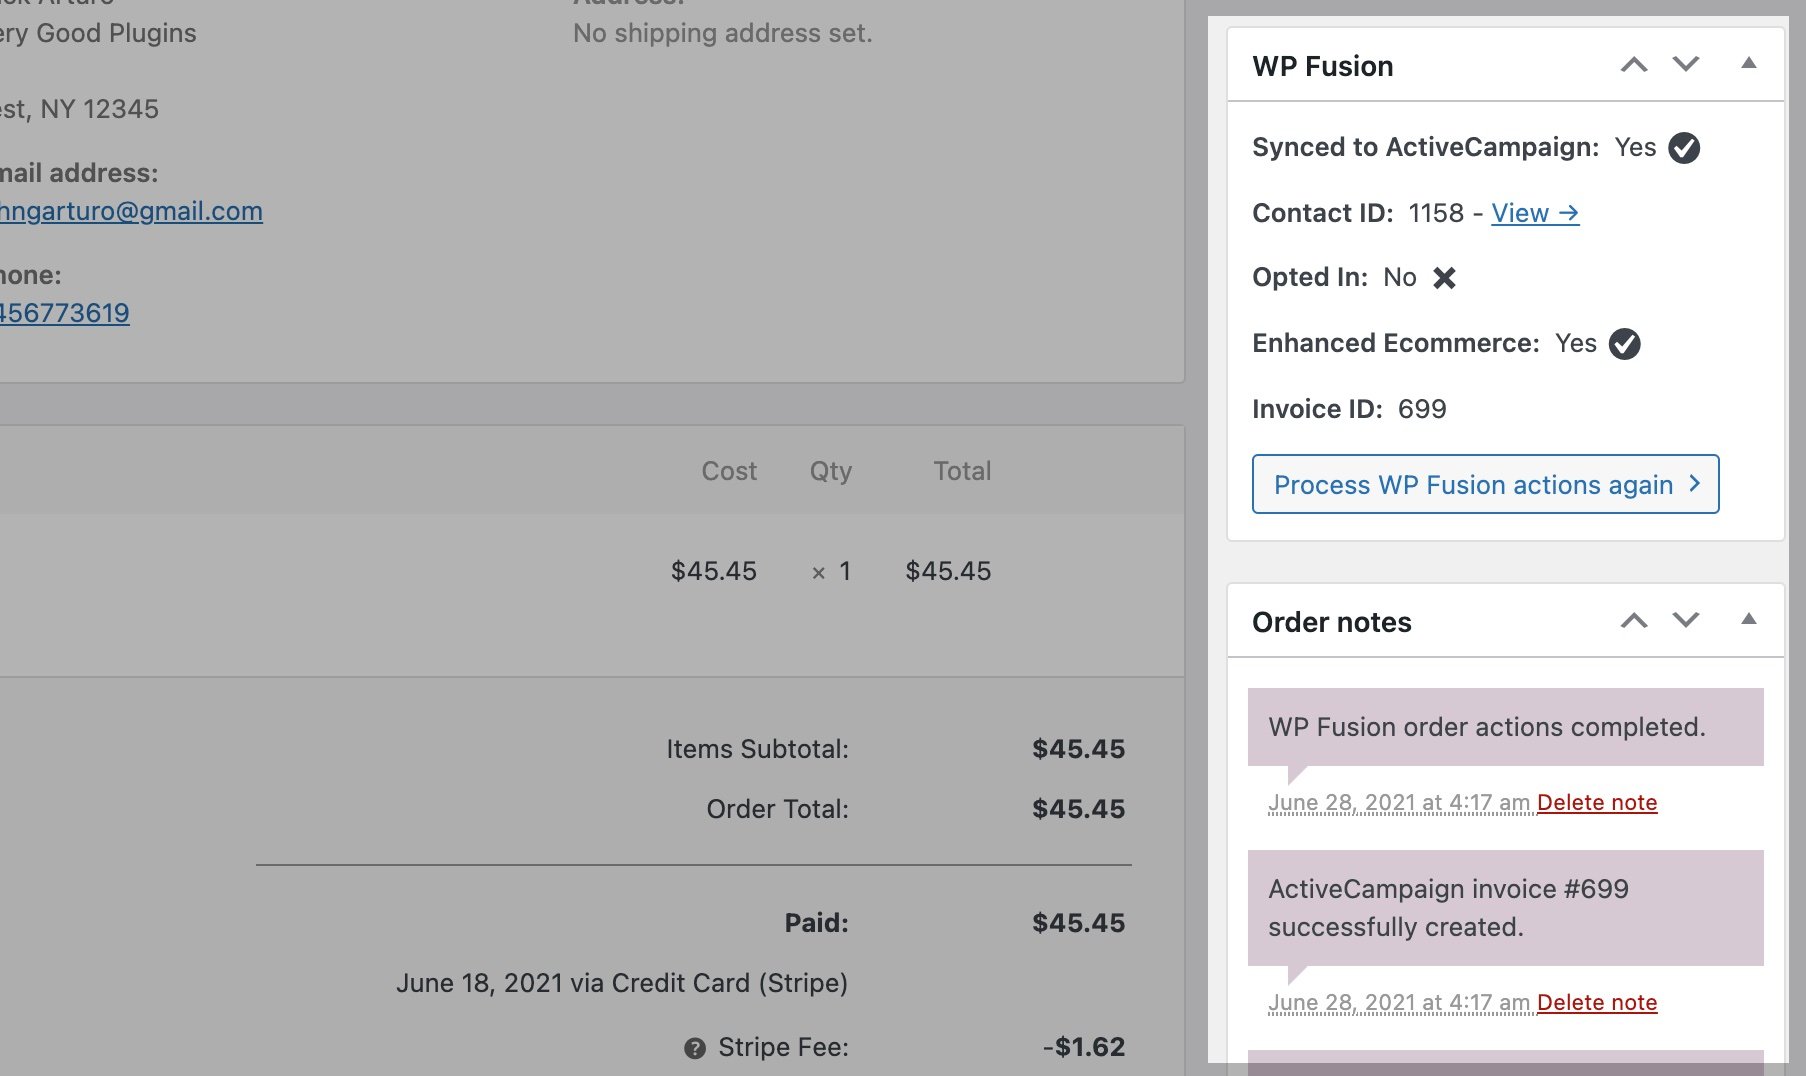
The meta box will show whether or not the order was processed by WP Fusion, and the customer’s contact ID in your CRM.
If you have email optins enabled, the customer’s optin status will be shown.
If you’re using the Enhanced Ecommerce addon you will also see the corresponding invoice ID (or order ID) in your CRM’s sales pipeline.
To manually process an order again (for example to fix an invalid field value), click the Process WP Fusion actions again button.
#Order notes
The order notes in the order sidebar will show when an order was processed by WP Fusion, and also any corresponding invoices created by the Enhanced Ecommerce addon. In cases where there were errors during checkout, these will also be recorded to the order notes, as well as the WP Fusion activity logs.
#Order status column
WP Fusion adds a status column to the main WooCommerce orders table. Hovering over the icon will display a tooltip which tells you when the order was processed by WP Fusion, and also gives you a link to view the customer’s contact record in your CRM.
![]()
The icon can change colors depending on the status of the sync with your CRM:
- If the icon is orange, the order was fully processed by WP Fusion.
- If the icon is grey, the order was not processed by WP Fusion
- If the icon is half-filled, this means that a contact record was created, but the Enhanced Ecommerce addon didn’t successfully process the order.
If you don’t want to see order sync statuses in the orders table, you can disable it by un-checking the WP Fusion Status checkbox in the Screen Options menu at the top of the page.
#Process orders in bulk
WP Fusion’s batch operations for WooCommerce allow you to export all of your historical orders to your CRM at once.
For syncing individual orders in bulk, you can select orders using the checkboxes on the Orders list, and select Process with WP Fusion from the bulk actions dropdown.

A status indicator will appear at the top of the page showing the progress. WP Fusion will work through the selected orders one at a time, creating and updating contacts in your CRM, and applying any configured tags.
If you are using Enhanced Ecommerce, invoices will also be created (or updated) for the selected orders.
#Tagging customers
WP Fusion gives you a variety of ways to tag your WooCommerce customers in your CRM. The simplest method is to tag based on the product purchased, but you can also apply tags to all customers as a global setting, or based on product categories.
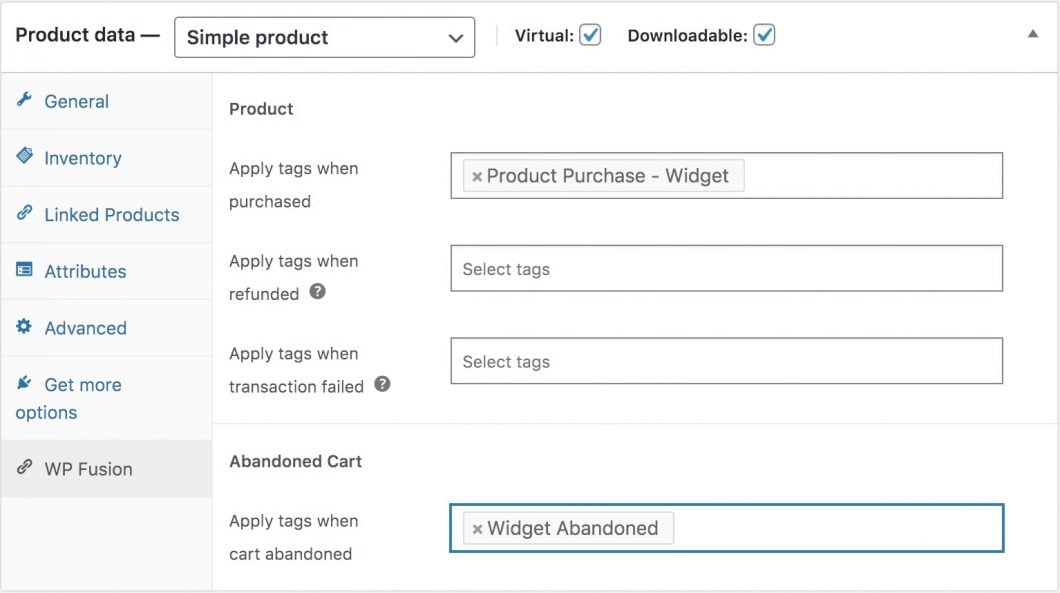
#Product setup
When WP Fusion is active, you’ll see a new tab on the WooCommerce product settings where you can specify tags to be applied when that product is purchased, refunded, or when an initial transaction fails.
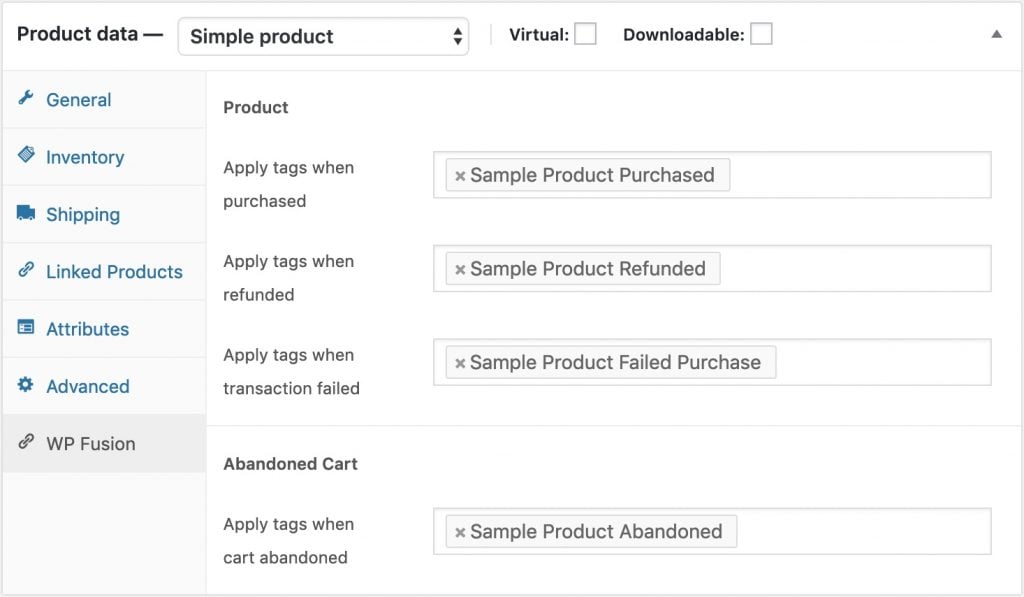
The standard settings are:
- Apply tags when purchased: These tags will be applied in the CRM when the product is purchased. They will be removed automatically if the order is refunded or cancelled.
- Apply tags when refunded: These tags will be applied in the CRM when an order is refunded.
- Apply tags when transaction failed: These tags will be applied when an initial payment fails, or when an order status changes to Failed. They will be removed when a successful payment is received.
You may see additional fields for Subscriptions or Deposits if you are using those plugins.
If the Abandoned Cart Addon is active you can also configure tags to be applied when the product is left in an abandoned cart.
#Variable products
If you’re using variable products, you can also specify tags to be applied at purchase per-variation. These are visible when editing the variation, alongside the price and other details.
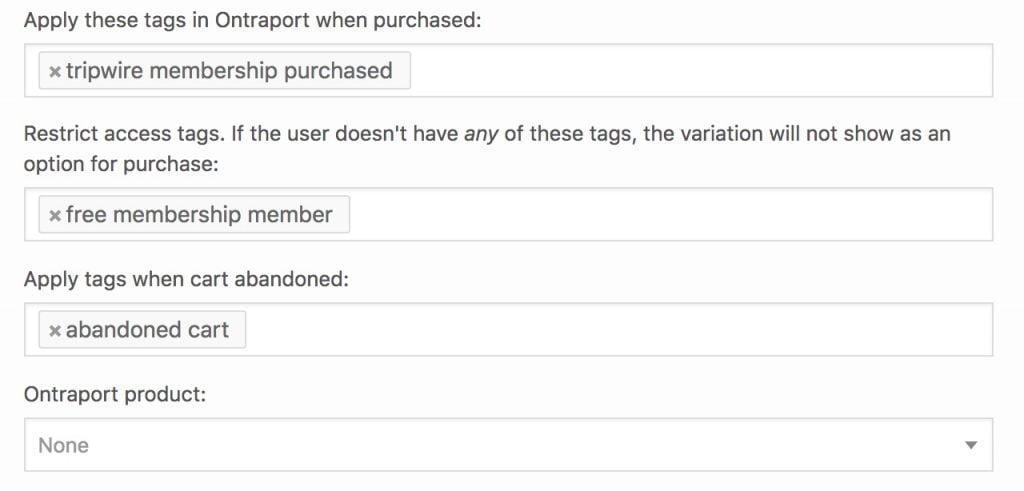
WP Fusion also gives you the option to only show specific variations to users based on their tags. This can be used to offer special products or pricing to existing members.
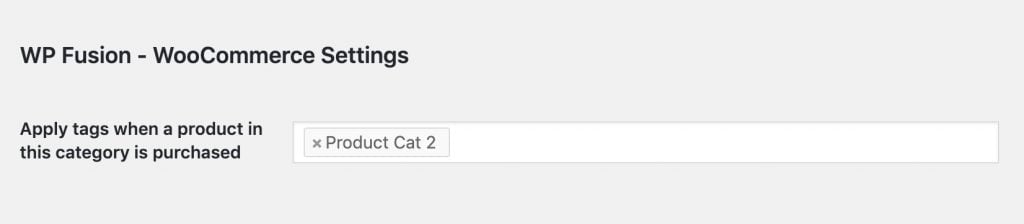
#Category tagging
You can also specify tags to be applied at the category level. To do this click Edit on any product category, and you’ll see a setting where you can specify tags to be applied.
#Bulk editing
There may be situations where you need to bulk edit the tags that are configured on your WooCommerce products. For bulk editing, we recommend Setary.
Setary connects to your WooCommerce store (or multiple stores) and allows you to edit WooCommerce product details in bulk, in an intuitive spreadsheet interface.
Setary’s WP Fusion integration allows you to configure the settings for Apply Tags, Apply Tags – Refunded, and Apply Tags – Failed for all of your products.
For more information, see the Setary documentation.
As an alternative to Setary, WPSheetEditor also provides a free WP Fusion addon to customers of their WooCommerce Products Spreadsheet plugin.
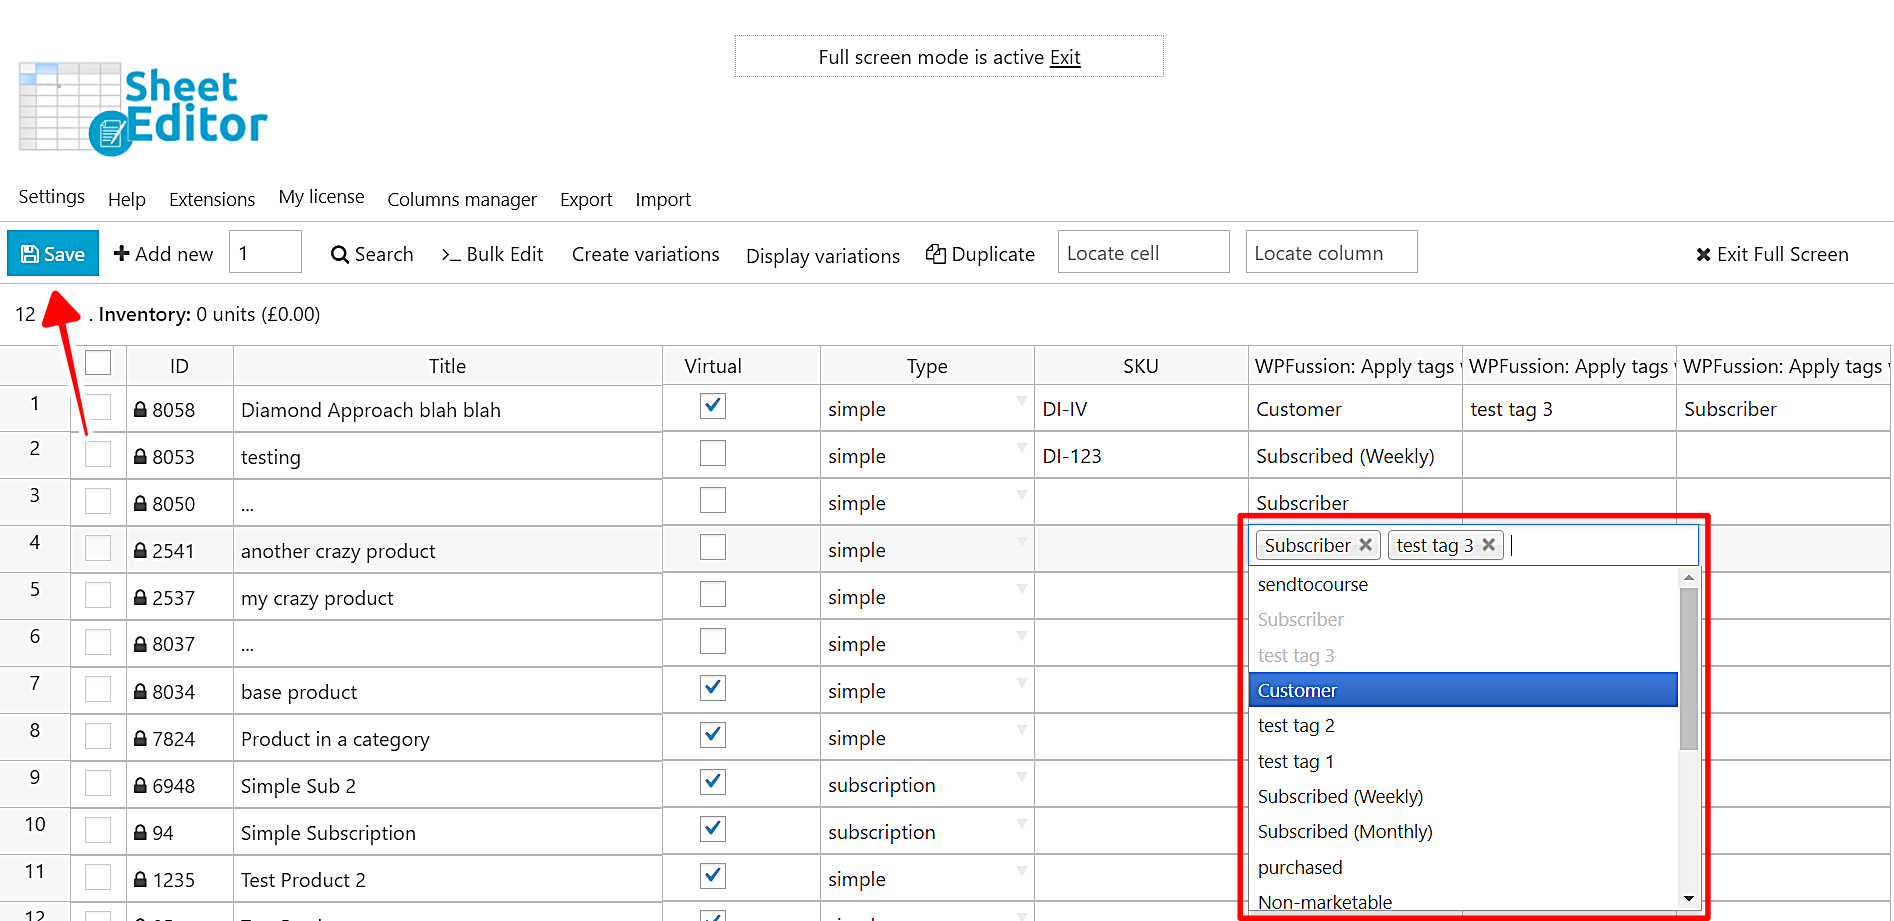
You can read a tutorial on bulk editing WP Fusion tag rules with WPSheetEditor here.
#Refunds
If an order is marked Refunded or Cancelled in WooCommerce, the tags specified in Apply tags when purchased will automatically be removed. You can also optionally specify tags to be applied when an order is refunded using the Apply tags when refunded setting.
If there are tags you do not want removed during a refund, you can include these tags in the Apply tags when refunded setting. In this case a notice will show in the logs when the refund is processed, and the tags will not be modified.

Note that if you refund a WooCommerce Subscriptions renewal payment and the user’s subscription is still active, no tags will be modified. This is to help in cases where a user might have signed up or been charged twice and you need to refund the duplicate order, without revoking access.
If you want access to be revoked when refunding a renewal payment, it’s best to cancel the subscription first. You can also automatically remove tags when a subscription is cancelled by checking the Remove Tags box. For more information see the WooCommerce Subscriptions documentation.
#Coupons and Discounts
While editing any coupon, you can specify tags to be applied to the customer if the coupon is used.
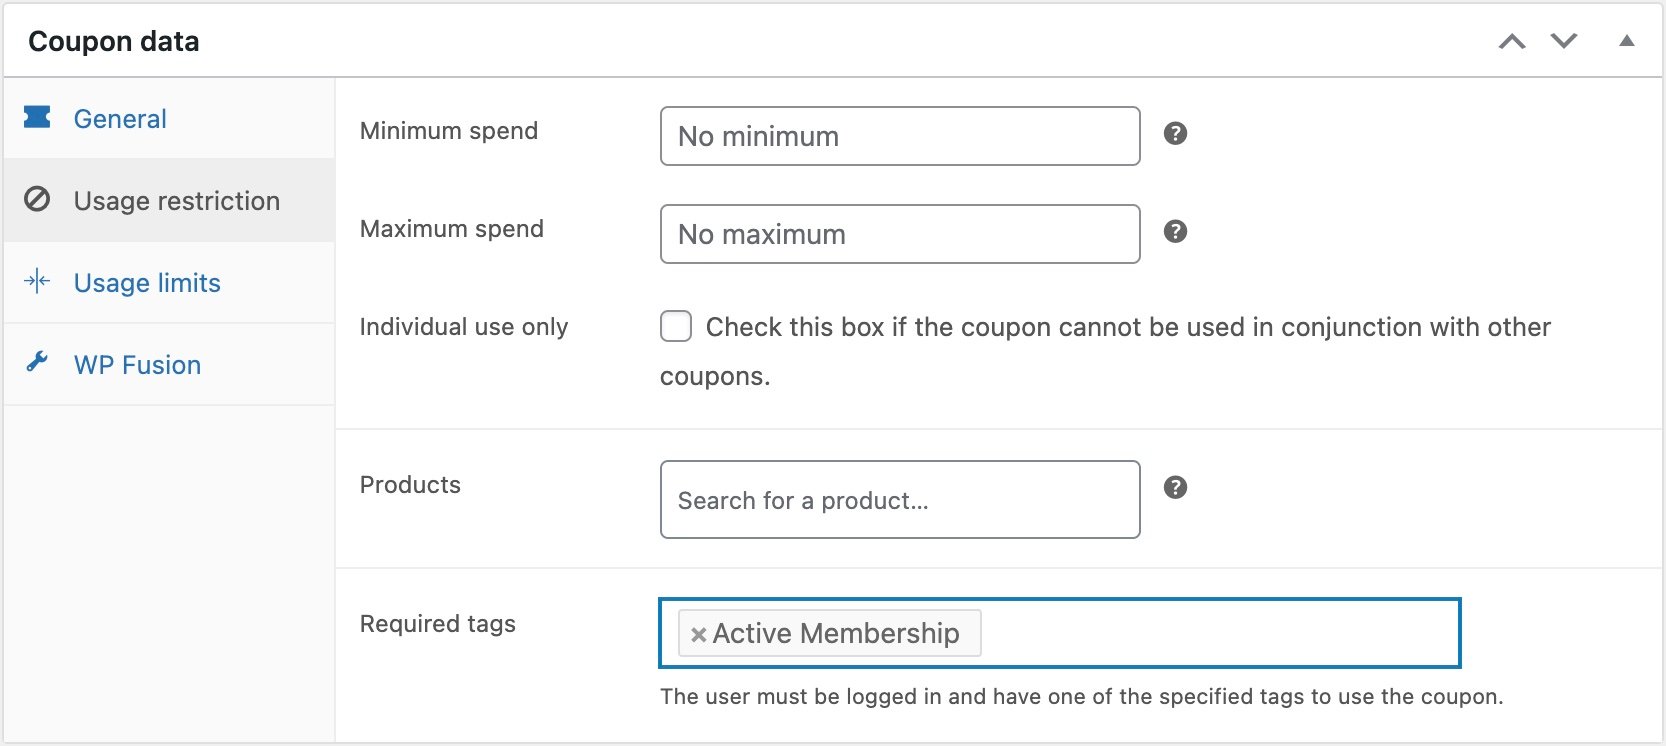
#Restricting access to coupons
You can require a user to be logged in and to have a specific tag to use a coupon code. This can be set from the Required Tags setting on the Usage Restriction tab in the coupon settings.
#Auto-applying discounts
You can also automatically grant coupons to customers based on their tags in your CRM.
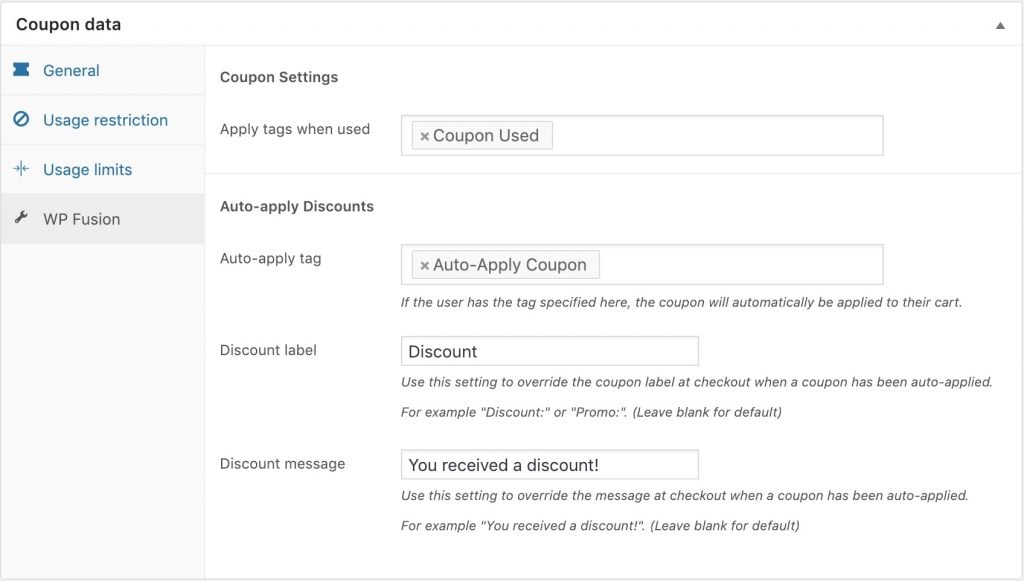
If the user has any one of the specified tags, the discount will be applied when they add a product to their cart. This feature also works with our auto-login links.
In cases where the user has more than one tag linked to a discount, the discount with the highest amount will be applied first. If the cart value has already been discounted to zero, no additional automatic discounts will be applied.
#Discount labels
You can optionally override the coupon labels shown on the cart and at checkout. The Discount label is displayed in the order summary.
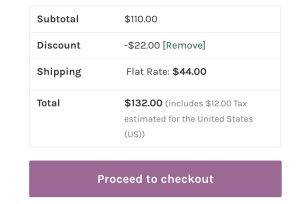
By default this will be the coupon code of the applied coupon, but here we’ve overridden it to say “Discount”. You could set this to say something like “Member Discount” or “Loyalty Program”.
The Discount message is shown at the top of the cart or checkout when the coupon is applied.
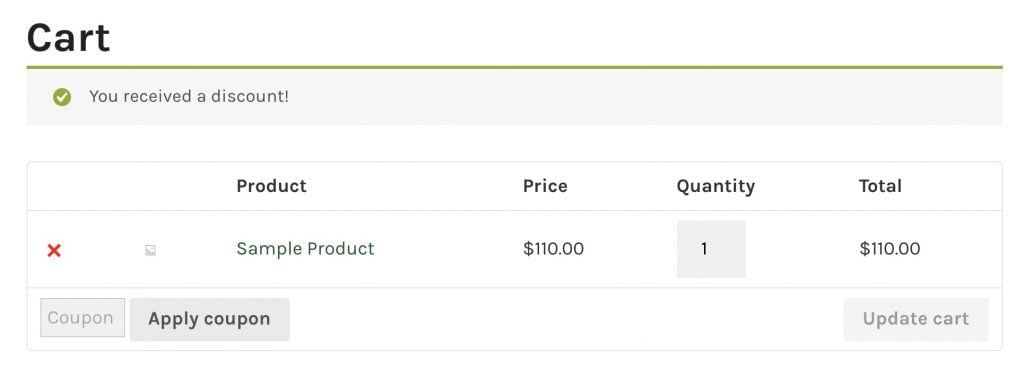
By default this will say “Coupon code applied successfully.” Here we’ve overridden it to say “You received a discount!”
#Product Availability
You have the option to restrict access to a product unless a user has a certain tag applied to their account.
This is a great way to offer up-sell products or add-ons for your existing users. For more information on restricting content, see the documentation on meta box setup.
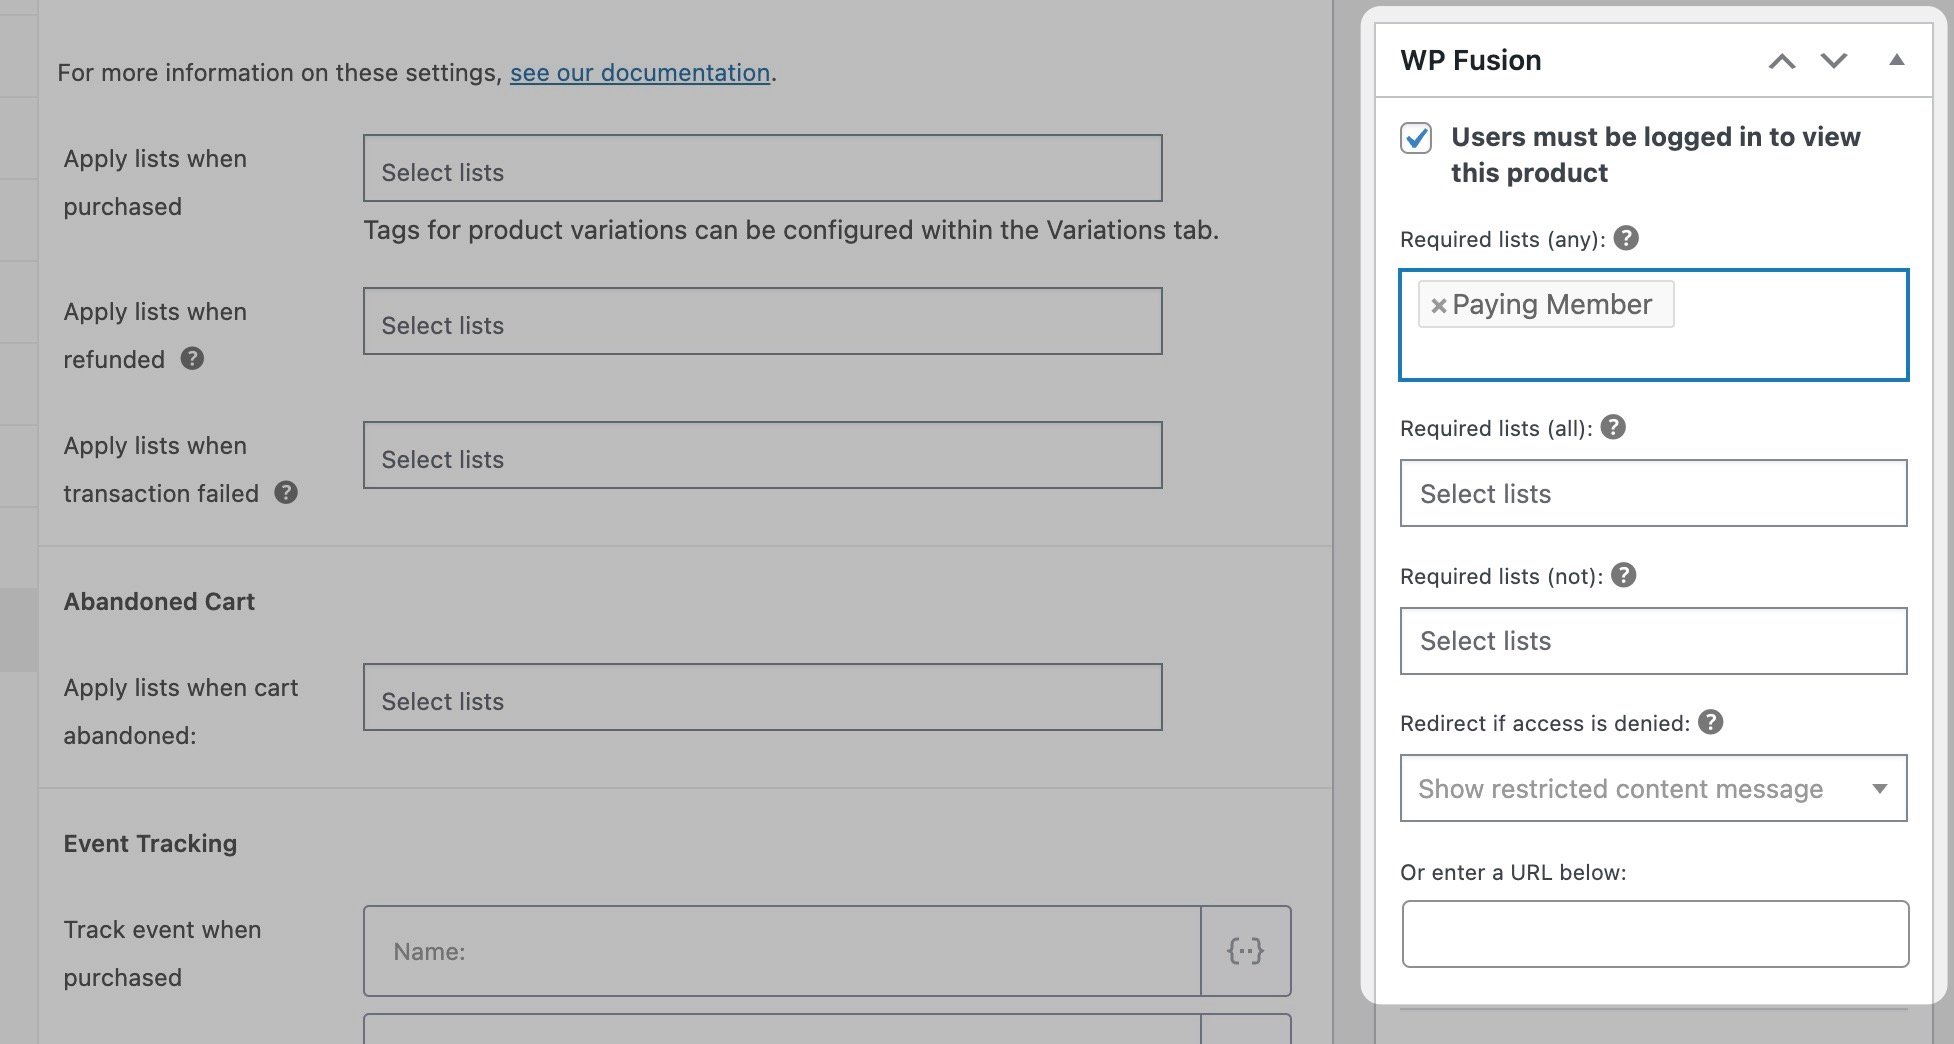
If you specify a redirect in the WP Fusion meta box, customers who attempt to view the product will be redirected to the page or URL you’ve specified.
If you don’t specify a redirect, the product will be visible, but the Add To Cart button will be disabled. Customers who attempt to add the product to the cart will be shown the message set in the General settings in the Restricted Product Error Message option.

You can similarly restrict access just to individual product variations via the variation settings.
#Abandoned cart tracking
WP Fusion’s Abandoned Cart addon (available to Plus and Professional license holders) can capture customer details on the WooCommerce checkout form and sync them to your CRM before checkout has been completed.
For logged-in users or identified visitors, the addon can even trigger abandoned cart sequences when a product is added to the cart, even if the customer never visits the checkout.
You can then use tags and automations in your connected CRM to follow up with customers who started but didn’t complete checkout.
With WooCommerce you can specify product-specific abandoned cart tags from the WP Fusion panel while editing any product.
You can also specify variation-specific tags when editing any variation.
For more information on tracking abandoned carts with WooCommerce, see the Abandoned Cart Tracking Overview.
#Enhanced Ecommerce
WP Fusion’s Enhanced Ecommerce addon (available to Plus and Professional license holders) can sync WooCommerce orders to supported CRMs and email marketing platforms.
With WooCommerce, the Ecommerce Addon will send enhanced ecommerce data for all orders, including support for products, variations, quantities, discounts, shipping, and taxes.
#Products
In CRMs that have Products as separate entities from Orders, you can associate your WooCommerce products with CRM products by selecting them from the product dropdowns.
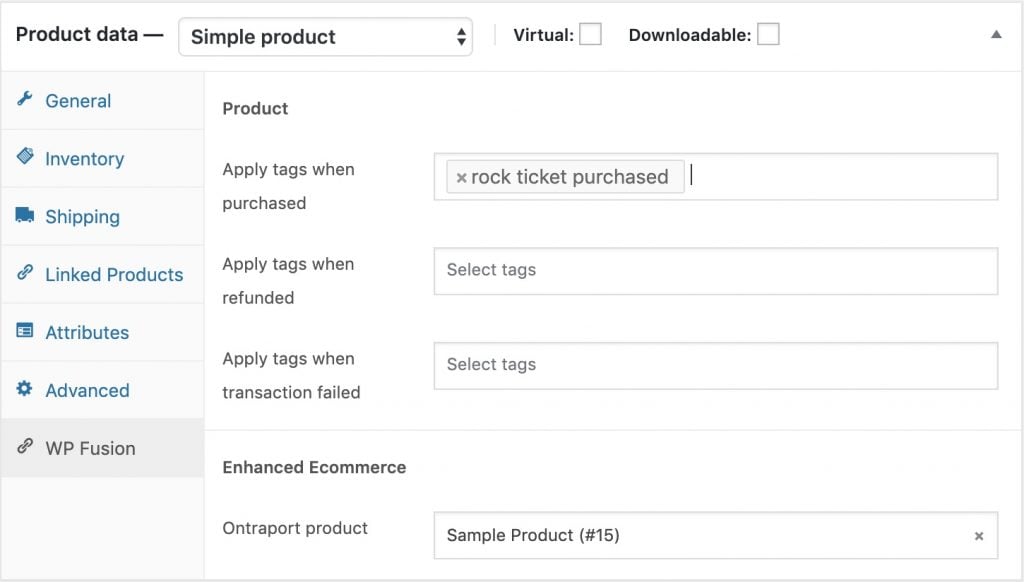
Variable products can be associated within the individual variations.
#Sales pipelines
With CRMs that support sales pipelines, like Brevo, HighLevel, HubSpot and Zoho, you can also map WooCommerce order statuses with individual pipelines and stages.
This can be found under the Enhanced Ecommerce settings.
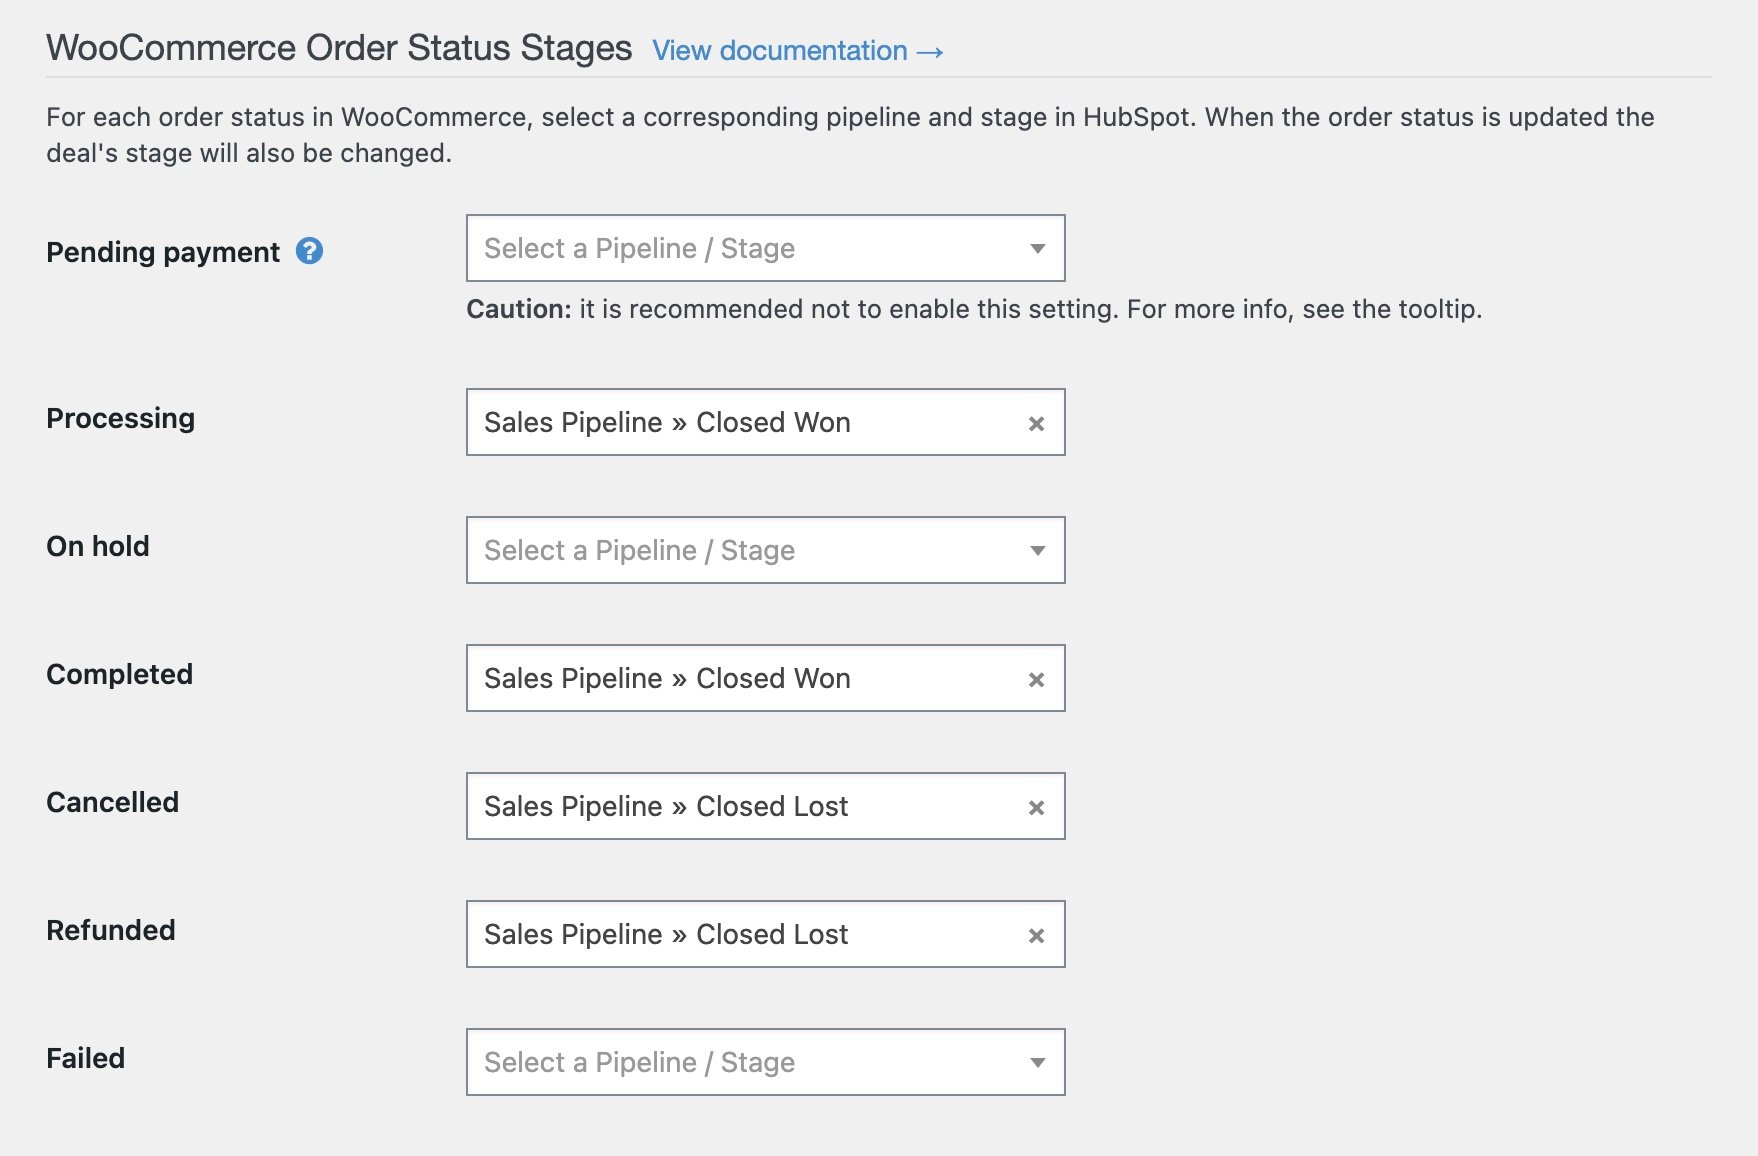
When the order status is updated in WooCommerce, the deal stage will be updated in your CRM.
Warning: It is recommended not to sync Pending payment orders with your CRM. When this is enabled, WP Fusion needs to create a contact record and a deal in the CRM as soon as the pending order is created in WooCommerce, and then update it less than a second later when the payment is processed.
This slows down your checkout with many duplicate API calls and in most cases isn’t necessary. A more performant method of tracking incomplete payments is to use Abandoned Cart Tracking.
#Supported platforms
#Event Tracking
Using the Event Tracking addon, you can track WooCommerce product purchases as events in supported CRMs.
Events can be configured in two places. On an individual product, on the WP Fusion settings tab:
Or in the Event Tracking global settings:
The available triggers for event tracking with WooCommerce are:
Purchased Product
Triggered each time a single product is purchased. If the customer’s order has multiple products, it will sync individual events for each product, regardless of the quantity. For example, if a customer purchases 2 items of Product1 and 3 items of Product2, only one event per product (Product1 and Product2) will be synced.
This trigger is used for tracking the performance of individual products, since the product details aren’t available in the Order Placed trigger.
Order Placed
Triggered each time a WooCommerce order is placed. This event is triggered each time a WooCommerce order is placed, but only for orders with a status of “completed” or “processing“.
Order Status Changed
Triggered when a WooCommerce order status changes. This event is triggered whenever the status of a WooCommerce order is changed. By default, WooCommerce sets the initial order status to “pending” and then will change it to “processing“, “completed“, or “failed“. This status change will trigger this event.
#Syncing historical orders
If you already have an existing WooCommerce store, you can use WP Fusion to sync all historical orders to your CRM.
First configure your products with any tags you’d like to be applied when purchased. Then navigate to Settings » WP Fusion » Advanced and scroll down to the Batch Operations section.
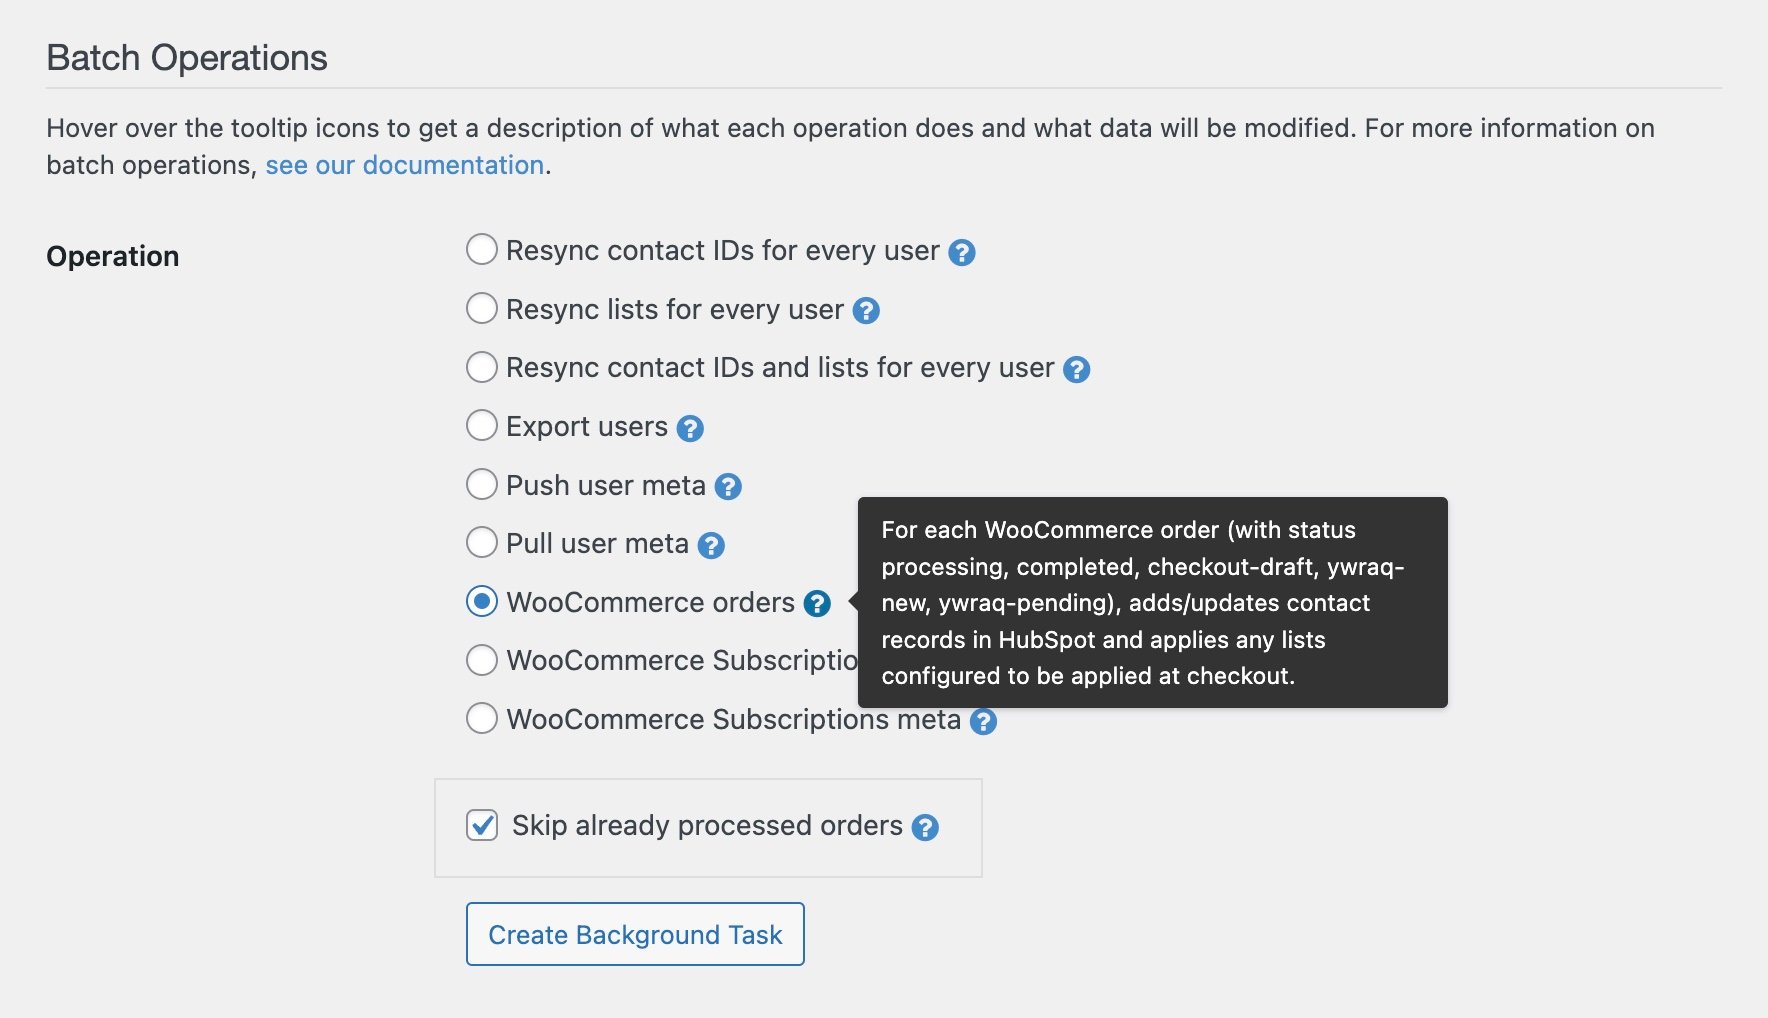
Select “WooCommerce orders” from the list of options, and click Create Background Task.
WP Fusion will go through all of your orders (from oldest to newest), adding or updating contacts in your CRM as necessary, and tagging them based on the products purchased. A status bar will appear at the top of the page indicating the progress.
By default, WP Fusion will only export orders that weren’t already successfully processed by WP Fusion.
If you un-check Skip already processed orders, WP Fusion will export all of the orders on your site, regardless of whether they’ve already been synced.
In the case of refunded or cancelled orders, any tags configured in the Apply tags when refunded setting will be applied.
If you want to customize the export, such as limiting it to a certain date range or order status, see the documentation and example for the wpf_batch_woocommerce_init action.
#Developers
WP Fusion’s WooCommerce integration is very developer friendly. If you open the integration file in /wp-fusion/includes/integrations/class-woocommerce.php you’ll find many actions and filters that allow you to modify what data is synced with your CRM (and when).
Some general notes:
#HPOS
WP Fusion and the Enhanced Ecommerce addon both support WooCommerce High Performance Order Storage.
#Order statuses
By default WP Fusion processes a WooCommerce order when its status is changed to either processing or completed. When an order is “processed”, a contact record is created in your CRM, and any tags configured on the products (and elsewhere) are applied.
There may be situations in which you need to process an order at a different status. For example maybe you want to apply tags that grant access to content while an order is still in pending status (i.e. before a payment has been received).
#Register additional statuses for sync
You can register additional statuses by hooking into the woocommerce_order_status_{$status} action and calling wp_fusion()->integrations->woocommerce->process_order( $order_id ).
function wpf_add_custom_order_status() {

	// Process "pending" status orders
	add_action( 'woocommerce_order_status_pending', array( wp_fusion()->integrations->woocommerce, 'process_order' ) );

	// OR, alternatively, on a custom order status "tbh-unpaid"
	// add_action( 'woocommerce_order_status_tbh-unpaid', array( wp_fusion()->integrations->woocommerce, 'process_order' ) );

}

add_action( 'wp_fusion_init', 'wpf_add_custom_order_status' );
Note that the woocommerce_order_status_* hooks are triggered when an order status is changed to that status.
If you wish to register additional orders for export (using the order exporter), you can use the wpf_order_statuses filter:
#Register additional order statuses for export
This example causes WP Fusion to treat the pending and failed order statuses as valid for export by the WooCommerce Orders batch operation.
add_filter( 'wpf_woocommerce_order_statuses', function( $statuses ) {

	$statuses[] = 'pending';
	$statuses[] = 'failed';

	return $statuses;

} );#Exclude order statuses from syncing
Or, maybe you want to prevent WP Fusion from running on a particular status. This example causes WP Fusion to ignore the processing status and only run on the completed status.
add_filter( 'wpf_woocommerce_order_statuses', function( $statuses ) {

	$ignore_statuses = array( 'processing' );
	return array_diff( $statuses, $ignore_statuses );

} );#Actions
WP Fusion includes the following action hooks for WooCommerce:
wpf_guest_contact_createdwpf_guest_contact_updated- wpf_woocommerce_payment_complete
wpf_woocommerce_panelwpf_woocommerce_variation_panelwpf_woocommerce_coupon_panel
#Filters
WP Fusion includes the following filter hooks for WooCommerce:
- wpf_woocommerce_customer_data
wpf_woocommerce_order_statuseswpf_woocommerce_billing_email- wpf_woocommerce_user_id
- wpf_woocommerce_apply_tags_checkout
wpf_auto_apply_coupon_for_user